

Freeform Modelling in 3Ds Max for Sculpting Object Surface – Part 2
Published on 5 February 2025
Introduction
In this article we’ll catch up with where we left off in the Part 1 of freefrom modelling in 3Ds Max using its different tool sets.
There are quite a few tools for freeform modelling in Autodesk 3Ds Max. We have discussed some the features in the last piece i.e Part 1 of this series like the Push-Pull button and its features of Paint deform and different brush options.
In this piece, we’ll delve deeper with other tools and see how we can extend functionalities in relation to terrain modelling and development.
Before I take the plunge, let me just quickly run down the hierarchical structure of modelling and surface sculpting tools and features of 3Ds Max for a better clarity.

The above mind map shows us different tool sets and functionalities 3Ds Max offers for modelling geometries and 3D objects. Freeform modelling falls within the group of Graphite Modelling Tools and it does give us immensely powerful some features for surface sculpting in 3Ds Max.

In this piece we’ll go through the options under Paint deform that we didn’t discuss in the Part -1 .
Table of Contents
1. How to use Noise in Paint Deform for freeform modelling in 3ds Max?
The Noise brush or tool lets you add random patterns while creating a terrain. It helps you add chaos to the scene geometry or more precisely to its surface. See the image below and you’ll have an idea.
1.1 Noise with default Scale & Turbulence in the Paint Options for Sharp protrusion

You get different shapes by changing the parameters. By default, the Scale is 4 and Turbulence is 3 in the Paint Options (Twirled down). The wave created with these tool sets or values are much jittery. If you want to build a jagged surface or terrain, you may consider using these values or somewhat close.
But, how could we form less jagged or less sharp a surface or terrain, something much soft or tapered!
1.2 Noise with a larger Scale value in the Paint Options for a soft and tapered crest
Let’s change that and see the effect. First let’s change the Scale to 15 with the Turbulence kept at 3.

The surfaces or terrains have different protrusions and you have various options in the paint deform for variation.
1.3 Pro Tip: Press Shift for relaxing the mesh or wipe off the change you made with Noise

There is an easy way to get rid of the changes you made with the Paint deform brushes, Noise in this case. Hold down Shift and drag the Noise Brush and you’ll get the mesh without the effects of Noise brush you just got. It’s quick and time saving.
Let’s now change the Turbulence and see what happens!
1.4 Noise with a higher Turbulence & the default scale value of Paint options for surface sculpting

Clearly, a higher value of turbulence creates more peaks. If you need more mountain tops, go with this setting. Let’s now see what would happen if you crank up both Scale and Turbulence.
1.5 Noise with increased Scale & Turbulence for freeform modelling in 3ds Max

A higher value of scale increases the brush pattern repeated over a surface with less peaks within the same area. In this case, the number of peaks are few and they’re less dense.
Different sets of parameters lead to different patter and each of these effects are useful for terrain modelling and sculpting in 3ds Max.
1.6 Noise with an increased strength value and Scale, Turbulence kept unchanged

This time, I have cranked up the strength to 5 from 1, keeping other values unchanged. It’s leading to a type of surface or terrain modelling.
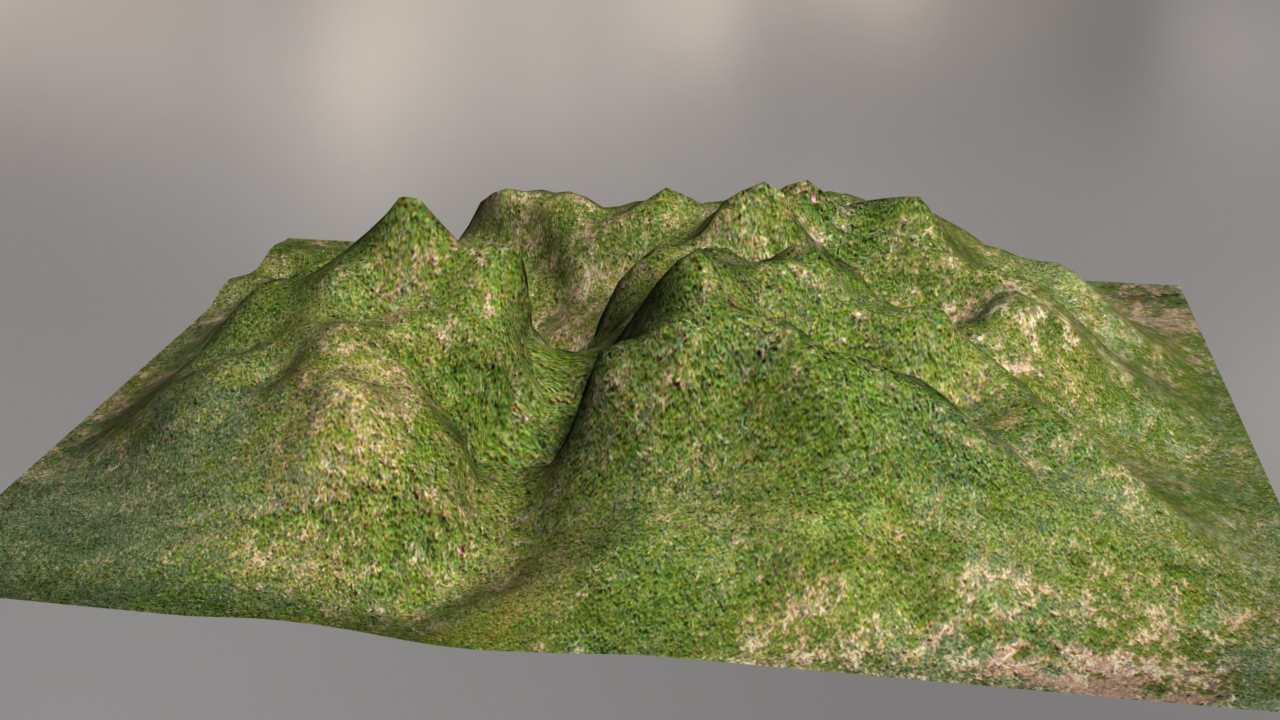
1.7 Noise with all the parameters changed

In this case, I have tweaked all the parameters of the Noise brush in the Paint options that has led to such a surface sculpting. So you have to keep on tweaking the values till you reach the desired effect for terrain modelling.
Below is a simple render with V-Ray material I downloaded from Texture Heaven.

It’s no way near to a realistic model. What I wanted to show is right after using the noise brush in paint deform your surface is almost there to get a material.
I have added one dome light (V-Ray) and used an HDRI as the environment. Note that, V-Ray HDRI has changed into V-Ray Bitmap from VRay 5.

Don’t worry. We’ll come back later and refine this.
2. Smudge Brush – pushes the polygons in a direction

The smudge brush doesn’t alter the shape actually. Rather, it pushes the polygons in a certain direction. So it can become useful when you need to create a skin texture pushed toward a specific direction.
Play around the paint options to get different results for the Smudge brush.
3. Use of Flatten Brush in Paint Deform for freeform modelling in 3Ds Max
This brush averages and tapers the polygons. It creates a kind of plateau on the mountainous terrain while you drag the brush.

So if you want to level the curvature, Flatten is the Paint deform brush to go with.
4. Use of Exaggerate while surface sculpting in 3Ds Max

This brush proliferate the curvature. So in effect, it has the function opposite to Flatten.
5. Pinch & Spread Brush in Paint Deform

This brush helps you squeeze the polygons and brings them closure. This sort of effect is more useful in skin texturing than terrain modelling in reality.

Press Alt with the Pinch/Spread Brush selected while dragging the brush and you’ll have the polygons spread out.
6. Relax/ Soften Brush in Paint Deform for freeform modelling in 3ds Max

This brush smooths the curvature, even with extremities. This curvature was created with the Exaggerate brush and with the help of Relax/ Soften, the curvature gets diminished or almost flattened out. It’s very helpful.
Use Shift and drag with any brush and you’ll get the effect of Relax/ Soften over the curvature you built .
Much better. Right!
Let’s now check another useful operation for freeform modelling in 3ds Max.
7. Use of Conform tool of the PolyDraw Panel [Freeform] to slap a surface or object on to a target surface

A perfect case for the use of Conform tool is fixing a road on a mountainous terrain. It’s not possible with the all-season transform tools, moving, rotating. A mountainous terrain has ups and down and the roads running across have to conform to the tops and bottom of the surface.
The function of the Conform tool does not limit within slapping one surface to another. It also extends to slip and slide the slapped surface to adjust and set properly, which we’ll see shortly.
Effectively, the conform tool helps you stick the surface and position in accordance with the ups and downs beneath.

This image further shows why you’re are having to conform one surface to another in a tailor-made way. Because, each terrain or surface has its unique feature.
Not only the terrain. We see countless instances of one surface or object slapped onto another.
I have created a ribbon like plane with 5 as the width segments and some 30 as the length segments. You can assign the measurements according to your scene requirement. Make sure, you have converted it to an editable poly.
7.1 How to use the Conform Tool – Prepare the surfaces before the operation

First, select the road that you have converted in an editable poly. Go to the ‘Grid’ right beside the Conform tool icons and then select ‘Draw on Surface’. The moment you select ‘Draw on Surface’, it will yield the ‘Pick’ to select the target surface.
7.1.1 Change Grid Setting – Draw on Surface

Now you’ll see the change.

So there you are. The surfaces are selected. But there is another thing to be set.
7.1.2 Set an Offset value – to prevent the surface pushing through the target surface
Put a small positive offset value to thwart the source surface being pushed through the target surface. I assign a value of 0.01 as the offset value.
Let’s now go ahead and use the Conform tool brush.
7.2 Select & drag the Conform brush tool over the source surface to slap it on to the target surface

When you drag the brush over the source surface, it will push it down, but not to the extent we expect. And that’s because eh conform value under the Conform Options at the far right is less, at 0.1. So, we’ll have to crank that up.
Another think is, the Conform brush tool has two concentric circles. Anything within the inner circle will be directly affected. So make sure, when you rub the brush over the source surface, the inner or smaller circle always falls upon the road or source surface that you’re slapping.
Pro tip: Make the length segments of the source surface higher. Since it adds more details to the surface geometry.
It reduces the render time a bit tough. In this image you see another surface I have created with much higher a length segment at 200 and 8 as the width segments.

7.3 Increase the Conform size to grow the influence of the brush tool

I have increased the conform value to 1 from 0.1 and it clearly increased the extent of influence. This time you can easily conform the surface. But there is an issue. Although we have assigned a value 0.01 before, it didn’t work.
Many areas of the source surface still got pushed into the target surface which have to fix. Let’s crank the offset value to 0.1 from 0.01 and see what happens when you rub the brush again on the surface conformed.
7.4 Conform too with increased offset values to remove artifacts [to bring out the segments pushed into]

I have used quite a few settings for the to conform the road and get rid of the artifacts of the road pushed into. Got almost everything right except a few. Let’s now see how to fix the few that still remain.
In real world, roads often use a curve path to avoid ups and downs of the mountainous terrain.
7.5 Use Conform Transform Brush to divert road or slapped surface conformation
Select the Conform transform tool and divert the road or surface direction to avoid the crests of the terrain. You may have a different settings for the conform tool to avoid any artifacts.
The Full strength in the Conform options corresponds to the radius of the, inner circle while the fall off represents the outer circle with softer influence or fall off. In this case, we want to minimize the radius of the inner circle and drag the road with little or soft influence.
Let’s change the value of the Full Strength to 5 and and the fall off to 380 and drag the road again. I cloned the road before just in case there is an artifact and will now use that cloned surface. Like other forms of modelling, freeform modelling in 3ds Max too requires you to keep a few copies of the original to bring that in while modelling.
7.6 How to fix distortion created due to the use of Conform Transform tool in 3ds Max?

Select the surface mesh and then select Relax/Soften tool. Rub the brush over the distorted area. You have to send some time to get the desired result.

After a few deliberations, I got this. You have to periodically use the conform tool, conform transform brush and relax/ soften tool from the paint deform to arrive at your desired result.
Conclusion
That’s what the tool sets of Freeform modelling in 3ds Max is all about at the beginner’s level. With its different tools in the paint deform section, we can sculpt skin or surface of a geometry to a satisfactory level. All you have to do is to spend some time to master it.
Get used to changing the values of various parameters on the fly and master the hot keys of changing the brush size and influence while surface sculpting or terrain modelling.
The conform tool comes with its range of functions in relation to moving or transforming the slapped surface after you are through with sculpting. This often leads to some distortion, which you can reduce or fix using relax/ soften tool.
So there you’re. Go ahead and master with the tools for freefrom modelling in 3ds Max for surface sculpting and terrain modelling.