

A Web Hosting Guide for the Non-Techies – DIY from Domain Registration to WordPress Installation
Last updated on 11 January 2025, Published on 13 March 2023
Disclaimer: Some of the pages in this site contain affiliate links. If you make purchase through those links, we’ll get a small commission without any additional expense to you.
Why am I writing a blog on web hosting?
I am a content creator. A video maker, to be more precise. Do I have to do anything with all these web hosting, DNS records, name servers, etc? Yes, I do.
And so do hundreds of thousands, or maybe millions of content creators and website owners, who do not know web hosting, but are always looking for a solution where they can do things on their own, without depending on a coder or developer.
It’s no way to suggest that you can dispense with a programmer. You need one or more than one when necessity demands. But getting a WordPress site up and running is not as hard as many of us perceive.
So, here is the thing. I have recently got a WordPress site up and running, all by myself. And I would like to share my workflow with you. The idea is to make anyone, who has no idea of website hosting and the related technicals, get a functional site in WordPress, all by himself. Good Luck!
Introduction
Knowledge of web hosting is essential to get your site up and running. And it’s possibly the second most fundamental to a website after the domain.
But, first thing first. If you’re a geek or nerd, with your coffee getting cold with a sandwich left over for hours, and you remained glued to the terminal fixing syntactical errors, this article is not for you. I would rather ask you to leave your comment after (if) you run down this piece.
As I have already mentioned, this is intended for those who do not have knowledge of programming and often got to undergo the cumbersome process of wooing a developer and the following deliberations to get their site hosted.
We’ll be using WordPress as our CMS or Content Management System. A recent figure, as charted by Kinsta, shows as many as 43% of all existing website is powered by WordPress. While WordPress has over 65% of the market share in CMS, over 14% of the World’s top websites (top-level domain authority and traffic) run on WordPress. It’s certainly the most popular CMS and easy to use.
Small business owners to any site owner who wants to register a domain and then wants to host the site all by himself, will find this article helpful. Whether you’re a videomaker or a writer or a seller, a dedicated site is a must-have. Social media pages may not be adequate, since there are many restrictions on pasting direct sales or affiliate links on social media accounts.
Not only we’ll focus on domain registration, followed by web hosting, but you’ll also get to know how to integrate your site with Cloudflare and submit your site and URL to Google Search Console. We will, in this piece, go up to installing WordPress with a theme perhaps, and not beyond (not delving deep into WordPress).
A lot of things to do. So let’s just note down what are the key things you have to do while getting your site functional and thereafter.
Table of Contents
Domain Registration with Godaddy
Here, we shall be using Godaddy for domain name registration. I am a user of Godaddy, but not an affiliate. So there is no question of promotion.
I would say any domain name registrar will do. All big-shot domain registrars render similar kinds of services with different price brackets. It’s you who has to decide what kind of service you’ll opt for. We shall be using entry-level price brackets for our domain.
I haven’t used any other domain name registrar for my purpose, so can’t talk about them. All I can say about Godaddy is they have a good support service via online chat. And that helps a lot when you’re desperately looking for a solution should there be any urgency.
Once you finalize the domain, just go and purchase the domain with any registrar that you like. It’s just plain and simple online payment and needs no explanation.
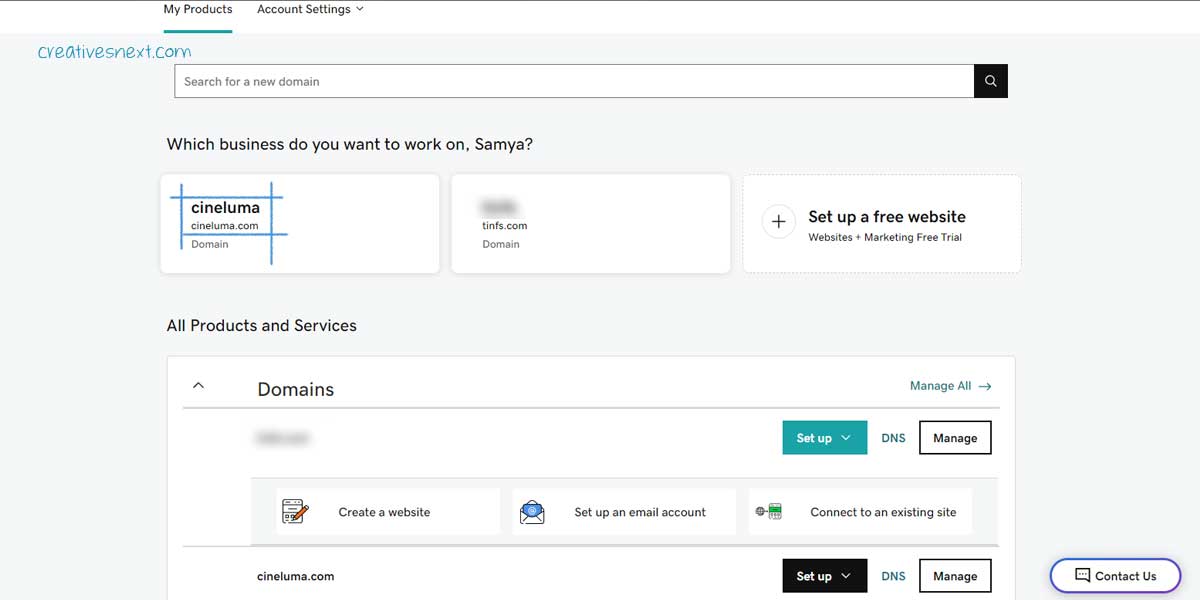
We shall be working with the domain cinleuma.com in this article. It’s showing up in my Godaddy account.
There are other domain name registrar big-shots. To name a few are Namecheap and whois. You may often encounter a situation where you may not find the very domain available. It means someone else has already registered the domain.
But there is a way by which you can find a similar domain close to the keyword (in your original domain) of your choice.

Domain name suggestions for your web hosting with a keyword contained within – Lean Domain Search
If you want to look out for domain name availability with a base keyword, there are plenty of options too. What I mean can be understood by an instance. Let’s suppose you want to buy a domain with the word capital within. And it has to be a .com too.
You may go to Lean Domain Search to look out which domain names are still available with the keyword capital within them. Just type in the keyword of your choice and it’ll throw the available domain names that are up for registration.
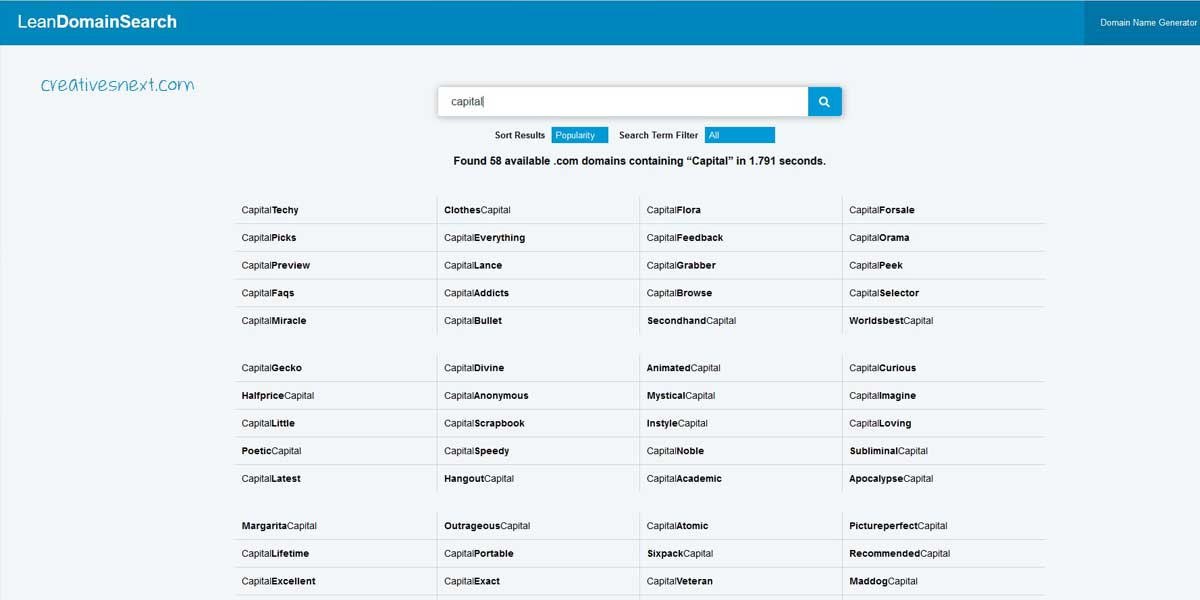
So you get the idea. Now there are plenty of other websites that offer such a service. To name a few are nameboy, isitwp and domainwheel.
Once you finalize the domain, just go and purchase the domain with any registrar that you like. It’s just plain and simple online payment and needs no explanation.
What are the DNS records? – The basic knowhow needed for web hosting
It’s important to know about certain terms, at this point. DNS stands for Domain Name System. When you purchase a domain, cinleuma.com here, it comes with certain data or records specific to this domain, not just the domain name viz. cineluma.com or any other domain for that matter.
Basically, DNS records are certain numbers that enable the internet to talk about a name viz. a domain via internet protocols or IP addresses. These numbers are the backbones of the Internet and enable us to do almost all sorts of activities, like opening a webpage, scrolling through social media, and sending emails, you name it. Also, There are two types of IP addresses. IPv4 and IPv6.
The DNS records could be a huge subject if you want to delve deeper into their intricacies. But for our purpose of web hosting, an overview will do. So let’s get down to the basics.
Internet protocols or IP addresses
An example of IPv4
104.205.179.255 is an instance. You’ll require this during the web hosting process. We all require this at times.
An example of IPv6
Unlike the protocol IPv4, IPv6 is a set of numbers and alphabets and looks like 2001:0db8:85a3:0000:0000:6a2e:0371:7234
Essentially, any user types in a URL (a web page), and these difficult-to-remember alphanumeric strings act at the backend of the internet.
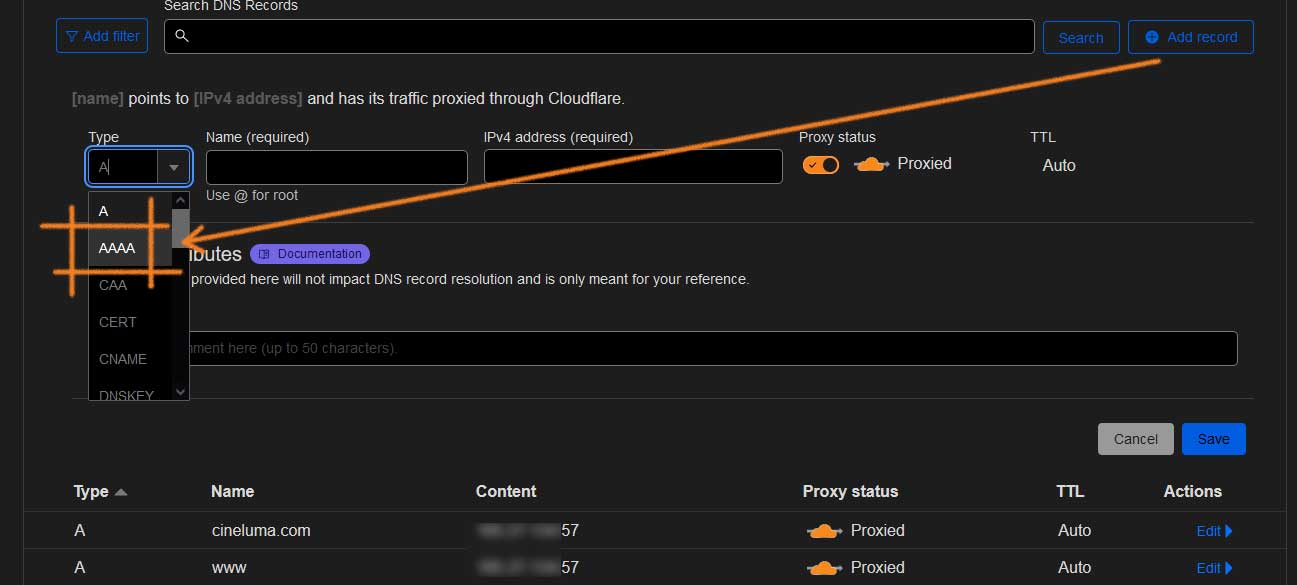
A Record
A record comes first in case of discussing the DNS records. You Domain name provider assigns a specific IP address to your domain and your hosting provider catches up with that IP to re-direct any visitor who clicks on any of your URLs. It looks like something as follows.

Here the A record shows that there is an IPv4 address assigned to cineluma.com. Although, it’s not inside the Godaddy account, as I have changed the nameserver (you’ll know about the nameserver in a few moments) to Cloudflare. Details about those processes will come later.
The main purpose of A record is to look up an IP address associated with the domain. Every domain or website has an IP and you can access that domain without knowing its IP.
Here, a DNS record always looks up to this IP for cineluma.com or associated URLs. There is also something called TTL or Time To Live. It’s nothing but a parameter showing how long it takes to update the record to reach the end user or visitor. On Cloudflare, all the proxied records, which is here by the way, have a TTL set to Auto with 300 seconds. This means they will update every 300 seconds.
In plain language, the TTL tells you how long it takes to update the IP records, should there be any change. Even if there is no change it’ll check periodically.
The A record only supports IPv4 addresses. But you can point your domain to an IPv6 address using another type of record though which is the AAAA record.
AAAA Record
This DNS record also points to a domain’s IP address. But it’s different from A record in terms of the IP version it uses. AAAA record points to an IPv6 address like 2001:0db8:85a3:0000:0000:6a2e:0371:7234. The colons separate fields in an IPv6 address. The future of IP addresses will be dominated by IPv6 and not IPv4, as we’re running out of IPv4 addresses with the rapid growth of the internet.
CNAME Record
A CNAME record or Canonical record points from one domain to another. In plain language, we have to use a CNAME record when there is any use of a subdomain. Thus, cineluma.com is a domain and if we want to use blog.cineluma.com, the use of a CNAME record becomes obvious.
In this case, the subdomain blog.cineluma.com points to the domain cineluma.com using a CNAME record, while the main domain i.e. cinleuma.com points to the server’s IP address using an A record.
MX Record
MX stands for Mail Exchange. It’s the type of DNS record that routes the emails addressed to a specific domain. For example, we have the domain cinleuma.com. Now, if we want something like info@cineluma.com or support@cineluma.com, then we have to use an MX record that will direct all the emails to the mail server of this domain viz. cineluma.com is hosted upon.

You can have multiple MX records for different mail ids under a single domain name. Here we have one with a priority number of 10. If we have others, then there will be more with different priority numbers. A priority number of 10 precedes another of 20 in the hierarchy.
MX record is an absolute necessity for a dedicated email server for your domain. It looks more professional and there are scenarios where you must enter a dedicated email instead of freely available ones like Gmail, Yahoo, or rediffmail.
NS Record
NS records specify the nameservers for a domain. The change of nameservers always requires you to change the NS record with your domain registrar.
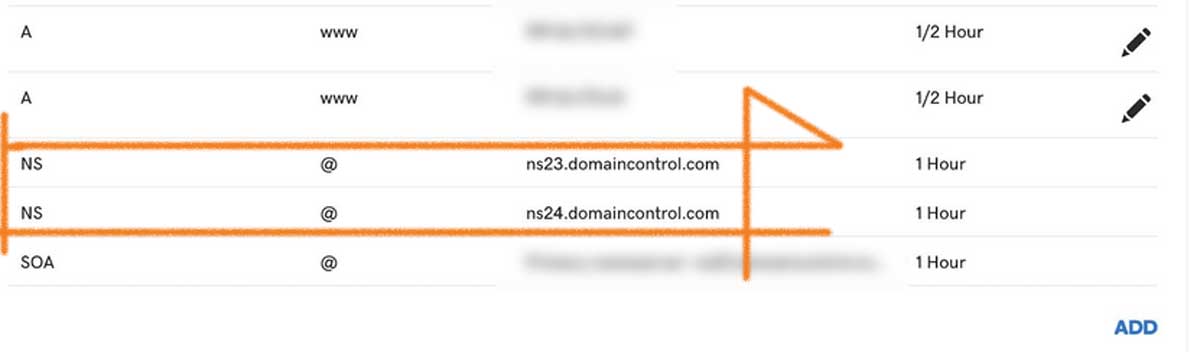
These nameservers connect your domain name to the actual server your site is hosted on. It acts something like this. Let’s say, our cineluma.com has been hosted on a different server and not on Godaddy, which is the case in actuality. So when you do click any URL with cineluma.com, it hits Godaddy’s domain control first. Then it immediately redirects to the server the site is actually hosted.
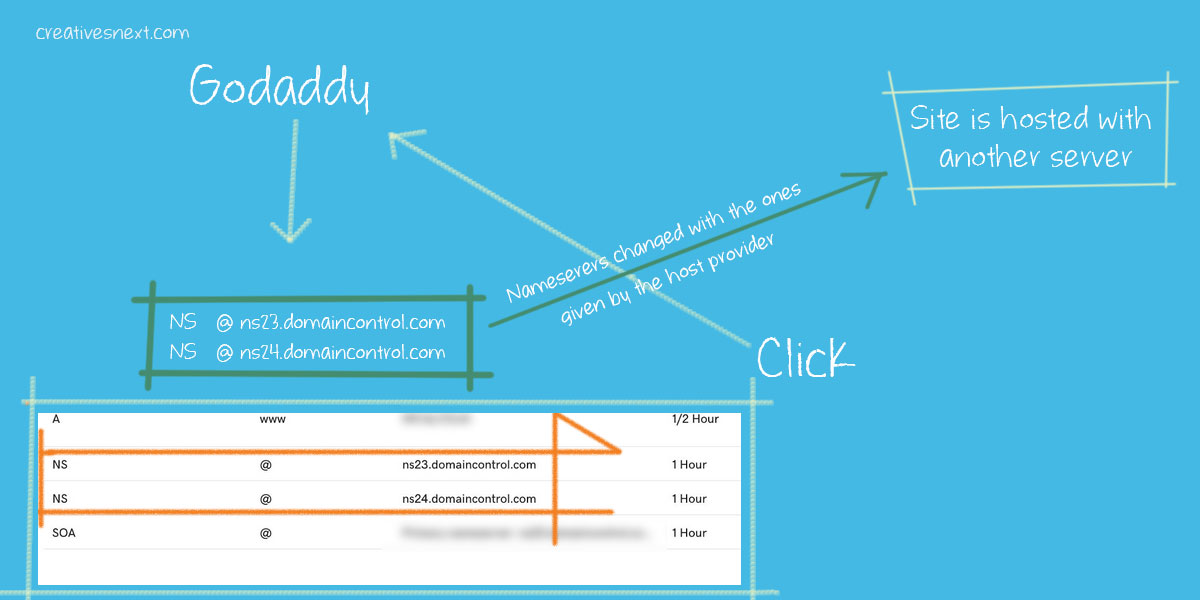
We’ll come back to this NS record again for our web hosting.
There are, however, many other DNS records with different functionalities. We’ll just look for another record i.e. TXT record for our purpose of web hosting here in this article.
Although a TXT record doesn’t come into play during the web hosting directly, it will be required for domain ownership verification asked by Google Search Console, which we shall look into in detail.
TXT Record
TXT stands for text records. With this record, you, as the domain owner, will be able to store some text values inside your DNS, wherever they are. Different services, let’s talk about Google, tell you to store this value within DNS to verify your ownership. When you sync your site with Google Search Console, one of the site ownership verification methods is through verifying one TXT record that Google provides and asking you to put it inside the Domain Name System or DNS.

Once you successfully do this, they will test and validate your domain ownership. It’s a prerequisite for using Google Search Console, which we shall see in greater detail.
These are the DNS records that you need to know before finally hosting your site. So you have registered one domain in Godaddy, in this case, cineluma.com and now you want to host the site to a hosting provider.

Web hosting with a hosting provider – infinityfree.net
For our purpose of web hosting, we shall be using a free hosting provider inifinityfree.net. There is plenty of hosting service provider. Most are paid. The free service has some limitations. But to understand the workflow, it offers all the features that are necessary for web hosting.
So once. you are through, you could replicate this process anywhere else with any hosting provider.
Signing up or creating an account at infinityfree.net is pretty straightforward. Once inside the infinity free account, you’ll be able to host up to three websites. Let’s now move ahead step by step.
Change your DNS’s NS records with the ones given by the Hosting provider
Let’s say our domain held by Godaddy has two NS records. Most of the DNS have at least two. Now the thing is, when you want to host your site, first, you have to do is change these original NS records or the nameservers at the domain registrar with the ones provided by the hosting service.
In our case, when we hosted cinleuma.com to our account with Infinityfree.net, we were first given two NS records by inifninityfree.

So you have Godaddy’s NS as ns1.domaincontrol.com and ns2.domaincontrol.com for cinleuma.com. And you now have to change these two original NS records with the ones given by the hosting provider viz. ns1.epizy.com and ns2.epizy.com.
Inifityfree, on the very first instance during your account creation followed by adding your domain asks you to change the nameservers there at the domain registrar with theirs before you create your account (or add your domain).
One thing is to mention here that the nameservers for inifinityfree are always ns1.epizy.com and ns2.epizy.com. I can’t see these specified anywhere within the account. This has been confirmed by the above image I picked from their forum.
So you have Infinityfree nameservers (ns1.epizy.com & ns2.epizy.com) assigned to Godaddy’s DNS via the following route.
Manage DNS > Advance Setting Control > Change name servers
So here is the workflow. You first have to change the nameservers or NS records at Godaddy with inifnityfree’s NS records viz. ns1.epizy.com and ns2.epizy.com. Then you have to create an account inside inifnityfree.
If you don’t change the nameservers prior to adding up your custom domains, it’ll throw up a message asking you to change the nameservers.
Once you have changed the nameservers and then land up within your infinityfree account, you’ll see this.
Add your domain to the infinityfree account
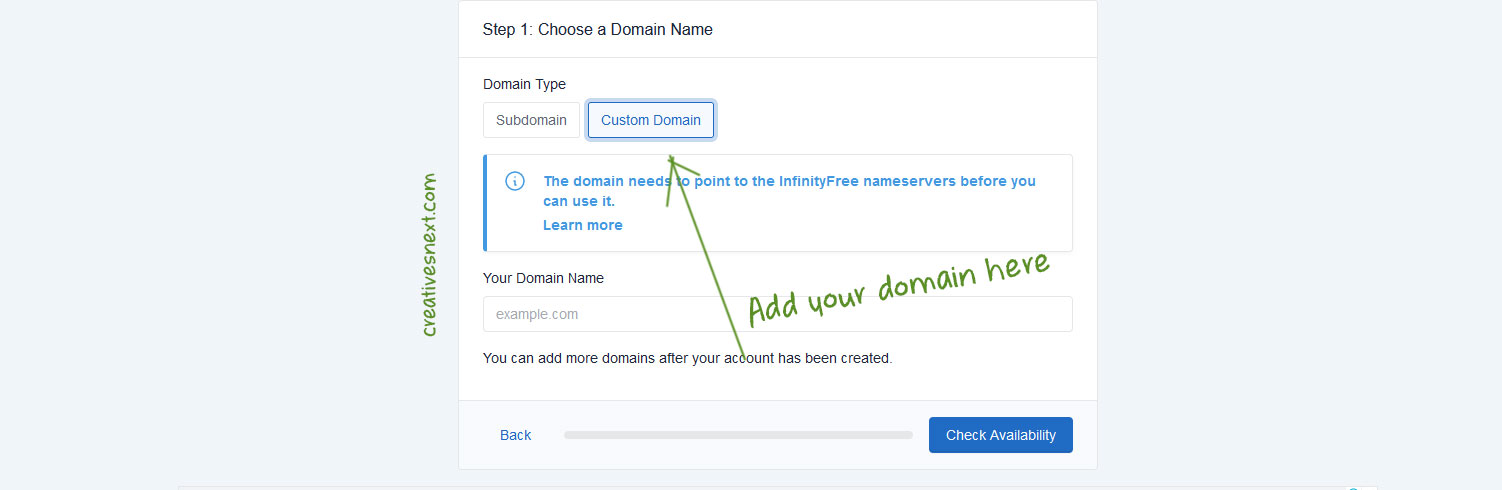
Here is an instance with a fresh domain, since we already have added cinleuma.com to the inifinityfree account and we don’t have those screenshots. Just click on the tab of Custom Domain and you’ll be given a field to enter your custom domain, let’s say capitalhandbook.com for a reference.
The term Custom Domain means a domain that you have registered, not necessarily with infinityfree. In our case, it’s registered with Godaddy.
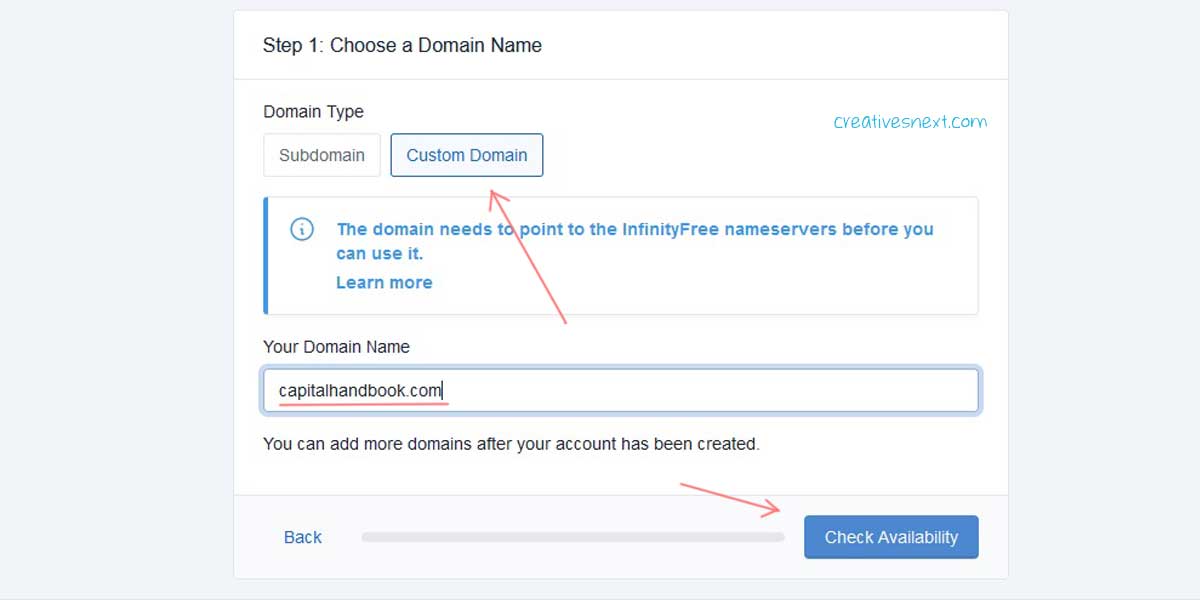
Click on Check Availability and you’ll be taken on to the next screen.
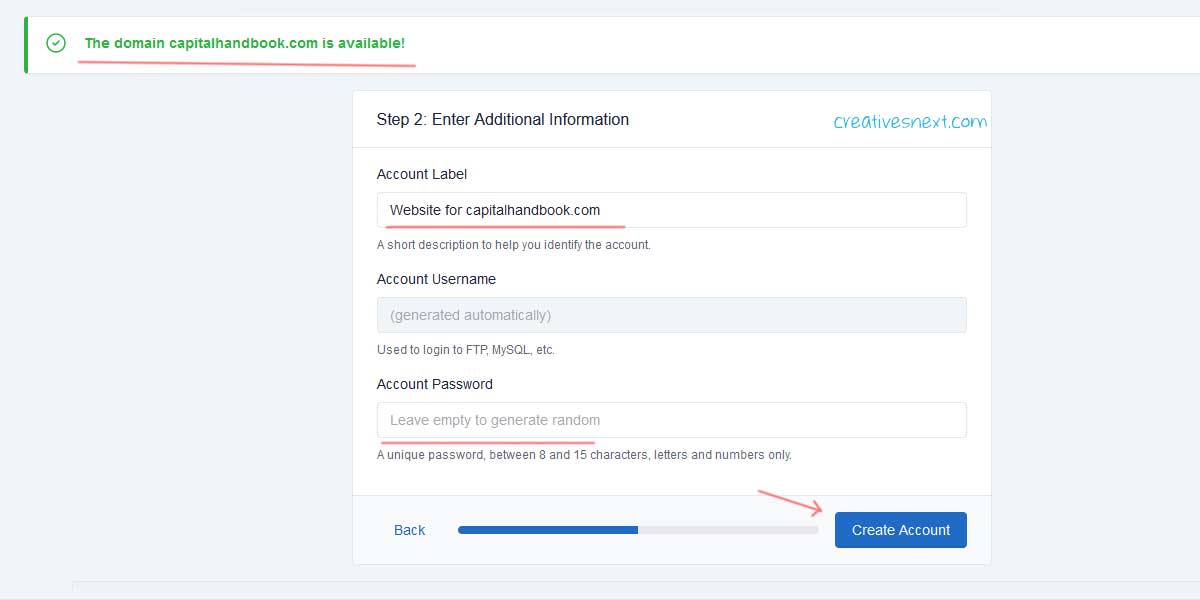
See this screen, pretty straightforward, right? All you have to enter some details and then click on Create Account. Remembers, changing nameservers and this account creation process may take some time. So you have to check back if they are ready. Also, take note of all these details in a notepad or doc.
You have just seen these steps with a custom domain. Let’s now get back to our cineluma.com which is already created and let’s see how does it look like inside infinityfree.
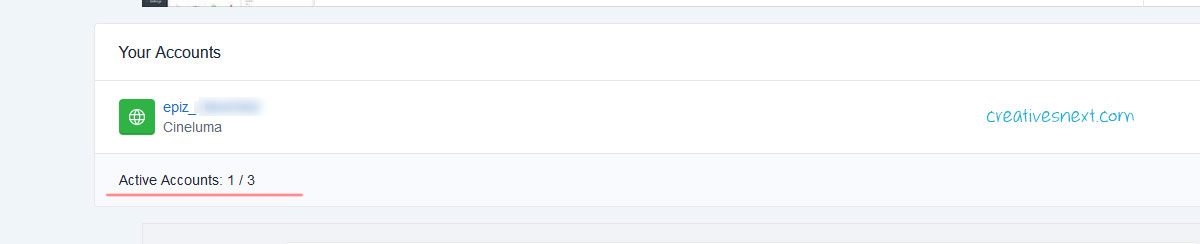
This ‘Active Accounts’ means how many domains you can add within your infinityfree account. You’re allowed as many as three. That means you can host as many as three sites on inifinityfree for free.

Account (added domain) details inside infinityfree
Just click on that epiz_xxxxxx (your account, Cineluma in this case) and you’ll get to your account with all the details. Here are how it looks.
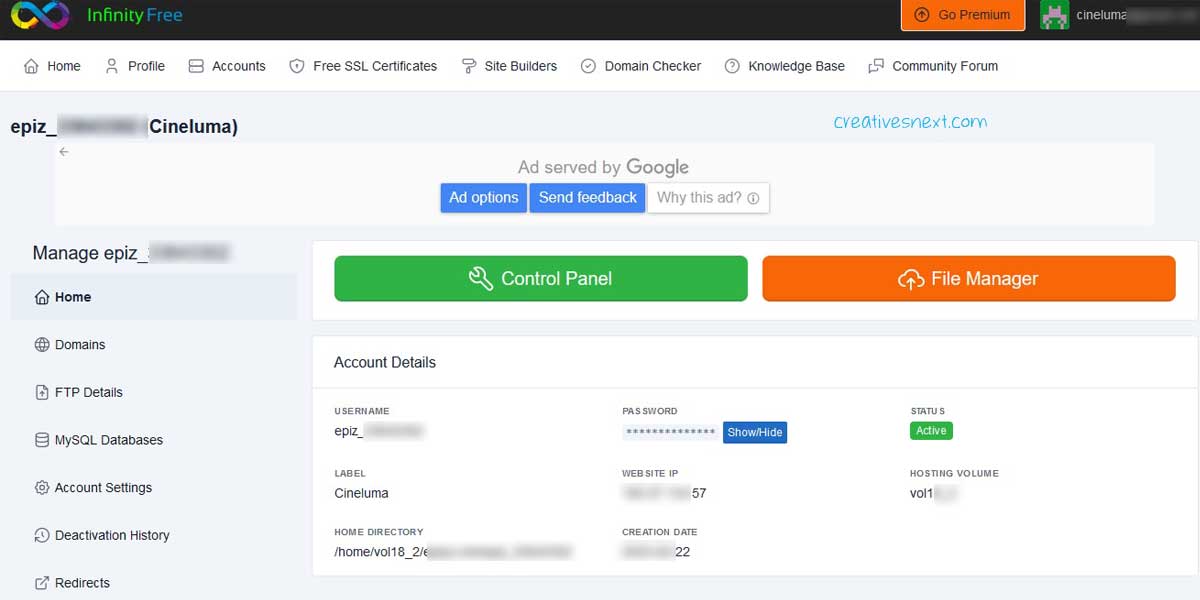
So many things and features, you can see here including the Control Panel or Cpanel and File Manager or FTP. We shall get into this for WordPress installation later. At this moment, we will have to generate an SSL certificate first.
Whenever we register a domain it comes with http:// and not https://. The former is unsecured and the latter is secured. Not only do you need a secure connection, but also you must have this from the SEO perspective. To convert our domain http://www.cineluma.com to https://www.cineluma.com, we need to generate an SSL certificate here.
We could also have done this at Godaddy, but since we are hosting this on infinityfree, we are doing it here.
I would just ask you to notice that there is something called ‘Website IP’ beside the label. It shows the IP and you’ll require this IP later during integration with Cloudflare.
Generate a free SSL certificate at inifinityfree.net for your domain

You have to go to the client area to log in to your account. And then you have to click on the ‘Free SSL Certificates’ menu at the top.
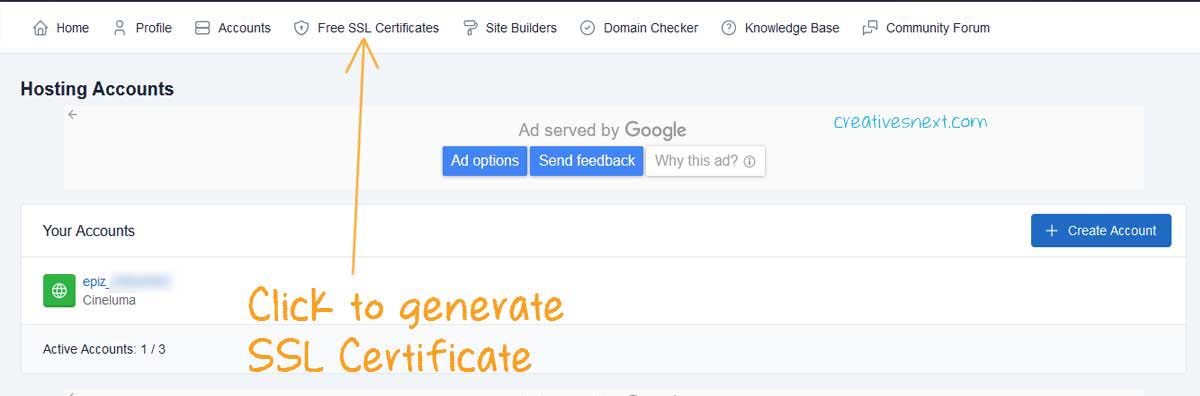
Here you could see, Cinleuma under your accounts, as it’s been already added. You would see your domain in place of that. Now follow the steps stated below.
- Free SSL Certificate> Add Domain i.e. cineluma.com (No http:// or www.)
- Continue> Choose Let’s Encrypt > Create CName record. Wait for a few hours to update the DNS records.
- Either click on ‘Setup CNAME Record Automatically’ or ‘Change Manually later’.
- Clicking on ‘Setup CNAME Record Automatically’ will take some time to update CNAME records: It will show ‘Ready’ beside the Current Destination.
- Request the Certificate. It will take some time.
- Go to Free SSL Certificate – Click on your domain (Cineluma in our case) – Private Key and Certificate
- Install SSL Certificate Automatically Or You can do it manually by accessing the SSL/TSL section of Cpanel to upload the Certificates.
- Check back after 15 minutes and you’ll see your SSL certificate is successfully installed.
I didn’t take screenshots during the procedure, but noted down all the steps and have written them down here. If you find any issues, please leave a comment below this blog and I’ll try to come back with a solution. But in my case, cineluma.com has gotten the SSL certificate working in the above-mentioned steps.
So your domain is now secured with https://yourdomain.com. You can check by typing your URL on any browser and it will pop up an infinityfree page. It means your domain has a secure connection to a browser. You are all set to go for WordPress installation at this point.
Install WordPress
Get back to your account with the domain and then click on the Cpanel or Control panel to get into the software.
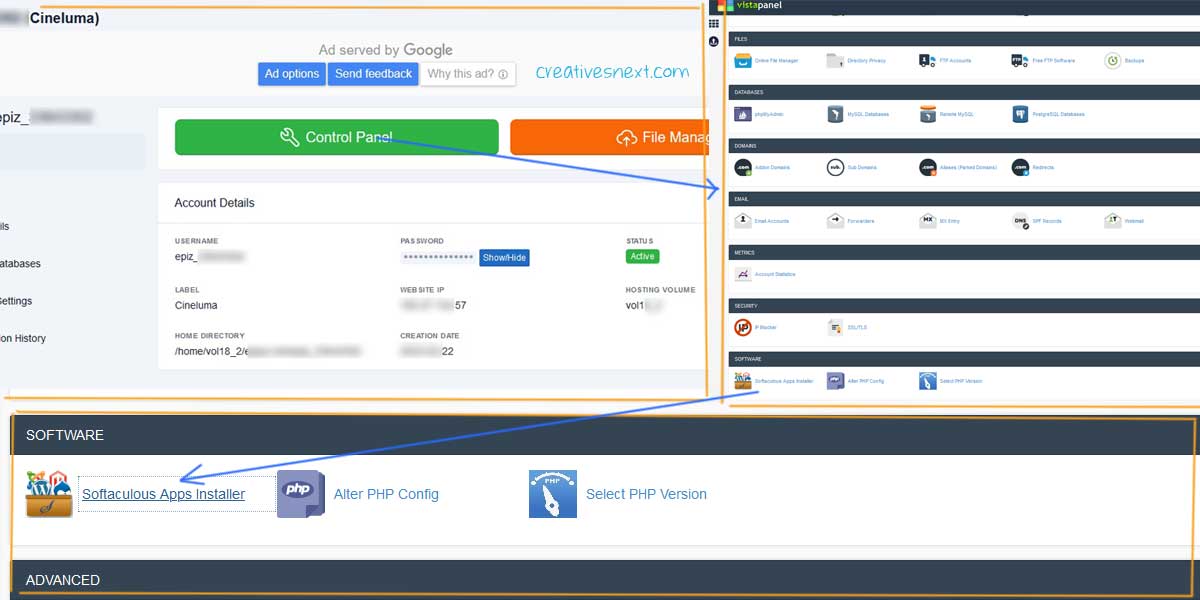
This is Softacuclous App Installer. Most of the Control panels with other hosting providers have exactly the same or similar kinda applications which will let you install WordPress for your domain.
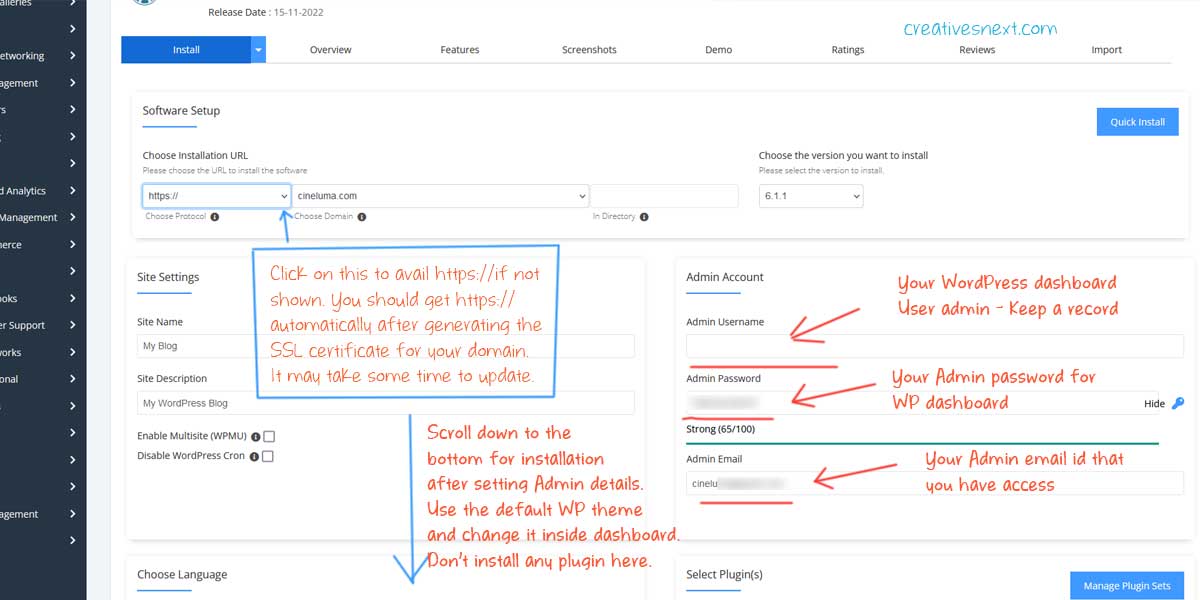
And now, you’re finally in the zone of installing WordPress. A few things to take note of here.
Under Choose Installation URL at the top left, you might still get to see an http:// instead of https:// even with the SSL generated. Use the drop-down to force an https:// for the URL. My experience is it sticks to https:// and tells you that you don’t have one SSL for your domain by saying ‘A Trusted SSL Certificate was not found’.
But I kept on trying and after a few attempts, it got the SSL or https://. It’s weird, right? But that’s the way it is.
Enter your admin email id and password. Remember these are the details for signing in to your WordPress dashboard. Also, you have to put in one admin email id.
Use the default WordPress theme here and you can later change this from within the WordPress dashboard. Also, you should avoid installing any plugins here.
Scroll down to the bottom and click on Install. It will take some time to install WordPress and once through you’ll be asked to log in via the dashboard.
You may like to tweak the settings inside the dashboard. I am a subscriber of the idea that you should go minimal on plugins. The less you install and use, the better. Besides the vulnerabilities plugins bring, there is a factor of fast loading of your pages. Plugins affect this fast loading of webpages and this is directly related to the Core Web Vitals, a sure factor of page rank and SERPs.
Also, go on a theme that makes you easily control and manage. Remember, we’re no developers. We create content and want to turn our site either to showcase our service or portfolio or turn into a small business hub and generate leads.
So, you got WordPress installed on your domain after successfully generating an SSL certificate. Now it’s time to sync your website to Cloudflare.
Connect your site with Cloudflare after web hosting and syncing with Cloudflare
Why Cloudflare?
Cloudflare is a Content Delivery Network or CDN that creates caches or proxies for your webpages, should you opt for their service. Now, what does that mean in plain language?
Suppose you’re based in Malaysia and someone clicks on your URL from Vancouver. In normal circumstances, I mean without the aid of any CDN, it will take some time to load your page against the query or request. Because your hosting server may reside near your city, somewhere in Malaysia and the signal has to pass through some 12,000 km.
But a CDN or Content Delivery Network, on the other hand, has data centers spread all over the world for their servers. So what happens when you take up their service, they create copies of your web pages on different servers across the world. These copies of web pages are called caches or proxies. And they keep on updating frequently.
So when a visitor from Vancouver clicks on any of your web pages, no matter if you’re based in Malaysian, the CDN, Cloudflare in question, will serve your web pages from a data center nearest to the location of that Vancouver visitor. Naturally, the web pages will render and load faster.
There are many CDN services out there. But Cloudflare is possibly the most popular among the free ones. It has premium service too. But we’ll take up the free option for our purpose.
Create an account with Cloudflare and add your domain
Pretty simple. You have to your any email id of yours not necessarily a dedicated email. I use one of my gmails to open a Cloudflare account. Within your Cloudflare account, you can add multiple domains. Here is my account overview.
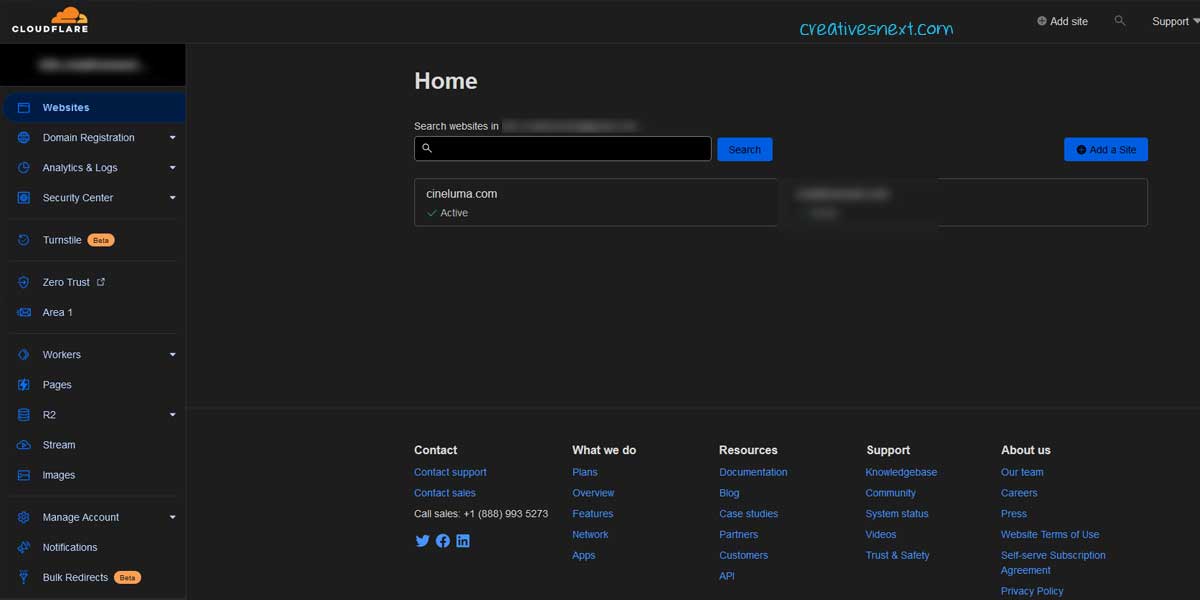
After creating your account with Cloudflare, all you have to do is add your domain.
Add site (cineluma.com)/ Enter URL> Selec Free Plan. Wait for some time to update. Once, your account is prepared, you could see something similar to the above screenshot, with your domain name as Active. Click on that domain or yourdomain.com and you’ll get into the dashboard specific to that domain.
Since you have your domain hosted at the infinityfree, now you have to work a little on your Cloudflare dashboard (of that domain).
Change the DNS records inside Cloudflare
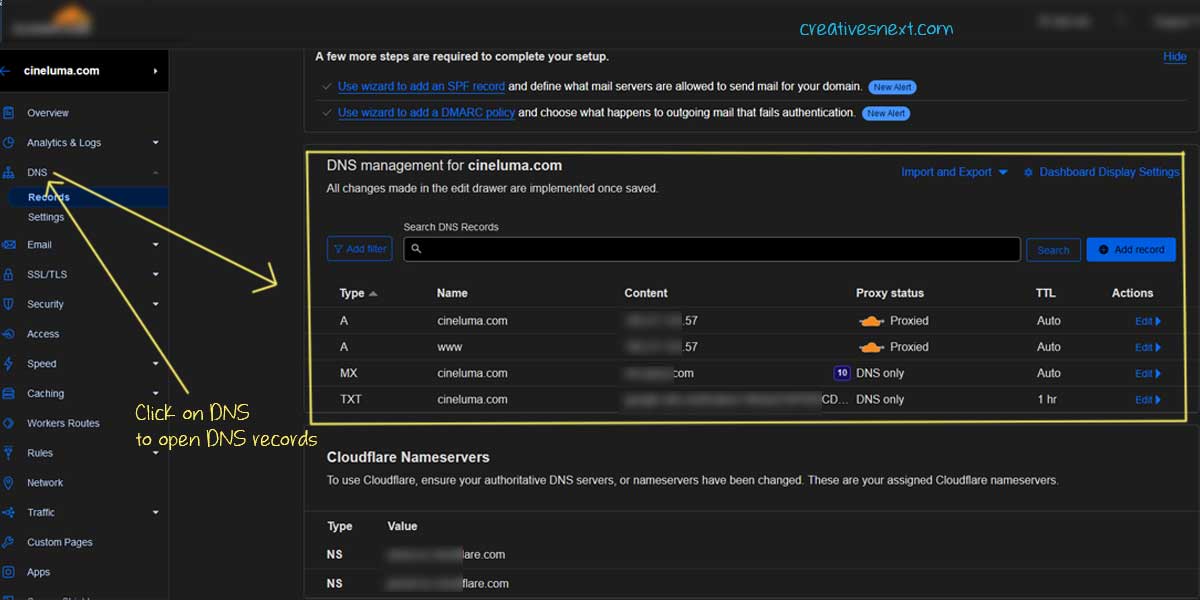
Now, delete all records in the DNS except the two ‘A’ records with ‘www’ and the domain name. Check if the IP in the Cloudflare DNS matches the IP in the infinityfree Client Area (for the account the domain is connected to). I have added the MX record and the TXT records for the mail server and Google Search Console’s domain ownership verification (will discuss this shortly).
While adding these records, the change in the IP addresses for A records points to your site hosted at Infinityfree and it’s important to check the IP. What happens is, when you click on your web page, it first gets redirected from the domain registrar to web hosting.
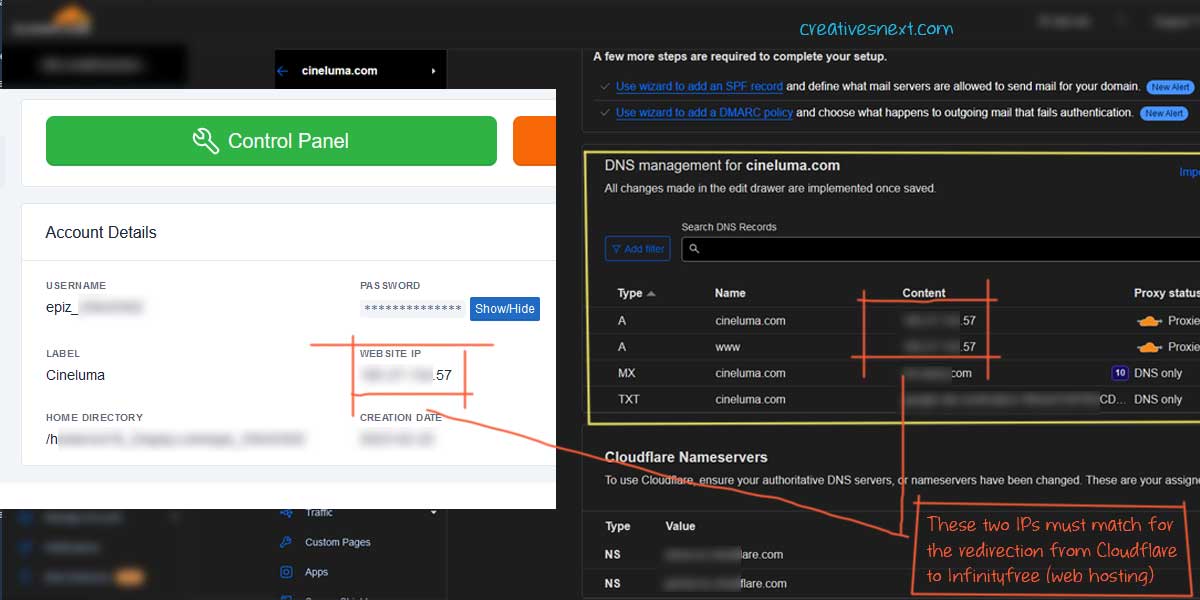
And then you change this IP given by the web hosting, infinityfree, while adding your domain to Cloudflare. So Cloudflare now points to the host against any query. But it’s still not over, since the loop is still not complete.
Now you have to go to Godaddy, or your domain registrar, to change the nameservers there. Because, the nameservers, there, are still holding web hosting’s name servers.
Change Godaddy’s nameservers, currently with Infinityfree’s, with Cloudflare’s

You see in the above image there is something called NS. You know what the NS records are. So all you now have to do is replace the nameservers there at Godaddy, currently with infinityfree viz. ns1.epizy.com, ns2.epizy.com with the Cloudlfare’s nameservers or NS records.
So, just open Godaddy’s DNS settings/ record (‘Manage DNS’) to replace Infinityfree’s nameservers already assigned there, with the ones provided by Cloudflare. It may take some time to update the change in nameservers. Check back later and you’ll see your site is up and running.
You can now play around within your WordPress dashboard to edit your theme, add plugins and upload content. So there you are with your WordPress site hosted and up and running, all by yourself.
One last thing you would like to do, by submitting your site to Google Search Console. For that, you have to sync the website with Google Search Console first.
Syncing your WordPress site with Google Search Console after web hosting and integrating with Cloudflare
As I said, I am no big fan of adding more and more plugins for every operation, I would tell you the way I performed this using header.php. Sounds technical? Okay, let me break it down as I proceed. Broadly, you could divide the process into the following steps.
- Use a Gmail account to access Google Search Console and add your domain
- Verify your domain and/or site ownership
Use one Gmail to access Google Search Console and add your domain
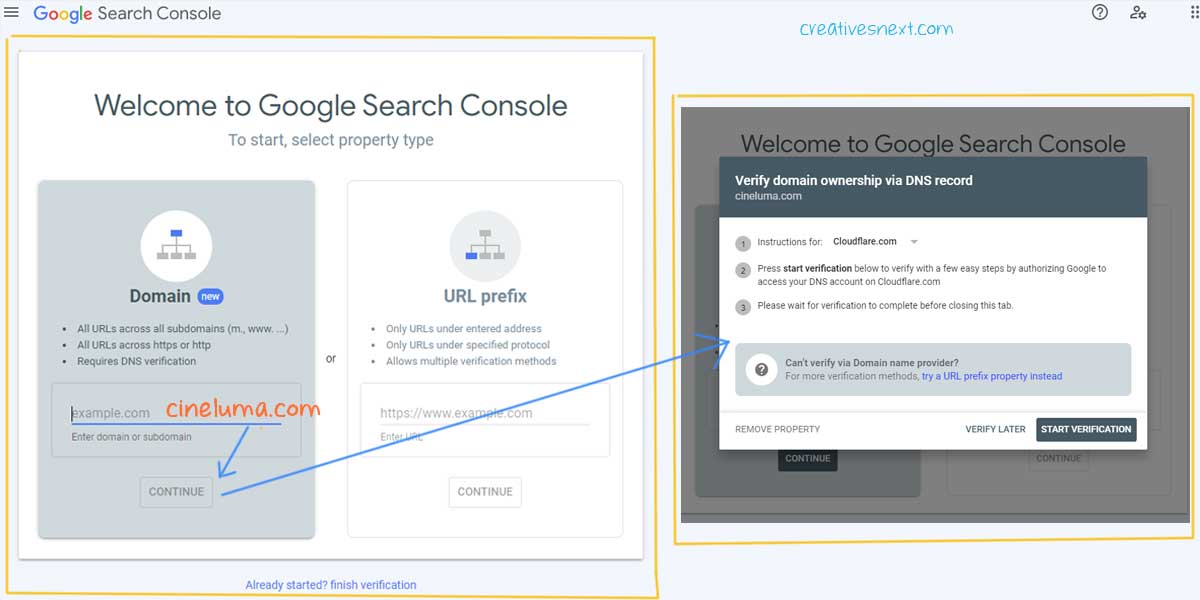
When you use Gmail to access Google Search Console for the first time it will take you to the landing page at the left (above screenshot). Just put the URL, click on Continue and it will take you to the pop-up on the right. You can clearly see, GSC is showing Cloudflare as the domain name provider at the top.
There are different ways to verify site or domain ownership for Google Search Console.
- HTML Tag
- HTML File
- Google Analytics
- Google Tag Manager
- Domain Name provider
We’ll discuss three of the above, except Google Analytics and Google Tag Manager. Let’s start with the Domain Name provider.
Verify your domain and/or site ownership
Domain Name Provider
Click on start verification and it’ll take you to your Cloudflare account. Had you not opted for Cloudflare, it would take you to your domain registrar. You have to add a TXT record at the DNS, remember we discussed what a TXT record is under DNS earlier!
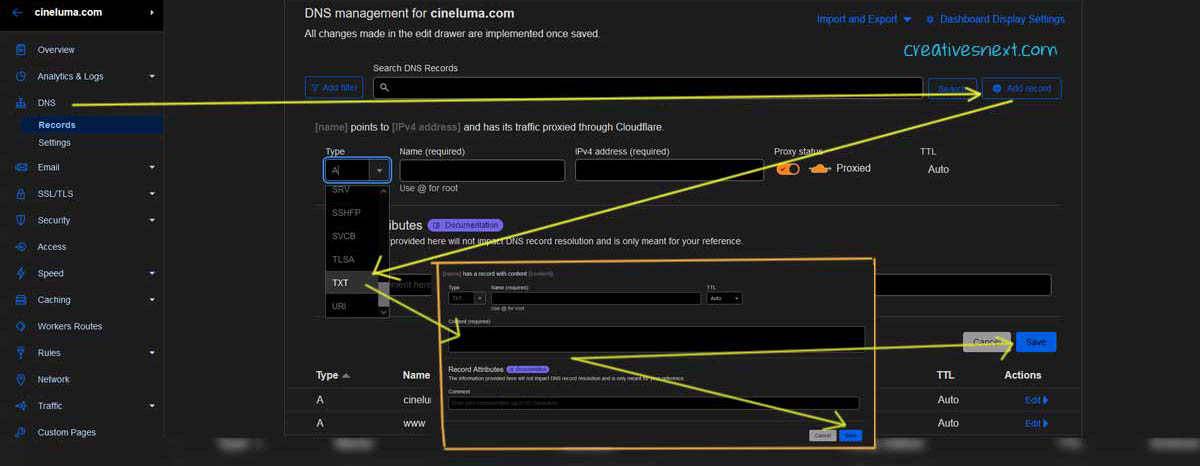
Because Google Search Console will give you a small piece of code like ‘google-site-verification=‘ and you have to be able to add this type of code snippet to your DNS. And for that, you have to add one TXT record in the DNS.
rXOxyZounnZasA8Z7oaD3c14JdjS9aKSWvsR1EbUSIQ
You may just add the TXT record field and come back later with the code available inside Google Search Console and paste that code at the Content section of the TXT record field and then save. This is when you don’t have the access to the domain registrar account. This method is particularly useful when you need to assign one email id to Google Search Console that you haven’t accessed when syncing your site for the first time.
But if you have an access to the domain registrar, Cloudflare in this case, then it will ask you to access your Cloudflare account. Once there, it will show the Gtag and ask you to authorize it. Something like this.
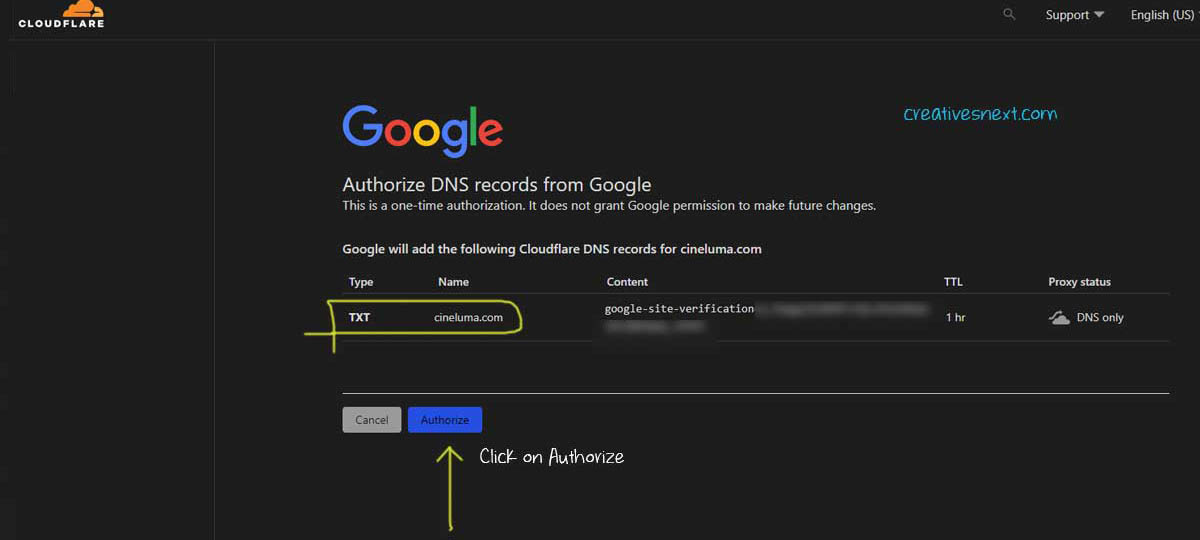
And you’re through. Now get to the Google Seach Console again and click on verify just beside Domain Name Provider and it will show you’re a verified owner of the domain of your site.
HTML Tag
For this, I have had one explainer video previously made. Just watch out and you’ll get the idea.
One thing, I like to mention here, is regarding the header.php file. This header.php file is available under the theme editor under Appearance. If you use the parent theme you could find it there.

But, if you use a child theme, which you should actually do, then you have to copy that from your parent theme folder. Three files, at least, you should copy and move to the child theme directory. If you don’t know how to get that header.php file from the parent directory. just read the next section.
Once you watch the video, you get the idea of how to paste that Google verification code into the header.php.
Uploading the HTML file
One of the site ownership verification methods, Google Search Console provides you with an HTML file and will ask you to upload it to your site. Let’s see where to upload this file.
So, you have it. You’re nearly there, almost at the concluding part. One thing I would like to show and that’s the header.php, the function.php, and the style.css that you may like to copy and move from your parent theme directory to the child theme.
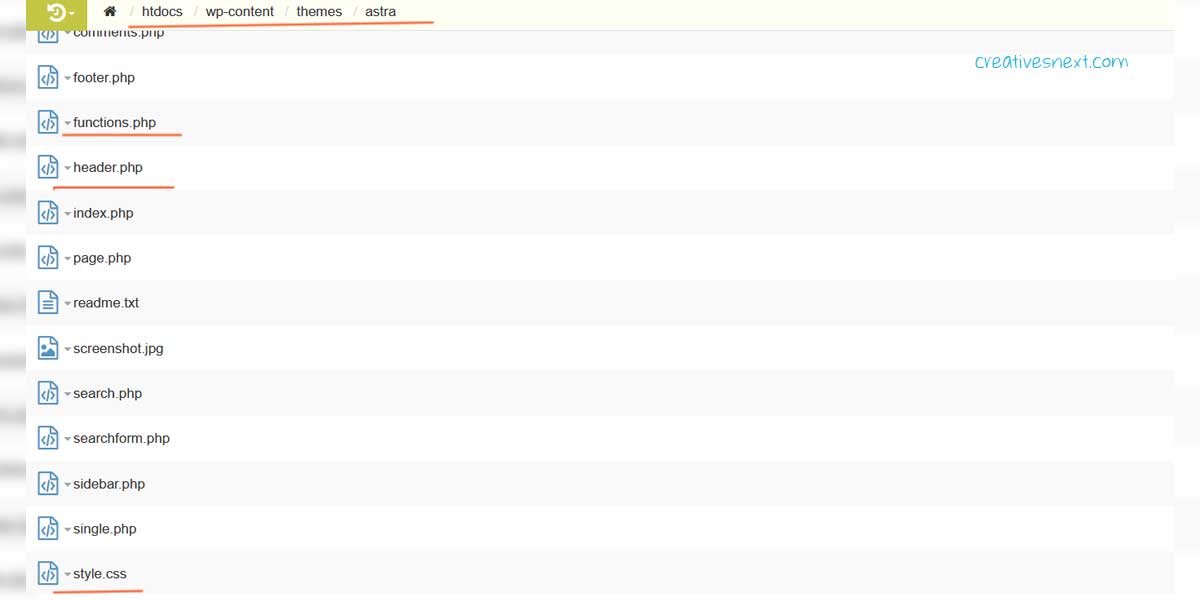
All you have to do is to go to the FTP or File Manager > htdocs > wp-content > themes > Your theme (in my case, I have used Astra). Copy these three files and move them to the Child theme directory, which you’ll have under the theme within the FTP or the File Manager. Many hosting providers have something called public_html and within that folder, you could have a similar path to find these files.
If you can’t copy and move, just download those files onto your computer and then upload them to the Child theme directory. Now, whatever change you would make to these files, within the Child theme, they will remain intact. You’re safe now.
Conclusion
We have covered a lot in this article. Right! Just to recap, let’s run down a quick summary.
- Nameservers at Godaddy replaced with Infinityfree.net’s > Update will take time
- Create and setup infnityfree account
- Set up one of the three domains provided with a free hosting plan
- Create SSL at Inifityfree > > Update will take time – SSL certificate creation, issuance and finally being active are a phased process – it takes time
- Install WordPress at Infinityfree – here the SSL will come into effect. This means, the domain, for WP installation, now must be https:// and NOT http://
- Go to Cloudflare (Sign in or Sign up) > Change DNS Settings
- Delete all except two ‘A’ records with domain and www. Ensure the IP is set correctly, and check your website IP (with the client area of infinityfree).
- Open DNS at Godaddy or the Domain name registrar
- Change the nameservers given by Cloudflare at Godaddy. Currently, they are the ones provided by infinityfree.net – The update will take a little time.
If you cover all the steps above, you’ll be able to get a WordPress-powered website up and running, all by yourself, right from domain registration to web hosting to syncing with Google Search Console.
I have used Godaddy for domain registration, infinityfree for web hosting, and Cloudflare as the Content Delivery Network (CDN). But this concept of changing nameservers, assigning IP to redirect query or request from one server to another holds for any player. I tried to grasp the logic, successfully hosted my site, and shared my experience with you.
Nothing could be more satisfactory if I find it useful for others.
Please don’t forget to share this post, if you find it helpful.
