
How to make Explainer Video Using Adobe After Effects and Illustrator [With Breakdowns & Expressions]
Last updated on 8 July 2024; Published on 12 May 2022
Introduction
Making an explainer video with after effects seems hard and time-consuming. But with a little know-how and planning, you could create a nice animated explainer video for your goods, service, or portfolio using Adobe After Effects and Illustrator.
With 5G connections as well as AI (Artificial Intelligence) knocking on our doors, a video on every single piece of information is just a matter of time. And, if you’re on the web for business and are still not making explainer videos, you’re missing out on money-making opportunities.
Animations used in online marketing videos, popularly known as explainer videos, act like hookers and bring traffic to your landing or sales page like nothing else.
It tells your prospective buyer about your product or service in short, simple, and plain language with interesting visuals and graphics.
An animated explainer video does not only hook your visitors, but they reduce the bounce rate and increase the CTR or Click-Through–Rate of your web pages. Click-Through-Rate means how many clicks your site or URL gets against every one hundred appearances or impressions against search queries.
Explainer videos embedded in the web pages or blog posts instantly lure visitors with increased stay time. It helps you reduce the bounce rate to a large extent.
With so many pros, you may be thinking of the cons such as the creativity, the cost, time to finish or deadline, etc.
There are two ways to deal with it. One, outsource this to an agency or explainer video production company that has an expensive team of professionals or do it yourself.
Even if you have the budget, which is unlikely for small business owners or start-ups or even a small industrial or manufacturing unit, it’s wise to get a solid hold on the workflow of making a short animated video for your business instead of depending on explainer video services.
Now, why did I say, it’s unlikely that you would be able to cough up money for making an explainer video?
In the present-day scenario, content promotion on social media requires a consistent and regular effort. And so is with online marketing videos or animated explainer videos.
If you consider making one video every week, or even two, it will make you spend more than a few hundred dollars every month! That’s not something we would love to do.
So finally, you arrive at the point where you can decide to take it on your own. And trust me, it’s not as hard as it seems.
All that’s required is a little sense of visualization for the animation, and planning followed by an orderly execution.
In this article, we shall see how you could create an animated explainer video for your business or organization step-by-step using Adobe After Effects, in combination with Adobe Illustrator. We shall also use a few basic After Effects expressions in the later part of this article that are widely used to create simple vector animations.
Although there are many other programs for animation and compositing, Adobe After Effects is by far the most popular choice among animators, graphic artists, and video makers or editors, when it comes to making animated explainer videos to promote any product, service, or information.
Even in commercial video production After Effects can give you shot in your arm for creating stunning visuals and motion graphics.
You’ll, by the end of this article, have a clear idea about how to plan and create an explainer video for your product or service. Even if you hire professionals or animators, you’ll be in a position to dictate the terms revealing the know-how of animation during the talks.
However, we shall not deal with character animations in this article.
Table of Contents
Eight types of the most popular explainer videos
Now, before making an explainer video for your business, it’s important to know what are the types that draw traffic. In plain language, what are the types of explainer videos that are most popular?
It’s important to know because you need to find which type best suits your business, or more specifically a particular need. However, you are not
Here are the eight different types of most popular explainer videos doing the rounds on the internet.
Animated Explainer Video
If you are looking for videos animating vector elements, showcasing your products, or explaining your service, this type is the best one. Most videos doing the rounds online belong to this category. This style consists of using different graphic elements and their animations. It’s very common to use this style of treatment to tell a story, scene by scene.
In this article, we shall be focusing on how to create an animated explainer video without involving a character. Here, we have an Instance.
Whiteboard Animation
In this style, the designer uses a graphic hand or palm holding a pen or pencil to tell a story with sketches or illustrations. In this style, you will see less use of color compared to other forms of an explainer video. Brands, fond of understated elegance, often use this type of presentation. It’s also one of the most preferred styles for service explainers like SaaS solutions or App promotion.
Character Animation
Character animation serves a specific purpose and style for a certain group of buyers and sellers. When you focus on the end tip of your sales funnel, you need to interact with your prospect much more directly. This certainly requires a character to communicate while you tell your story. Character animation is a bit expensive in the sense that it requires involving an illustrator/ artist in the process. But a nicely made character animation is worth the spend.
Here is an example of an explainer video with character animation.
Screencast
Screen video is widely used for tutorials on software and web applications. Grabbing computer or mobile phone screen actions is essential when it comes to creating tutorials on a certain process. Mostly captured on Camtasia or applications alike, the clips are then edited with some text animations, effects, and voice-overs to create a soothing presentation.
Making a screencast explainer video is relatively easy
A screencast explainer video is relatively easy to prepare if you know your stuff.
All you need to capture the screen and record it. You also have to record what you speak simultaneously, which you could do easily on your smartphone. Later, you could import the captured stuff and voice-over file (the .m4a file, in android) in a timeline. Since they are recorded together, they would already be in sync. All you have to do at this point is to edit.
A screencast is very popular among YouTubers. There are in fact many animated explainer video companies that offer services in relation to producing screencast videos, their capturing, and editing to finish.
3D Animated Explainer
3D animation works best for scientific, engineering, architectural, and any other forms of explainers where shooting real-life footage is not feasible. With 3d animation programs, like 3ds Max, Blender, and other online solutions, It’s becoming increasingly common to use 3d scenes and simulations within a presentation. Still an expensive niche, it caters to the specific need and audience.
Industrial applications and bio-medical science particularly require using a 3d environment and simulation that can’t be attained otherwise.
One such is below.
Motion Graphics Explainer
A motion graphics explainer is a form of animated explainer. It deals more with the movement of different graphic elements through different scene setups. This style involves a more subtle and intricate movement and therefore animations of different elements. A proper motion graphic explainer requires meticulous planning and detailed mock-up preparation beforehand.
Here is an instance.
Dynamic typography
It contains extensive typographic animations. If you are interested in using typographic creativity, then certainly it’s a good bet for you. You may not use this as the central video core to your topic, but occasional inserts as the fillers help your audience get a pleasant user experience on your channel or website.
An example.
Footage-based explainer video
You may or may not quite consider this as the form of an explainer video, like the ones listed above. The footage-based explainers can be edited out in many different formats of different lengths. And there comes the dissimilarity! You see, footage-based videos can be of a wide range, promotional ads, webinars, testimonials, you just name it.
Whether or not like the other types of explainer videos, footage-based edits constitute the largest pool of videos uploaded or streamed on different platforms every single day.
Here is an instance.
There could be many different programs for making explainer videos. But Adobe After Effects enjoys immense popularity among graphic artists and video makers for its close nit relations with other Adobe programs like Illustrator and Premiere Pro.
Besides, a huge pool of resources available online kind of gives unmatched leverage to After Effects for creating explainer videos. In vector animation, we often use Illustrator with After Effects to edit the vector graphics prior to importing different elements from Illustrator to After Effects.
How do you plan for making an explainer video with After Effects?

For any business, big or small, making creatives comes with an opportunity as well as a challenge.
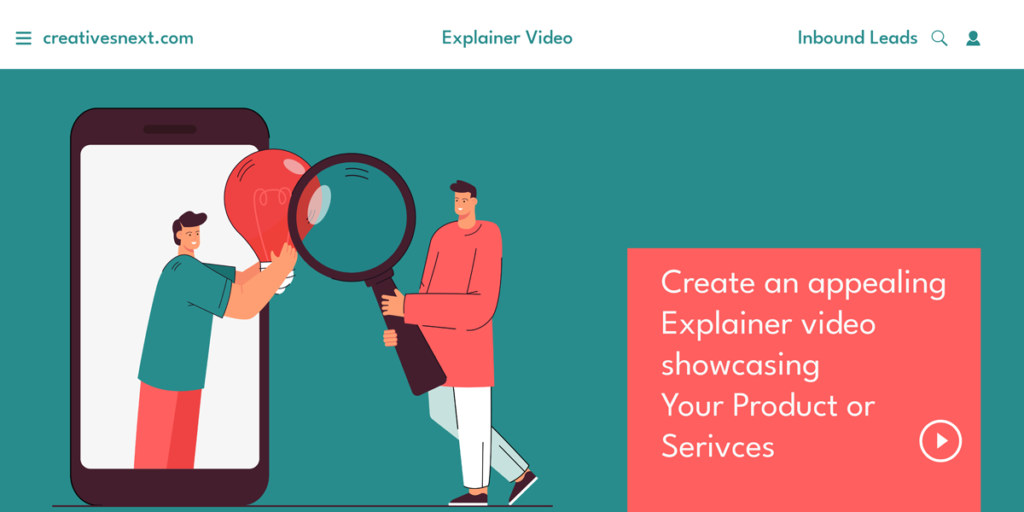
It’s important that you know your marketing funnel and plan accordingly. An explainer video acts like a hooker.
It tells your customer how your service or goods will help him in his buyer’s journey. It starts with ‘an attractive’ piece of content that creates a kind of awareness for him. At this point, he tries to figure out how he would benefit from your business vis a vis his particular need.
Then he arrives at the ‘consideration stage’, where he actively ponders over fulfilling his need through your offer. This takes him to the ‘engagement stage’ where he is convinced of your product or service. At this point, he could even help you by engaging in social shares, likes, subscriptions etc.
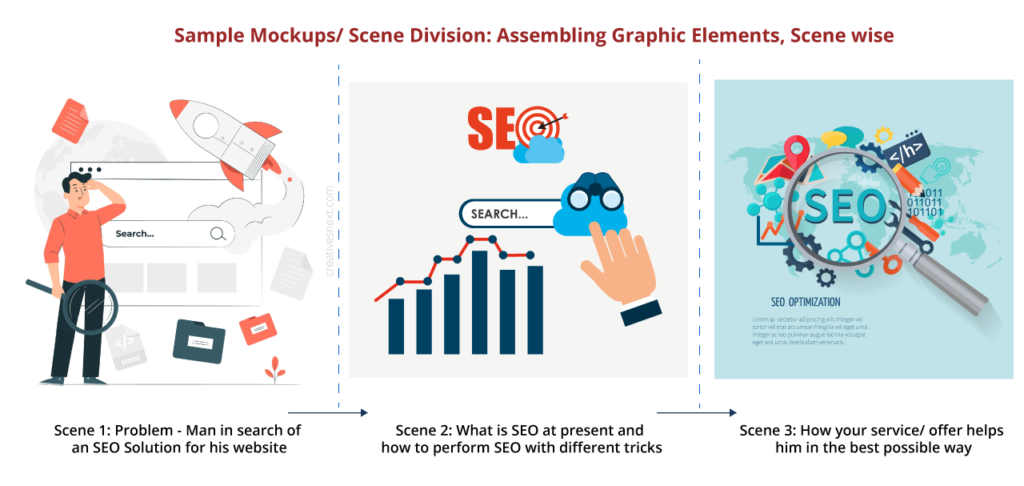
This eventually turns him into a business lead. This eventually leaves you with a simple yet crucial structure for your video, however small that would be. Let’s consider a test case scenario for a 1-minute animated video production.
- The problem for your prospective buyer: He is having trouble with – Creating a situation; 10 sec
- The solution you are offering: In relation to his search/ query/ need – Introduce your product/ service; 15 sec
- How it works: That means how your service or product works – A how-to or informative sequence; 15 sec
- Value proposition: How your business scores over others – the key area of the video where you could turn him into a lead failing which you could lose him; 15 sec
- Call to action: A standard or creative format to state what to do next; 5 sec
This could be an approximate structure and not the scene divisions for your video or for your client for that matter. We shall deal with the scene division later.
Working out a proper structure is pivotal to making the video successful, be it a documentary, a corporate promo, or an animated explainer. This takes us to the next stage of carving out a creative brief, essential for a video script or commentary writing.
How to prepare a creative brief for an explainer video?
Whether you are creating an explainer video for your own business or on behalf of your client, a creative brief is a must before you proceed to the production stage.
Now, what exactly is a creative brief?
It’s nothing but a set of questions and answers that you need to prepare for a better understanding of your business and its reflection on the video. If you’re making the video for your client, you have to provide the set of Q&A to him/ her to obtain the inputs. Here is an instance of a creative brief. It’s just a prototype and you may tweak it according to your need.
- The hooker: Mention/ describe your business, product, or service, in 2-3 sentences.
- Your target audience: demography, age, sex, location.
- The problem you are offering your solution to.
- USP or unique selling propositions. The features of your product or service that you think are likely to score over your competitors.
- The mechanism: how does it work, step-wise workflow?
- The treatment of the video. It should be in resemblance with what you offer. A SaaS solution to be narrated in a no-nonsense commentary while a kindergarten could accommodate funny typography and humor.
- Any specific style or treatment that you like or your client likes? Any sample link that you find a suitable one to follow?
- The CTA or Call To Action.
With this set of Q&A as the inputs, you are all set for the next stage i.e. writing the script/ commentary for the video.
How do you write a commentary script for your explainer video?
An amazing video needs amazing audio, always.
A commentary enhances your audio-visual. Remember, you can close your eyes, but can not close your ears. So, low-quality audio or commentary will surely spoil the success of the video and its reach.
The commentary script or notes should be precise, straight to the point, and yet conversational. A pain-speaking, conversational commentary sets the very tone and temperament of the video at the very outset.
Now, keeping with the creative brief we discussed in the last section, here are a few salient features for writing a video commentary.
- Outline: the creative brief that you had prepared should be your guide. Use the outlines of points in the creative brief to write down a central or core sentence for each point. It’s an evolutionary process. That means you don’t have to write all the sentences against all points at the beginning. Try writing down 2-3 sentences for the first 2-3 points. Once you get the flow, the other will follow.
- Build up a situation: Whether popping up a problem scenario or narrating the solution you’re offering, try telling a story. Like John was traveling back to his home on a rainy afternoon and then…kind of sentence acts like a hooker. People love stories.
- Be precise: Write without frill and flab where information holds the key. Every film or video has a beginning, middle, and end. You may indulge in a little chattering in the intro or conclusion. But be straight to the point when talking about your product or business or while disseminating information.
- Use transitions: Not the video transitions are the only ones. Even in commentary, we often use transition. That means when you are nearing the end of the current sequence or section, you have to use a sentence that kind of builds a temp for an incoming one. This creates a smooth passage. Remember, the David Attenborough documentary! While we are vicariously traveling with him in African Savana, he said…’ and to meet his cousin, we have to go to another part of the world.’ And immediately, the audience prepares in the subconscious for the next sequence. And here comes the importance of timing your words with duration.
How many words do you have to write for a certain duration?
There is a rule, a rule of proportion for how many words are to be spoken in each second.
Roughly, the ratio of the number of words to the time in seconds is 2.5. That means, for a 60-second video, you can write a 150-word script on the higher side. But you have to be a little flexible. It actually depends upon the pace of the voice artist. This estimate holds for form someone who narrates at a normal pace. if they speak a little slower or faster, you may have to tweak the length of the final draft accordingly.
It’s better not to force a voice artist to change his normal pace or he might be out of his rhythm.
Personally, I find it useful to write down the timing of each section or sequence and then reduce 5-8% of words. That gives me flexibility in the edit table. It’s good to use pauses and fillers within narratives. Continuous babbling removes the unpredictability of a video turning it into a not-so-pleasant thing to watch.
This calculation will help you create scene-wise compositions for making your explainer video with After Effects. You could easily calculate the duration for compositions by deducting the word count.
How to approach scriptwriting for an explainer video?
This is important if you write your script and create/ edit the video on your own. I do it mostly myself. So I would love to share my experience with two different approaches.
- Finalize the script first then Edit: This happens mostly when two different persons or a team of professionals are involved in producing a video. After the creative brief is prepared, they thoroughly draft the commentary script, send it to the client, get it approved with or without any change, and then send it to the storyboard artist, who is supposed to prepare the mock-ups or illustrations. But, that’s something typically seen in big-budget productions with large creative agencies. I have a somewhat different take on this.
- Prepare a tentative script – Create the video – Finalize the script: To me, script writing and video editing are evolutionary processes that best develop over time. It’s a perfect proposition in the case of producing a documentary, for sure. You can never write down a script and go for a shoot when it comes to producing a documentary. But even in the case of a short explainer video, if you first prepare an approximate draft, go for the edit or animation with that draft, and then tweak the commentary as and when necessary, I think that certainly yields a much better outcome. Most people have a tendency to write down a script first and that’s not unnatural either. Because we learn the text as kids. A sense of visualization comes much later.
Either way, you may attain your goal with proper coordination. Writing a commentary script with a sound structure is necessary as it helps create scene divisions while making an explainer video using After Effects.
Video script writing is itself a specialized area that calls for professional and aesthetic skills. There is always a great demand for professional video script writers. Non-fiction video scripts are in many ways commentary notes and differ widely from fiction. If you’re interested in different crafts and guile of writing scripts for non-fiction videos, here is an article you can go through.
What are scene divisions and how to create mock-ups?
Roughly speaking, the scenes are the sequences of a video.
During making an explainer video with After Effects, we usually create a composition for each scene or sequence. There could be many different nested compositions inside a master composition for a sequence.
After you write down your final or tentative script, you need to prepare the mock-ups. You have already created the scene division in the script, where you wrote the central sentence first for each section and then proliferated that sentence to fill up the sequence.
In creating mock-ups, you need to assemble probable graphic elements for each scene or sequence that best represents your message or commentary. At this stage, you don’t animate things or elements. You just put different graphic elements in order, which means scene by scene. Here is a set of sample mock-ups. Usually, these are vector illustrations freely available on the internet.
10 websites with freely downloadable vector graphics and elements
There are plenty of available resources online. Mostly, these are in Adobe Illustrator (.AI) or EPS file formats. Since both programs belong to Adobe, they have a close relationship. In plain terms, you can easily use these vector files in Illustrator format for making your explainer video with After Effects.
Here is a list of ten websites for vector elements and other resources that you can use for free. Just check, some resources need you to acknowledge or put attributes somewhere, while some are totally copyright free.
- freepik.com
- All-free-download.com
- vecteezy
- unDraw
- VectorStock
- Vector4Free
- flaticon
- vector4free
- Vectorstock
- Pimpmydrawing.com
The resources on these websites are more than enough for the standard vector graphics and elements required for animations unless you are looking for highly customized illustrations.
But, there is a little work to be done after you have downloaded the files, mostly in .ai or .eps format within Adobe Illustrator, before importing the layered Illustrator elements in After Effects.
How to prepare vector elements in Illustrator for the animation of the explainer video in After Effects?
Let’s consider an example. Here is an illustrator file that we have downloaded from freepik.


This grouping with numbers is done inside Illustrator for convenience with an eye on the animation that you’ll do inside after effects later.
Method I – Using manual segregation
After the grouping and numbering, just copy that group of elements and paste them into a separate Illustrator file and rename it accordingly while saving.
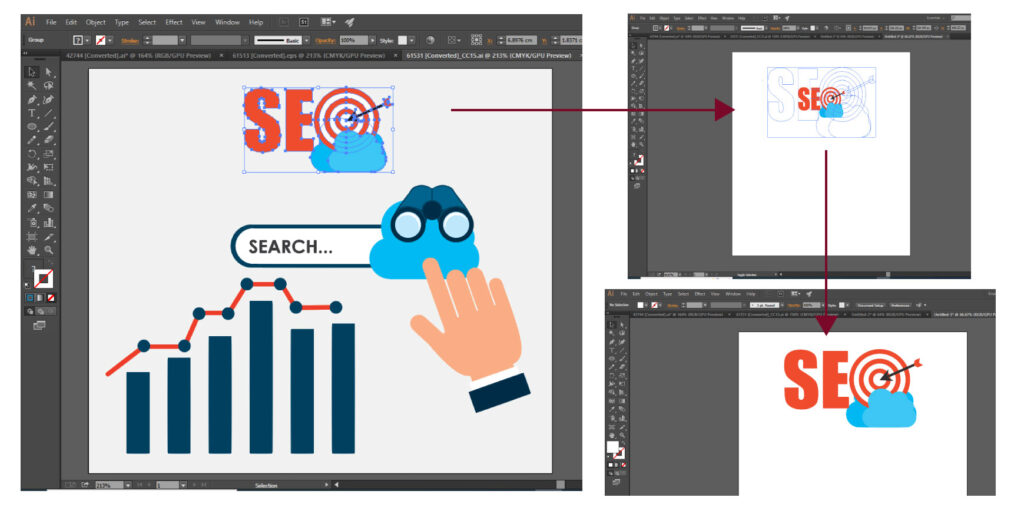
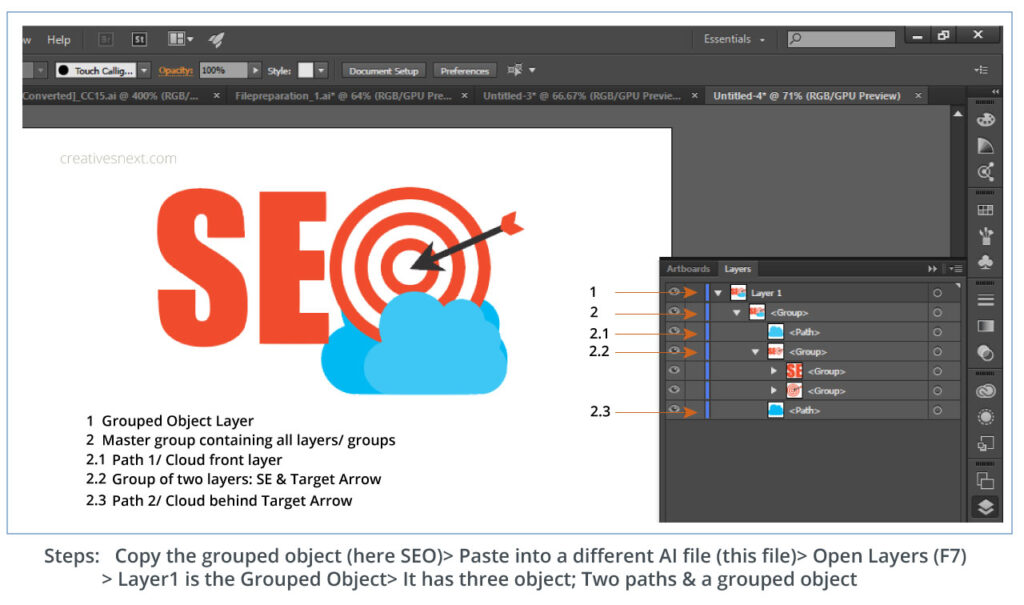
When you copy a grouped object, here the ‘SEO’ with target arrow and cloud, into a separate Illustrator file, it brings all the layers, grouped or not into that file holding its composite. Here, the idea is to separate all the layers and take those layers outside the hierarchical structure. This way, the layers are kept in a similar root hierarchy. It’s essential to be methodical for the future course of action while crafting your explainer video in After Effects.
Basically, this is done to change the layer properties of the AI files. Inside AI files, the vector elements remain under a single hierarchy (Look at the second image under Method 1, viz. Layer 1). That means the vector elements are not at the root hierarchy.
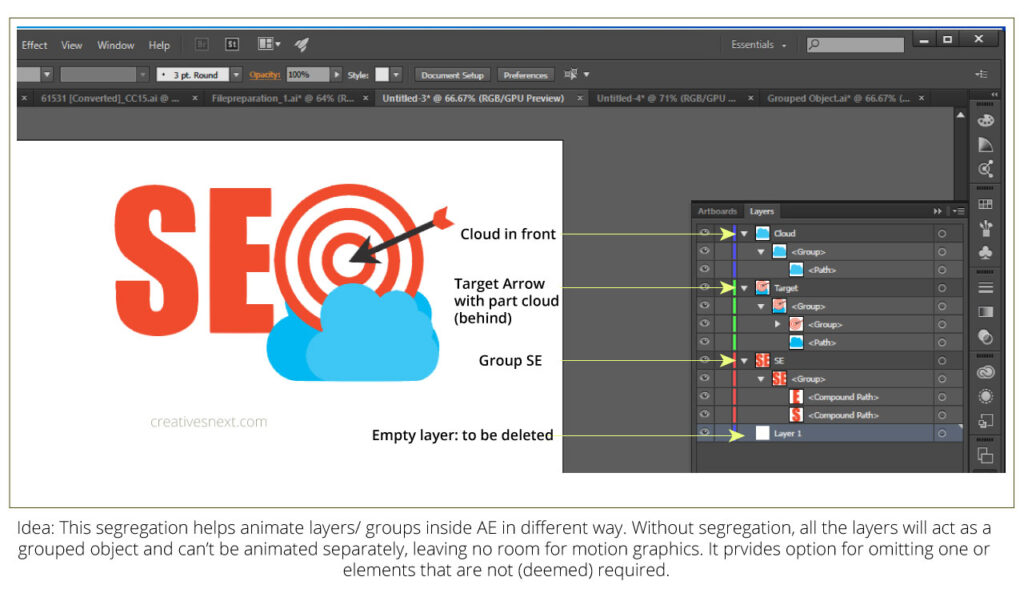
Here, the idea is to take all the layers/ groups outside the old hierarchy and put them into the root hierarchy. This will enable them to animate differently inside After Effects later. But, this method is somewhat clumsy as you have to do it manually throughout. It’s not elegant either.
There is another way with a certain tool inside Illustrator that gives us more flexibility in performing the same task.
Method II – Using Release to Layer (Sequence) in Illustrator
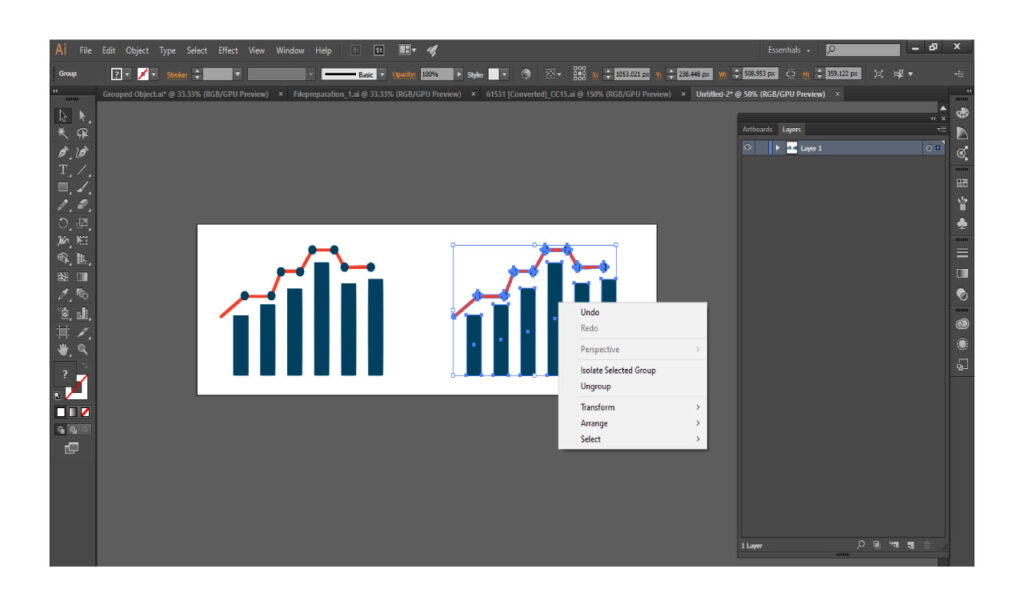
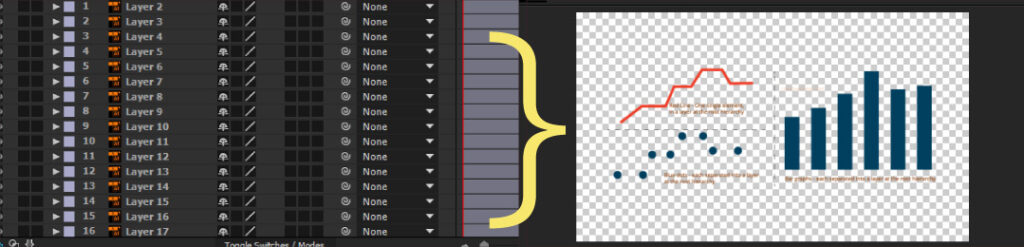
Let’s consider the above case, we have pasted this group of objects containing a bar graph (in fact, quite a few columns) with a dotted line riding over it.
Ideally, there would be three animations. Bars will be animated one by one, followed by the red line riding over it, and then the blue dots along with the line, but with a different type of animation.
Look at the image and you’ll see there are grouped objects. So we, first have to ungroup the collection of objects to the extent where right-clicking on any portion will not show up with the ‘ungroup’ option.
It’s important that you ungroup the collection of graphic elements in a certain way. Better, if you have a plan in advance, which is always a good idea, before working on the Illustrator files.
It will help you animate various graphic elements of the explainer video on After Effects, later.
In this case, we have segregated the graphics elements into three sections.
The First is the bar graphs. And the second is the red line riding over the bar graphs and the third is the blue dots. We roughly have an idea of animating these elements like the bar graphs kind of propagating or scaling up from zero with the red line riding over it, while the blue dots kind of blink or appear at different points.
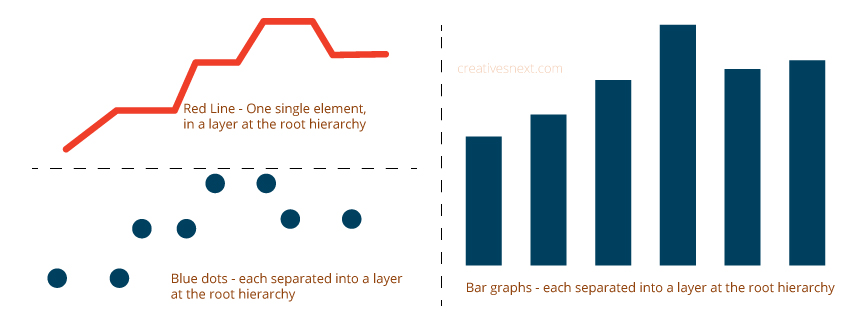
The sole purpose of the separation of each of the grouped elements into single layers is to be able to animate each layer separately. Without such segregation, any operation of animation would affect the whole group instead of the single layers.
While making an explainer video with After Effects, the objective is to break down your vector files according to the story into certain sections or scenes (called composition) and take them on to After Effects.
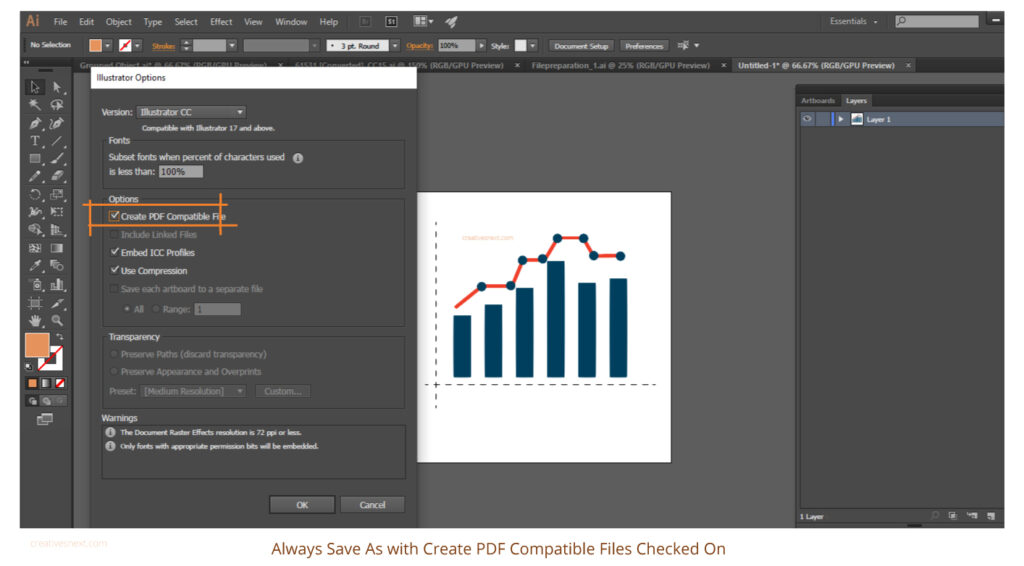
One last thing to mention inside, Illustrator is always Save As the Illustrator file with Create PDF Compatible File checked on as shown in the image below. You can access the Save As function from the File menu in the toolbar.
With the work done in Illustrator, let’s now head over to After Effects.
How do you animate the graphic elements of your explainer video within After Effects?
Now, that the work of Illustrator is over, you have to work on After Effects for the animation of your explainer video.
But, before you start animating within After Effects, it’s important to know how you bring your graphic stuff of Illustrator files into After Effects in a specific way so that you can make the best of those layers for animation.
How do you bring the Illustrator files/ layers into After Effects?
Let’s go step by step from composition creating through import and animation thereafter.
Step 1: Create a Composition in After Effects for the explainer video
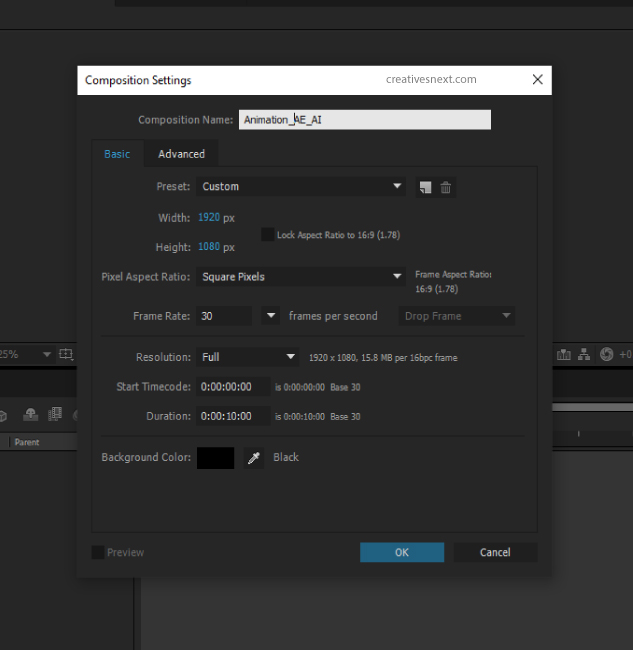
- Create a Composition inside After Effects; Short cut Ctrl+N or access Create New Comp from File Menu.
- Write a suitable title for the composition. It’s important or you’ll get lost when there will be many in numbers.
- Set the width and height as per your need, we have set it to 1920X1080
- ‘Square pixel’ is selected by default. If not, fix it.
- We have set the frame rate for most of the explainer video needs, at 30 FPS.
- In this case, we have set the duration at 10 sec. When you create composition scene by scene, it’s imperative that you set the duration as how long the scene will likely last. An 8-10 sec duration for a scene is a standard template.
Step 2: Import the Illustrator files for the explainer video into After Effects
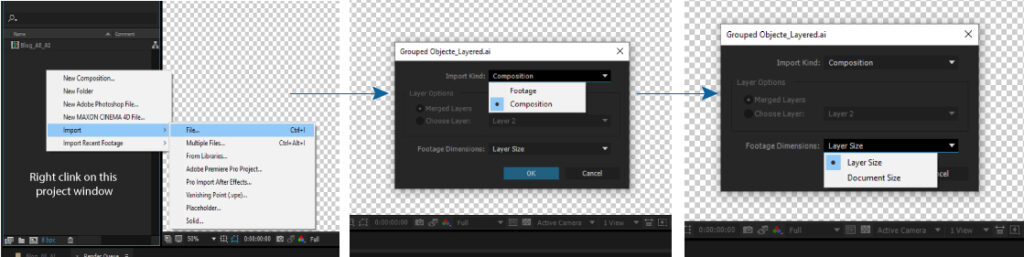
- Right-click on the project panel (left image)> Select File or Press Ctrl+I on the project panel
- Select the AI file (browse)> Select Composition instead of Footage (by default, Footage shows up) in the import option. This is important as you want to bring all the separate layers into After Effects. Bringing as Footage turns them into a group leaving no room for animating separately.
- Select Layer Size in the Footage Dimensions. This is important too as you want the layers to retain their original size. Selecting Document Size here will turn every layer equal to the document or composition size, an unwelcome scenario. Vector layers do not lose resolution when scaled up inside After Effects (if needed of course).
With all done in terms of file preparation in AI and importing that file into After Effects, you’re now set to start the animation.
How do you animate the imported graphic elements of your explainer video within After Effects using Animation Composer?
There are endless ways. But we shall concentrate on a couple of simple ways. First, we shall use Animation Composer. It has free as well as paid versions. Even the free version has plenty of features that you can use to create a pretty decent explainer video.
And second, we shall touch on a few expressions that would come in handy for some quick ready-to-go animations. The expressions in After Effects are quite a formidable topic to delve into. We shall deal with these mighty expressions in separate posts later. But for now, we will see a handful of those for our purpose of making an explainer video.
A quick tour of the Animation Composer Interface meant for the animation of explainer video inside After Effects
Let’s have a quick rundown of the animation composer interface before we actually start animating our imported graphic elements. After you have successfully installed the plugin, go to the windows menu and click on the animation composer.
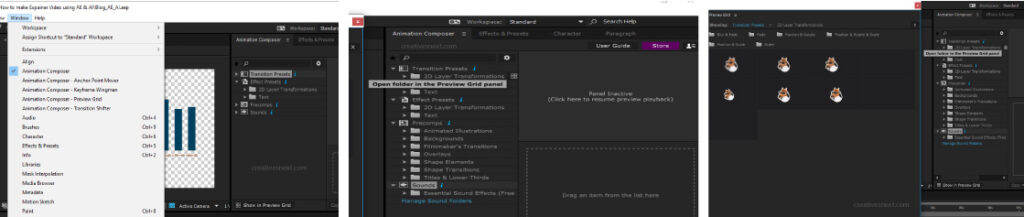
- Access the Animation Composer panel from the Windows menu. Doc the panel somewhere in your workspace.
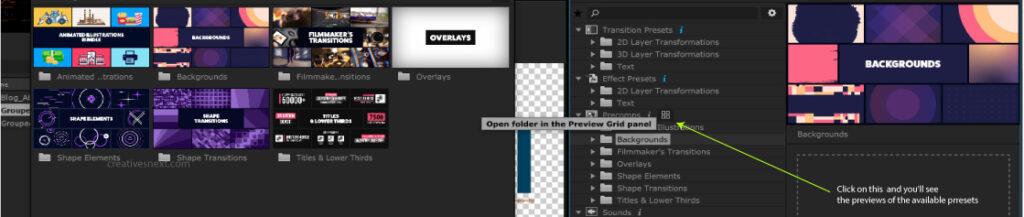
- Animation Composer has Transition Presets, Effects presets, Pre-comps, and Sounds. The free version has quite a number of each. If you feel you should get a paid version to avail all of its features, go for it. It’s certainly worth the spend.
- Clicking on the preview reveals the animation icons in gif format so that you get quickly get to see all the animation presets and choose accordingly.
- Two free tools you would like to use at this stage. One is the Anchor Point mover and the other is the Keyframe Wingman
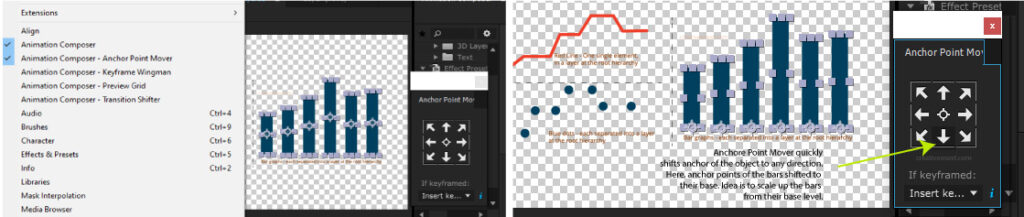
In this case, we have shifted the anchor points of all the bars to their base level. Here the idea is to scale up the bars from their base level, which we’ll do shortly.
- Keyframe Wingman is a free tool that affects the keyframes. if you’re already familiar with easy ease (shortcut F9) then you may consider this Key frame animation instead. Why? Because in the case of easy easing, you have to select the keyframes, apply ‘easy in’ or ‘easy out’, and then have to go to the speed graph to tweak the curve. But by using the Keyframe Wingman of Animation Composer, you can achieve this much faster. Just select the keyframes and drag the handles of the wingman panel, with either or both the keyframes selected.
How do you animate the imported bar graphs with Animation Composer?
Three types of animation we’ll perform here, with our ‘Bar graph’ elements.
- Bar graphs: Scaling up from their base point with the anchor points shifted to the base level already.
- Red line: Animating from a starting point to an endpoint, riding over the bar graphs.
- Blue dots: Appearing over the different points of the red lines to depict the change in the movement/ direction.
Here, we have selected all the bar graph layers and then applied a 2D layer Transformation under the Transition presets of Animation Composer. Shifting the markers, we have adjusted the animation at the in point. We have applied the Scale animation preset under Anchore Point Proportionately onto the layers.
With the bar graph animation done, it’s time to animate the red line. We’ll do it a bit differently, not with Animation Composer. We shall use an After Effects function rather.
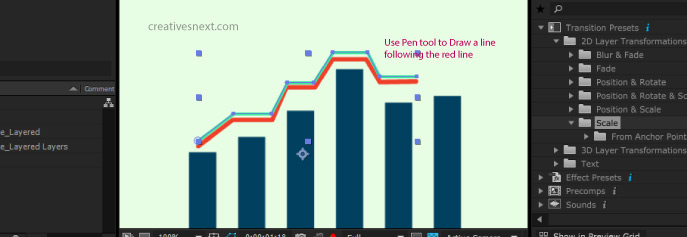
- Instead of using the red line of the Illustrator file directly for animation, draw a line following its path using the pen tool. It’s needed as Creating a Shape layer from Vector for Fill won’t yield a line required for ‘Trim Path’.
- Twirl down the shape layer properties of the line that you just drew and created with the help of the old AI element.
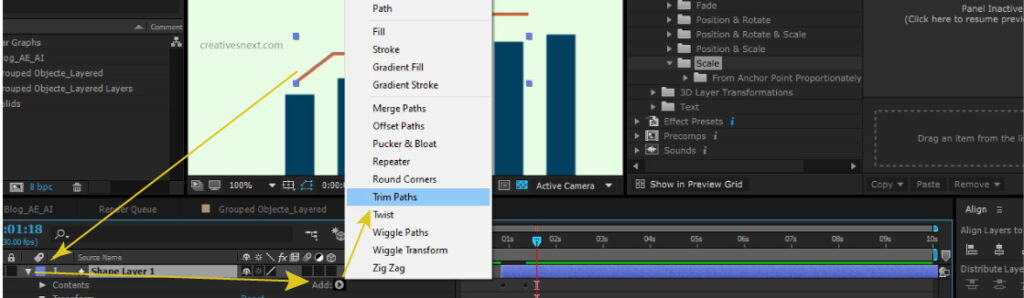
Here the idea is to animate the line as a progressing one with the Trim Path function. See we’re not using the Animation Composer, since it doesn’t have a feature that exactly conforms to this basic animation technique. That’s why we are using one of After Effects’ basic functionalities pertinent to the shape layers.
Great! So, you’re at the last lap of the animation. The only thing left is the blue dots. And that’s no big deal, at all. All you have to do is bring each of the dots to the joint of the red line i.e. the curvature (it’s linear actually) and shift in a way that they appear after the progression of the line and in unison.
Here is the idea. Have a look at the GIF.
So, you get the idea. This is the easiest of all. A little dancing back and forth is all you needed to arrive at the final animation of all the dots, in sync.
You have got plenty of vectors to start practicing. You have the list of sites in this article (above), where you can download free stuff for starting your animation.
To me, it’s always a welcome challenge to figure out different styles for animation using this tool while making an explainer video with After Effects. Because every video is different and so is every explainer video. Start using After Effects for your explainer video right from today, if you want to make compelling content.
Summary
You need to download some stuff viz. vectors, icons that suit your business, and content promotion.
Separate the layers in Illustrator. Releasing layers into sequence with proper layer stack order may seem difficult if you’re a beginner. Just ungroup and copy the vector element or group of elements (ungrouped) to a new Illustrator file and rename. Managing all the layers of a single vector (or group of elements) in a fresh file is certainly easier.
Import the AI files into After Effects as Composition with layer size selected or retained.
Animate the layers using Animation Composer. Don’t use Animation Composer if not needed.

Let’s now discuss a few basic After Effects expressions that may come in handy while animating vector elements. Doubtless, Animation Composer or the like are useful. But there is always good to have other ways around it.
A few useful Expressions for making your explainer video with After Effects
Wiggle in one direction
Wiggle in X-direction only:
Refer to the box on the right.
var w = wiggle(5, 75); // x and y
var result = [ w[0], value[1] ]; // set x from the wiggle result, and y from the original value
result; // apply
Here, we declare a variable w and assign a function wiggle to it with a frequency of 5 and amplitude of 75 for x and y. For wiggling in the x-direction only, the function calls the wiggle result for x and the original value for y.
Wiggle in Y-direction only:
Refer to the box on the left.
var w = wiggle(5, 75); // x and y
var result = [ value[0], w[1] ];
// set x from the wiggle result, and y from the original value
result; // apply
In this case, the function calls the original value for x and the wiggle result for y, to only make the wiggle perform in the y direction.
Rotation of wheel using time expression

Time expression in After Effects returns a composition’s current time in seconds. And this generated value can be connected to a layer’s property value to drive movement. In this case, you’ll see how to connect rotation property with time to drive the motion of a system of wheels.
Easy stuff this is. Just create a wheel or import vector graphics in an Illustrator file. In this scene, I have used the time expression in two ways, one for a clockwise rotation and the other for an anticlockwise rotation.
- For the left wheel, click on the stopwatch on rotation and write time*50
- For the wheels on the right, time* -100 and time*-120
Relatively simple an expression, this often comes in handy for the rotation of a wheel or gear system.
Index
Using an index within an expression is very useful for controlling the motion of a series of layers that are somewhat similar in their properties. And this is particularly efficient if you want to offset their motion.
Let’s consider an example. Suppose you have created a box and want a number of similar boxes to scale up or rotate in a similar fashion with a slightly different offset.
The idea is to create a box, and add some expressions to its property, say scale or rotate. You have to use an index within the expression. the index is nothing but a layer number. It tells the layer, via expression wherein it’s used, to act in a certain manner.
Let’s see an instance. Here, we have used the index on the rotation property of a layer.
- Create a box-shaped layer, open the rotation stopwatch, and alt-click.
- Write this: thisLayer.index * 36, But this won’t create the rotation. For that, you have to use the time expression that you just saw.
- (thisLayer.index * 36)*time*2
- Shift the boxes sideways in the array shown above. Bring the playhead in the beginning and play
What happens here is, that the first layer that has expression in its rotation property carries the function onto every layer that was created duplicating the first one. Layer one has a rotation value of 1*36, layer 2, 2*36, and so on. Time*2 brings the rotational movement over time, else all the layers would be stationary.
valueAtTime
This is another useful expression affecting the function of a series of similar layers with offset.
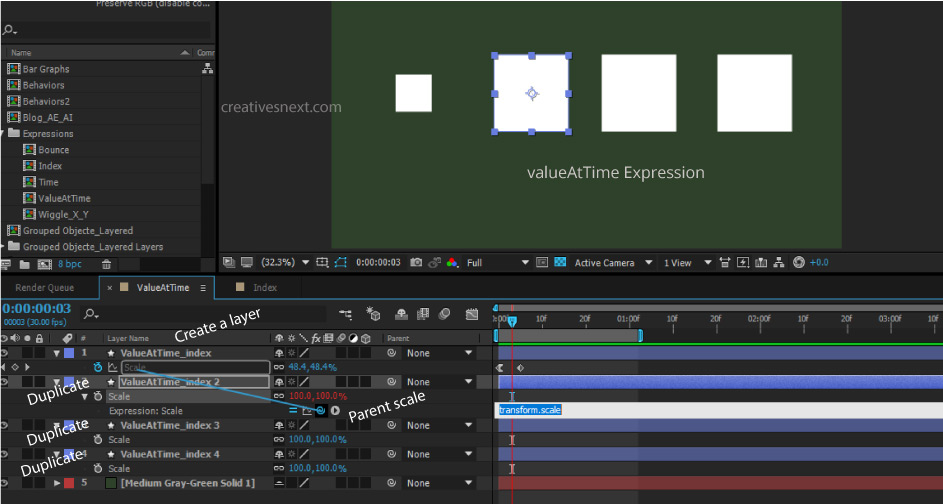
Here, we have created a layer, with scale keyframes from 0 to 100 over 5 frames. The first keyframe is easily eased out (Ctrl+shift+F9).
Then paste this code to the expression window of rotation property for layer 2 that you just parented as shown in the above image.
thisComp.layer(index-1).transform.scale.valueAtTime(time-0.15)
What it does is, it tells itself to adopt the scale function from layer 1 (index-1 means 2-1=1, this child layer number is 2) with a time offset by -0.15. That means it will scale up following its immediate above layer with a time lag of 0.15 factor.
And, now if you copy this expression, which we’ll do shortly, you’ll see every layer will adopt the function of the layer immediately above the layer. That’s what index and valueAtTime expressions do when applied in combination.

Index and valueAtTime can be efficiently used to create sequential motion. This will help your explainer video look much more professional.
Bounce
Scale and Rotation
This is a bit tricky. But you don’t need to understand this to be able to use it. Just follow the steps and imitate.

Now just follow the steps below.
- Create a background and box
- Use scale and rotation properties to create keyframes, let’s say 5 frames apart. Scale from 0 to 100% while rotation from 0 to 90 degrees ( same 5 frames apart)
- Easy ease out the first keyframe of under the scale and rotation properties. This is important before you apply the bounce expression on this very first frame.

- Now, Alt+click on the stopwatch on the scale property and paste the following expression
n = 0;
if (numKeys > 0){
n = nearestKey(time).index;
if (key(n).time > time){
n--;
}
}
if (n == 0){
t = 0;
}else{
t = time - key(n).time;
}

if (n > 0 && t < 1){
v = velocityAtTime(key(n).time - thisComp.frameDuration/10);
amp = .05;
freq = 4.0;
decay = 8.0;
value + v*amp*Math.sin(freq*t*2*Math.PI)/Math.exp(decay*t);
}else{
value;
}
Here, play around, if you want, with decay, frequency, or amplitude to figure out the variations with the changes in the parameters. Do the same thing for rotation too to create somewhat similar to the animation shown above.
Drop
This time you’ll apply the expression on the position parameter. But that expression will be different from the one you have just seen above.

- Create two position keyframes, 5 frames apart (in this example), and ‘Easy ease out’ the first one. Alt+Click the stopwatch and then paste the following expression.
e = 0.6; //elasticity
g = 5000; //gravity
nMax = 5; //number of bounces allowed

n = 0;
if (numKeys > 0){
 n = nearestKey(time).index;
 if (key(n).time > time) n--;
}
if (n > 0){
 t = time - key(n).time;
 v = -velocityAtTime(key(n).time - .001)*e;
 vl = length(v);
 if (value instanceof Array){
   vu = (vl > 0) ? normalize(v) : [0,0,0];
}else{
   vu = (v < 0) ? -1 : 1;
 }
 tCur = 0;
 segDur = 2*vl/g;
 tNext = segDur;
 nb = 1; // number of bounces
 while (tNext < t && nb <= nMax){
   vl *= e;
   segDur *= e;
   tCur = tNext;
   tNext += segDur;
   nb++
 }
 if(nb <= nMax){
   delta = t - tCur;
   value +  vu*delta*(vl - g*delta/2);
 }else{
   value
 }
}else
 value
Look at the first three lines of the code. There are three quantities, elasticity, gravity, and the number of bounces. Tweak these three parameters to see the changes.
Making an explainer video with After Effects becomes a game if you master some of the expressions like these.
There are tons of expressions for After Effects which we’ll cover in additional posts. Just in case you’re interested to delve deeper into Random expressions, go and check out my post in the Series of Useful After Effects Expressions – Random Patterns & Breakdowns.
There are immense possibilities. I have shown a few patterns that may help you explore many other patterns often used in documentaries on Astronomy. And all the Astronomical scene setups are CG created.
Conclusion
Creating an explainer video could be fun if you can figure out different patterns of its craftsmanship. More often than not, people avoid fearing an apparently imposing production process.
But, if you know your target audience and plan in advance accordingly, a little learning and hands-on effort could reduce the daunting work to a challenge that you would love to take up.
It’s not as difficult as it seems to be.
Why did I write a long post instead of making a simple 30 mins video on the camera and throwing it on YouTube?
Because it helps work out different segments of video production and analyze them in a blog that’s not exactly possible on a video. Besides, a write-up is much more engaging not even for a reader but also for a writer.
There are certain areas where we can’t help without video like screen grabbing.
But the idea of this post is to create a familiarity with video production techniques for an explainer video using simple vector animation and available resources.
Acknowledgment: Dan Ebbert’s motioncript.com and freepik for the header image and other graphics, stills.
It takes a good time to write such a piece of content. Please share the article on social media if you find this helpful.