
Useful After Effects Expressions – Random [Patterns & Breakdowns ]
Last updated 4 March 2024, Published on 17 May 2023
Introduction
After Effects expressions are extremely useful for animations with patterns. Expressions are, in fact, a small piece of Javascript code that the users add to different properties of the layers.
This reduces the burden of tedious keyframing of the respective layer properties.
What an expression does is controls the functions of the layer properties over time if various ways yielding values. So It becomes essential where there is a regular change of shapes, colors,s or any layer object or properties periodically. Thus it makes it imperative for After Effects users they get used to expressions.
You already have exposure to a few expressions in an earlier post on this site, where I discussed how to make an explainer video using After Effects.
In this article, I will discuss some common patterns and their breakdowns. The idea is to present a guide for useful After Effects expressions, for the users, to replicate those patterns. It’s not essential for you to be a coder. You can just follow and replicate.
An acknowledgment is certainly due here. Over the years, I have got inspiration from different online resources for getting to the core of Adobe After Effects and its functionalities. Apart from YouTube and Adobe, help guide, Video Copilot, and Dan Ebbert’s Motion Script are the two we’re all indebted to.
What I would do here is I would create a scripting guide that I kind of rearranged and used for creating motion graphic patterns. There are, however, certain expressions that I won’t repeat here. These are Wiggle (in both directions), Rotation of the Wheel using Time expression, Index, valueAtTime, and Bounce & Drop.
I have explained these expressions with GIF animations in detail. Go through those sections if you’re interested.
Assumptions
I assumed you’re familiar with After Effects and its basic functionalities including property linking. One of the basic premises behind using expressions is mapping one function of a layer with the change of another.
With this foundation, it would be easier to grasp different expressions. After all, the objective of using expressions is to control different parameters (Properties in After Effects’ parlance) conveniently.
What is Property Linking in After Effects?
Just in case, you want a brush up on property linking, here is what it is. When you use the pick whip to attach one layer property then
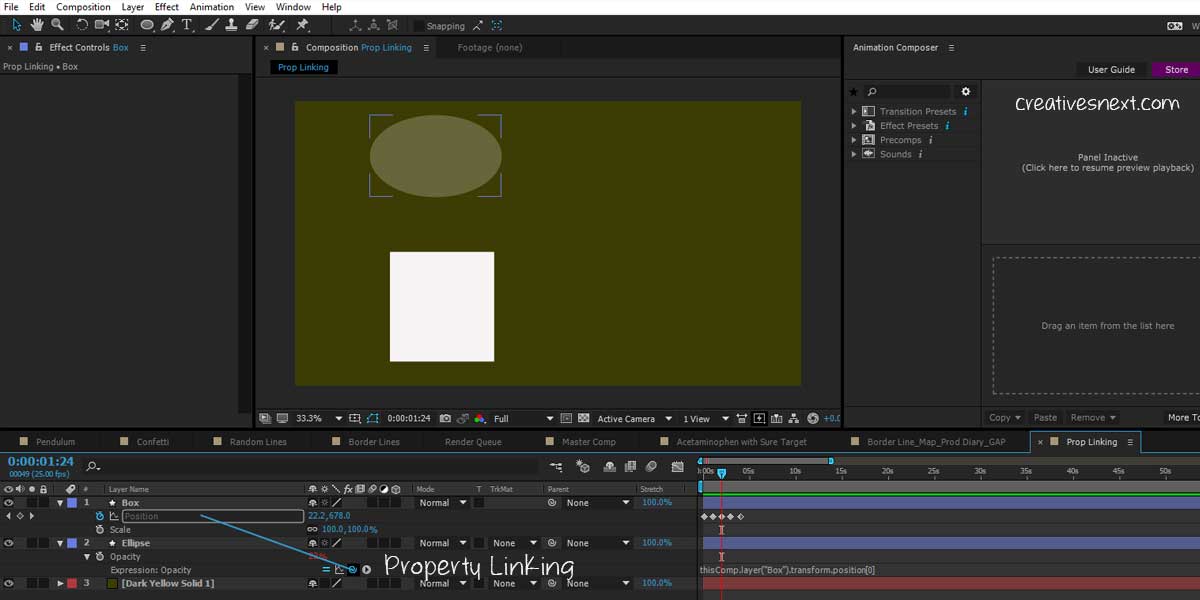
you’re actually linking one property with another. Here the layer, you’re taking the pick whip from, becomes the child whereas the layer, you’re taking the pick whip to, becomes the parent.
Therefore, the functions of the Child layer’s property becomes dependent on the functions of the parent layer’s property. In this instance, I have linked the Opacity property of the Ellipse (Layer 2) to the Position property of the Box (Layer 1).
The idea is to affect the opacity of the Ellipse layer with the change in the position of the Box. I am not going to elaborate on how that’s done using an expression. Because property linking is a point of interest here. You may have done property linking many times before without actually knowing that it’s THE property linking.
Let’s move on to the section to see what you’ll get at the end of this article.
Contents
- Expression – Random
- Random Motion – More Instances with Codes
- Random Motion of a Box within a Certain Canvas Area – Animate seedRandom
- Smooth Random Motion
- Random Motion – Smooth & Synchronized
- Random Motion – Smooth & Chaotic
- Random Rotation with a While loop
- Random Motion with Random Duration
- Random Animation along X-axis
- Random Animation of twp Properties – Position along X-axis and Rotation
- Random Change of Position along X-axis, Rotation & Scale
- Random Expression for Opacity along with Position, Scale & Rotation
- Randomizing Hues or Colors
Expression – Border Lines
Let me start with one that I used before in one of my blogs. I got this from Dan Ebbert’s motion script. Let me just quickly decipher
this quickly for you. We’ll concentrate on the beginning of this video where border lines opened up giving in large space for an animation. It looks simple, yet elegant to me. I created one master comp with four borderlines as follows. Copy and paste the code and
//left vertical line
m = thisComp.layer("master");
[m.position[0] - (m.width/2)*(m.scale[0]/100),height/2]

// right vertical line
m = thisComp.layer("master");
[m.position[0] + (m.width/2)*(m.scale[0]/100),height/2]

// upper horizontal line
m = thisComp.layer("master");
[width/2,m.position[1] - (m.height/2)*(m.scale[1]/100)]

// lower horizontal line
m = thisComp.layer("master");
[width/2,m.position[1] + (m.height/2)*(m.scale[1]/100)]
create a scene like this. You may put a number of nested compositions within the master composition. Here is a screenshot for you.
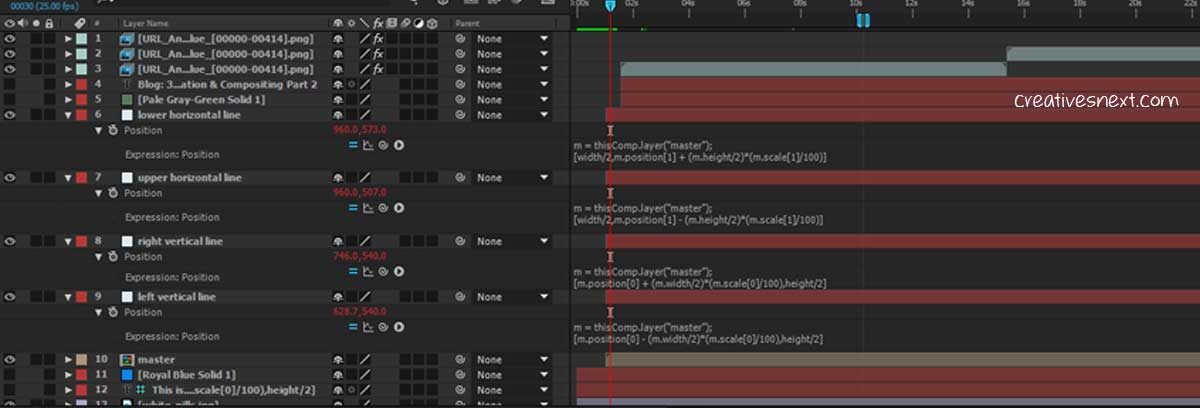
What this expression does is makes the positions of four lines on the edge of the rectangle change with the rectangle itself scaling up. Thus the position property acts as the function of the scale property. Here the rectangle is named master and the lines are named as shown in the screenshot.
A pretty intuitive and useful After Effects expression, right?
Expression – Dotted line Animation with Time Expression
We are familiar with the Time expression, aren’t we? Many a time, you saw Time*number on the rotation property, especially to rotate the cog wheel. This time let’s a different application. Watch out for the video and let’s see a snapshot below.
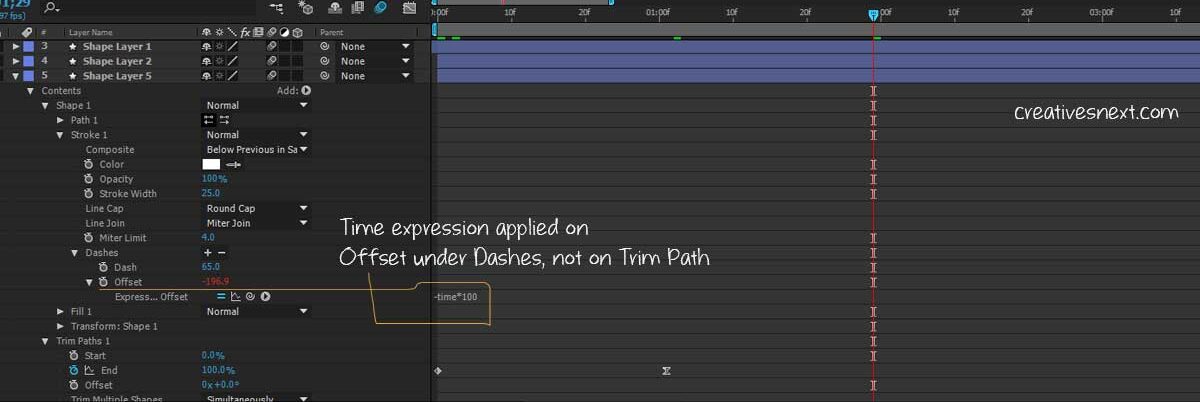
I have added two keyframes at the End within Trim Paths. Make sure you add the Time expression on Offset under the Dashes, and not on the Offset under the Trim Paths.
We can also write the syntax like Time*5+value with a specific value added to a layer property. Let’s see some other variations.
Math.round() & to.Fixed() along with Time expression
// Timer with the Time expression Alt+ Click on SourText layer, this will create decimal numbers too
time

// To create whole number or round off write the following syntax
Math.round(time)

// To create as many digits after the decimal as you want
time.toFixed(value)

// time.toFixed(4) will create 4 integers after the decimal
So it’s clear that you have to use Math.round() to round off an integer and have to use toFixed() to instruct how many places of integers you want after the decimal.
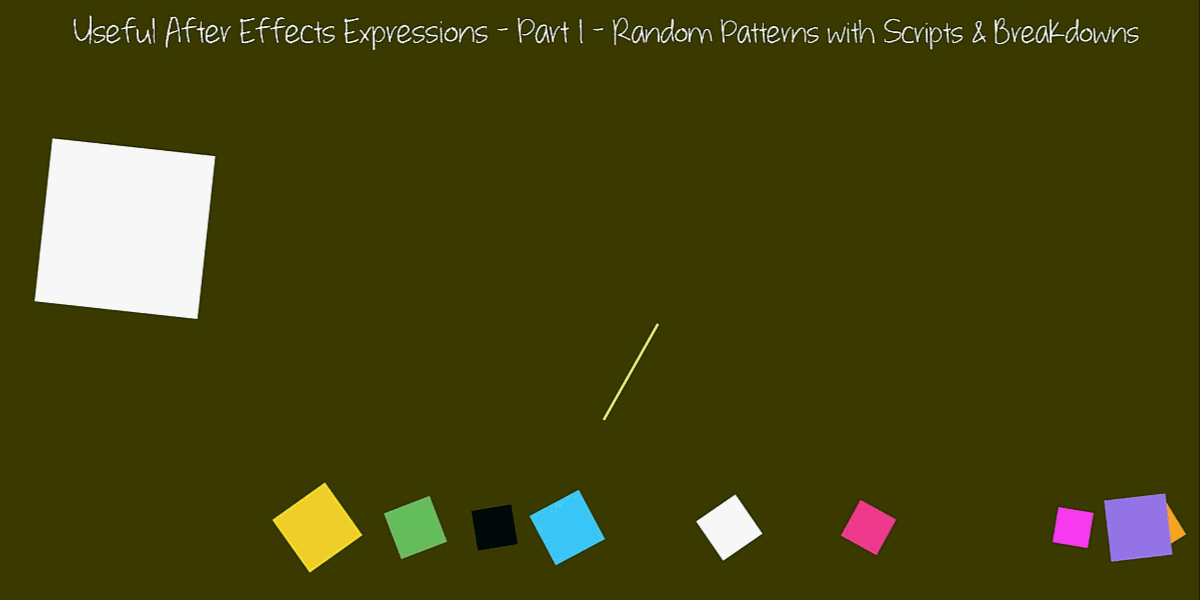
Expression – Random
//most basic Random expression
random()
// random(20) and random(0,20) are same, means that the layer will animate between 0 and 20 randomely
Let’s now see the screenshot below. ‘Random values’ is certainly one of the useful After Effects expressions that you must know. What it
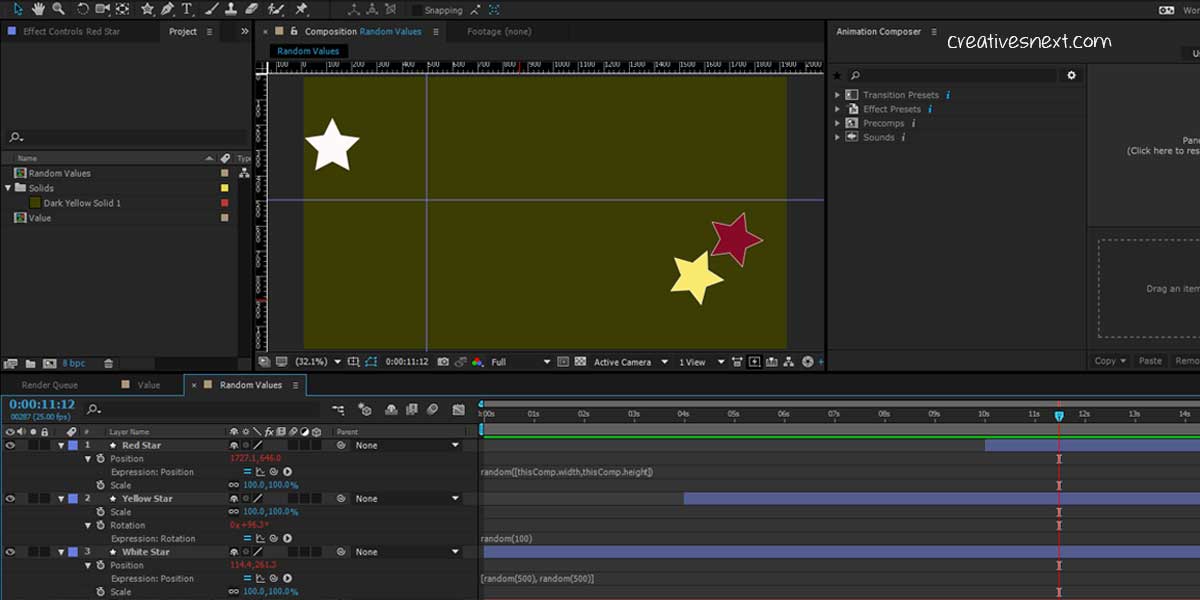
does is randomizes a property’s value over a specified range. Let’s analyze the above syntax in the above screenshot.
// White Star - for randomising its position parameters X & Y within 500 pixels wide and high.
//Make sure adding the value for Z when the layer is 3D
[random(500),random(500)]

//Yellow Star - for randomising it rotation property up to 100 degrees
random(100)

// Red Star - for randomising it position across the width and height of the composition
random([thisComp.width,thisComp.height])
Let’s now see how the layers animate with the above expressions applied. As I have said in the comment line of the code, three
different layers function differently with the expressions applied. You can also use a range of values through which you want the layer to animate. That means you’re then binding an area in which the layer (Box or any shape) will move. Let’s see the syntax in that case.
// Random Expression to specify a range
[random (200,500),random(100,500)]
In this case, the box will move 200 to 500 pixels across its width, or X, and 100 to 500 pixels along its height, or Y. For a 3D layer, there will be three fields for the Random argument while for rotation or opacity, there will be only one.
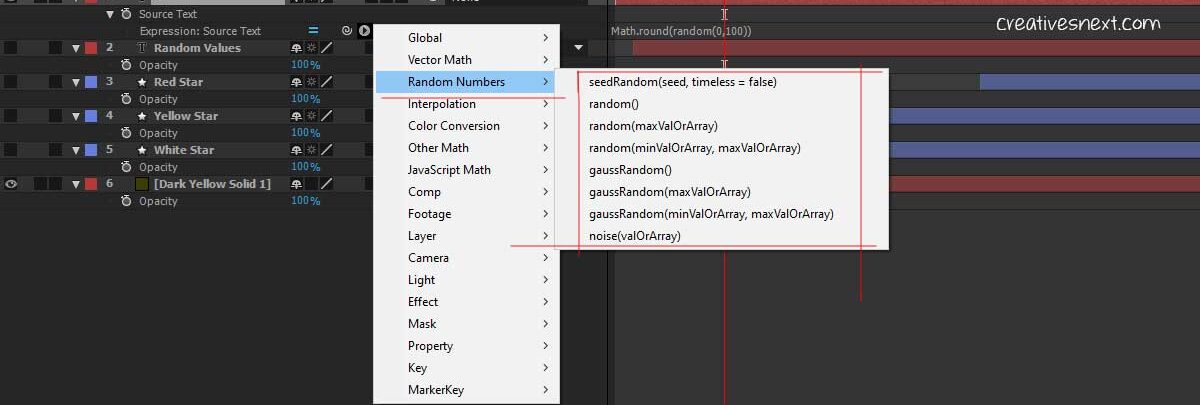
Random Numbers
Very popular among the useful After Effects expressions. Just type a number and Alt+ Click on the Source Text to insert random().
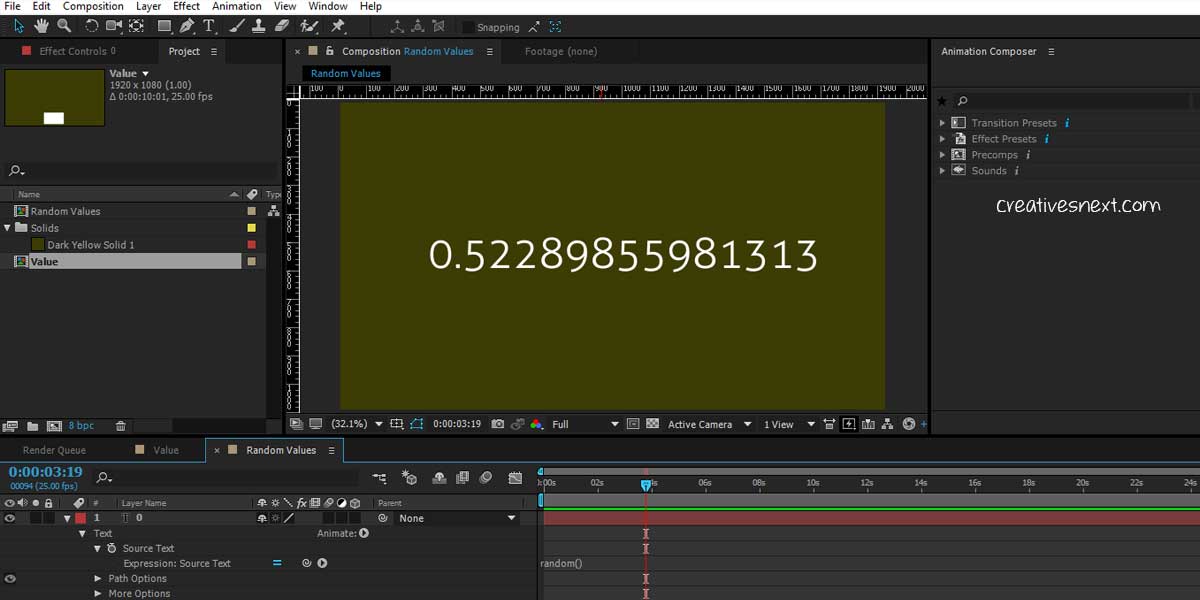
You get the idea. But here is a catch. Who cares for these decimals up to 14 places? We want whole numbers. So we have to round off this and specify a range. The syntax will be as follows.
Math.round() & toFixed() with Random Expression
// Round off Random numbers
Math.round(random(0,100))
// To display decimal integers [See the screenshot below]
random(0,100).toFixed(3)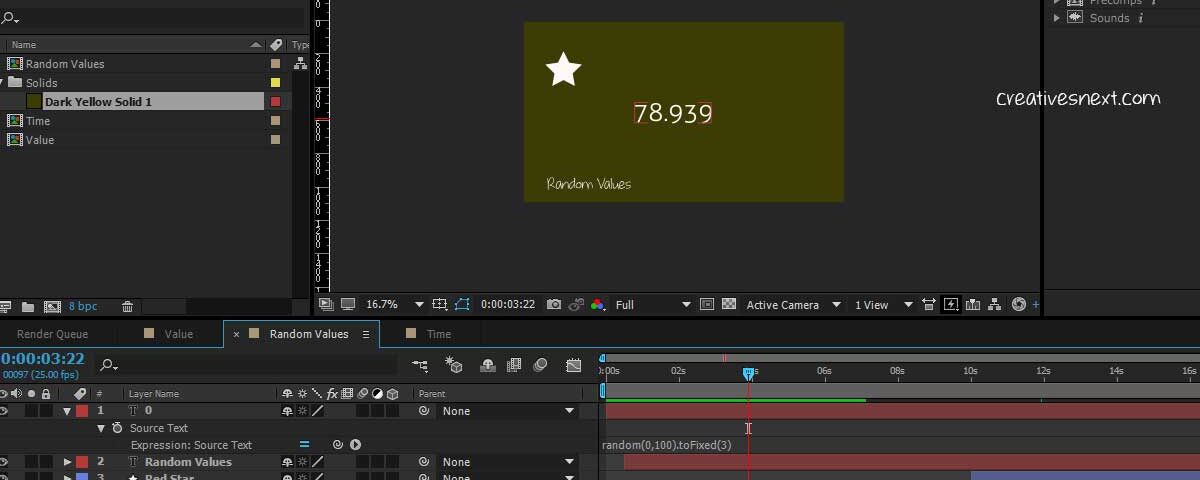
gaussRandom()
Gauss Random has the following syntaxes. It’s almost the same as Random, except it has a different type of distribution which we’ll see shortly.
gaussRandom()
gaussRandom(maxValorArray)
gaussRandom(minValOrArray, maxValOrArray)
By using gaussRandom, you ensure 90% of the distribution between the minimum and maximum values while the rest falls outside. This gives a more realistic look. Many organic movements, thus, see the use of gaussRandom.
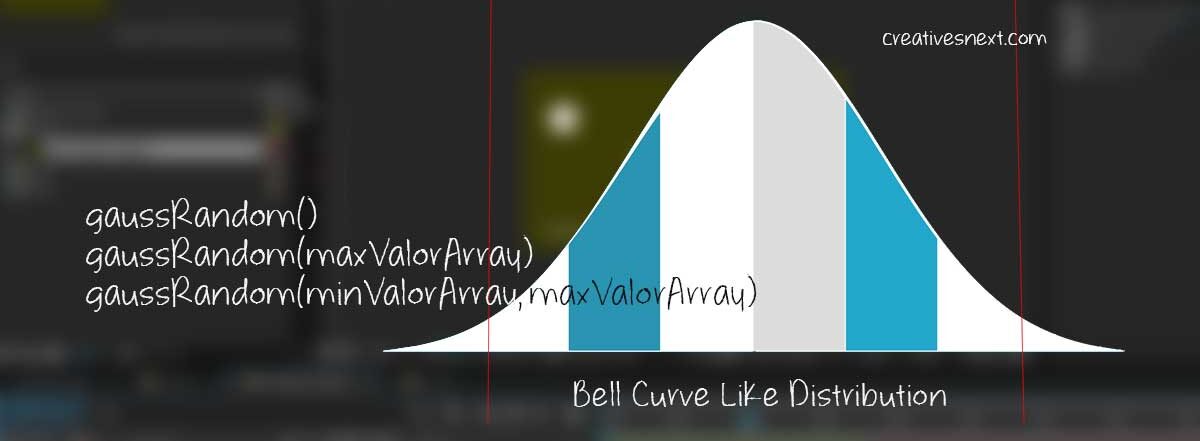
Let’s see one instance. gaussRandom results in a bell-curve-like distribution of the values within the minimum and maximum range.
It distributes 90% of the values within the range while the rest falls outside. This produces a more organic look than when the random expression is used alone.
posterizeTime() with Random Expression
Let’s first see the syntax.
// Method is PosterizeTime and the argument between the parentheses is value which tells the code
// how often to evaluate and is measured in frames per second

posterizeTime(5);
random(40)
I am using a composition of 25 FPS. And what the above code does is it tells to evaluate and return the rotation property value randomly 5 times per second instead of 25 times. It suits creating stop motion with After Effects.
Using posterizeTime with Random Expression to create Stop Motion in After Effects
Here is a link for how to use the posterizeTime syntax for stop motion. I have picked up the face from Freepik and made a PNG+alpha.
Here go the syntaxes, below. The Position values are an array as the PNG layer has both width and height whereas the rotation takes
//posterizeTime with Position
posterizeTime(5);
random([1200,600],[1500,600]);

// posterizeTime with Rotation
posterizeTime(5);
random(15);
up only one value. So you get the idea. The use of stop motion in After Effects turns much easier with this posterizeTime expression. There are other ways for creating Stop Motion too. But this one certainly is one of the ways.
Using a Slider Control with After Effects Expression
Using a slider control gives you a better hold on the expression applied to it. Get to Effects & Presets > Slider Control under the Expression Control and apply the effect on the Rotation property of the layer, say the Yellow Star.
Then use the Pick Whip of the Rotation Property to connect it to the Slider Control. You can also rename the Slider Control to indicate, say FPS, to change it conveniently, without having to change the syntax every time.
Understanding seedRandom – How to use it?
Seed Random offers better control of randomness to us. It lets us change the sequence of random numbers generated by random() expression. The method has two parameters, Seed value and Timeless as True or False.
Let’s examine it.
seedRandom(6,Timeless=false)
random(100,400)
It will generate random numbers as we have seen earlier. But, hang on, let’s examine the syntax. It has a seed value of 6 and then Timeless=false as the second argument. What it does is generates random numbers. But it generates a static number when the argument changes to True or seedRandom(6, Timeless=true). So it generates a static seed for every single frame when the Timeless

argument is True.
But why would you use Timesless=true if it throws a static value? It won’t become evident if you apply it on a single layer. Let’s consider a different instance. Create a small solid box and add the following code to its position. It remains static. But now, let’s see how we can
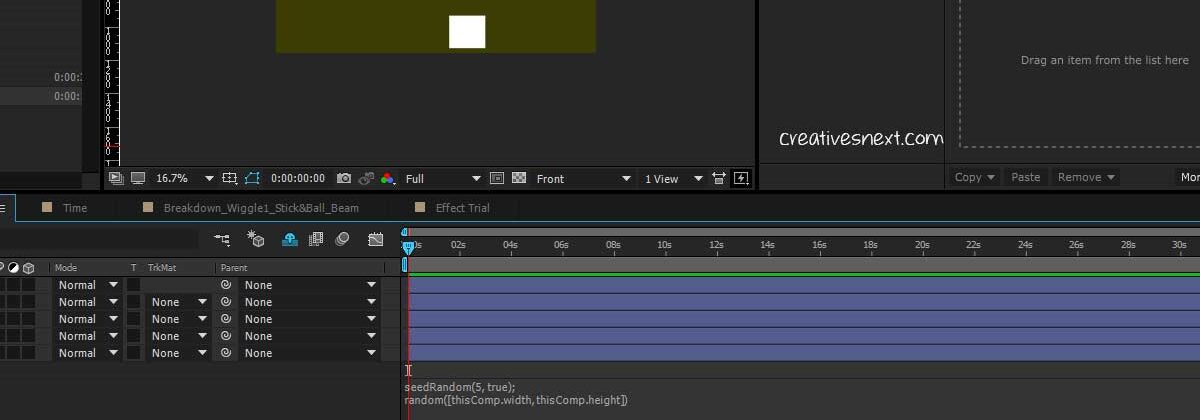
animate the seed. The idea here is to create a swarm of boxes that will move randomly. For that, first, we have to modify this code and then create several copies of that box layer.
holdTime = .5; //time to hold each position (seconds)

seed = Math.floor(time/holdTime);
seedRandom(5, true);
random([thisComp.width, thisComp.height])
Quite a few things are happening here.
I have added the above expression to the white boxes and then duplicated the layers and added the same code to the Source Text parameter of a Text layer.
I have left the Timeless argument as false for the Yellow box.
Random Motion – More Instances with Codes
Let’s now see some more instances with Canvas. I’ll first show a clip and then write down the code.
Random Motion of a Box within a Certain Canvas Area – Animate seedRandom
// Create a box and apply this code on its Position

holdTime = .5; //time to hold each position (seconds)
minVal = [0.1*thisComp.width, 0.1*thisComp.height];
maxVal = [0.9*thisComp.width, 0.9*thisComp.height];

seed = Math.floor(time/holdTime);
seedRandom(seed,true);
random(minVal,maxVal)
Smooth Random Motion
segDur = .5;// duration of each "segment" of random motion
minVal = [0.1*thisComp.width, 0.1*thisComp.height];
maxVal = [0.9*thisComp.width, 0.9*thisComp.height];

seed = Math.floor(time/segDur);
segStart = seed*segDur;
seedRandom(seed,true);
startVal =  random(minVal,maxVal);
seedRandom(seed+1,true);
endVal = random(minVal,maxVal);
ease(time,segStart,segStart + segDur, startVal, endVal);
Random Motion – Smooth & Synchronized
Now copy the above layer, with the above expression applied to the position property, several times and get a somewhat synchronized motion of a number of boxes together.
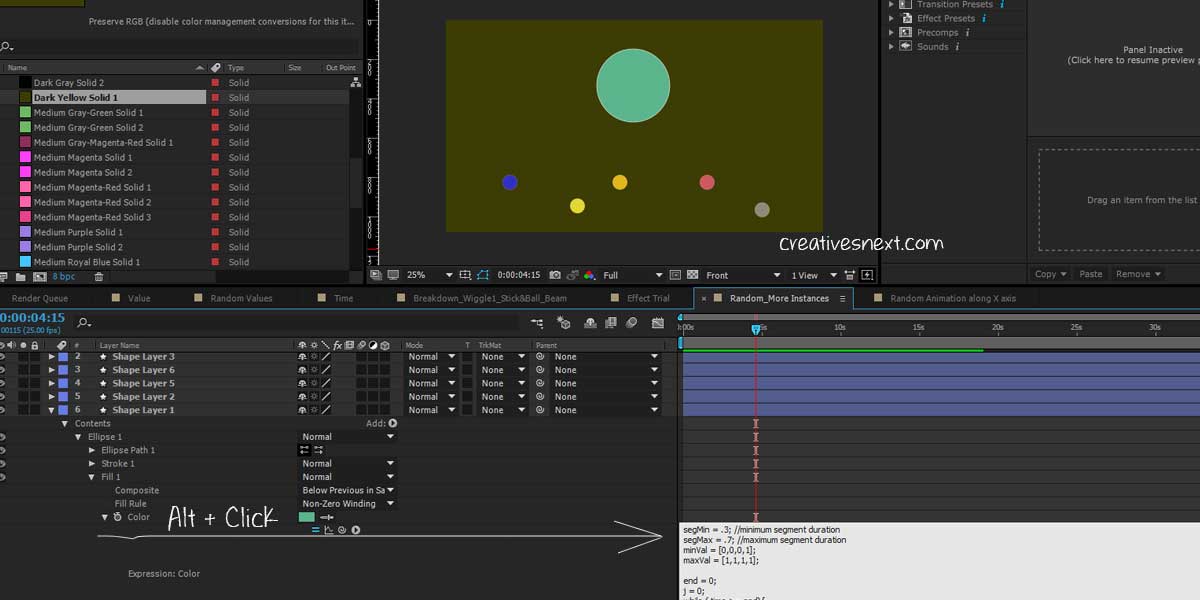
Random Motion – Smooth & Chaotic
segMin = .3; //minimum segment duration
segMax = .7; //maximum segment duration
minVal = [0.1*thisComp.width, 0.1*thisComp.height];
maxVal = [0.9*thisComp.width, 0.9*thisComp.height];

seedRandom(index,true);
segDur = random(segMin, segMax);
seed = Math.floor(time/segDur);
segStart = seed*segDur;
seedRandom(seed,true);
startVal =  random(minVal,maxVal);
seedRandom(seed+1,true);
endVal = random(minVal,maxVal);
ease(time,segStart,segStart + segDur, startVal, endVal);
Random Rotation with a While Loop Counter
Let’s see the codes one by one. All added to their rotation property.
// Blue Star
random(20)

// Red Star
rotation + random(10)

// White Stars
j = 0;     //initialize loop counter
accum = 0; //initialize random accumulator
seedRandom(index,true)

while (j < time){
  accum += random(10);
  j += thisComp.frameDuration;
}

rotation + accum
Random Motion with Random Duration
So far we have seen animations of the seeds (Boxes), but they’re in synchronized duration.
I mean the durations generated are in sync. But what if you want a random duration for the movement of those boxes? Again we’ll see the code, apply it on a layer and then make several copies.
But, let’s first see the animation.
// Random Motion of the White boxes with Random Durations

segMin = .3; //minimum segment duration
segMax = .7; //maximum segment duration
minVal = [0.1*thisComp.width, 0.1*thisComp.height];
maxVal = [0.9*thisComp.width, 0.9*thisComp.height];

end = 0;
j = 0;
while ( time >= end){
  j += 1;
  seedRandom(j,true);
  start = end;
  end += random(segMin,segMax);
}
endVal =  random(minVal,maxVal);
seedRandom(j-1,true);
dummy=random(); //this is a throw-away value
startVal =  random(minVal,maxVal);
ease(time,start,end,startVal,endVal)
Random Animation along X-Axis
// Random animation along X-axis; Code to be added to the position property

segMin = .3; //minimum segment duration
segMax = .7; //maximum segment duration
minVal = 0;
maxVal = thisComp.width;

end = 0;
j = 0;
while ( time >= end){
  j += 1;
  seedRandom(j,true);
  start = end;
  end += random(segMin,segMax);
}
endVal =  random(minVal,maxVal);
seedRandom(j-1,true);
dummy=random(); //this is a throw-away value
startVal =  random(minVal,maxVal);
y = position[1];
ease(time,start,end,[startVal,y],[endVal,y])
Random Animation of two Properties – Position along the X-axis and Rotation
// The code for the position parameters are as follows

segMin = .3; //minimum segment duration
segMax = .7; //maximum segment duration
minVal = 0;
maxVal = thisComp.width;

end = 0;
j = 0;
while ( time >= end){
  j += 1;
  seedRandom(j,true);
  start = end;
  end += random(segMin,segMax);
}
endVal =  random(minVal,maxVal);
seedRandom(j-1,true);
dummy=random(); //this is a throw-away value
startVal =  random(minVal,maxVal);
y = position[1];
ease(time,start,end,[startVal,y],[endVal,y])

// The code of the Rotation property

segMin = .3; //minimum segment duration
segMax = .7; //maximum segment duration
minVal = -720;
maxVal = 720;

end = 0;
j = 0;
while ( time >= end){
  j += 1;
  seedRandom(j,true);
  start = end;
  end += random(segMin,segMax);
}
endVal =  random(minVal,maxVal);
seedRandom(j-1,true);
dummy=random(); //this is a throw-away value
startVal =  random(minVal,maxVal);
ease(time,start,end,startVal,endVal)
Random Change of Position along X-axis, Rotation & Scale
// Add the following code to the scale property along with Position and Rotation (mentioned above)

segMin = .3; //minimum segment duration
segMax = .7; //maximum segment duration
minVal = 50;
maxVal = 200;

end = 0;
j = 0;
while ( time >= end){
  j += 1;
  seedRandom(j,true);
  start = end;
  end += random(segMin,segMax);
}
s = random(minVal,maxVal);
endVal = [s,s];
seedRandom(j-1,true);
dummy=random(); //this is a throw-away value
s = random(minVal,maxVal);
startVal = [s,s]
ease(time,start,end,startVal,endVal)
Random Expression for Opacity along with Position, Scale & Rotation
// Add the code below to the Opacity property along with the others for Position, Scale & Rotation mentioned above

segMin = .3; //minimum segment duration
segMax = .7; //maximum segment duration
minVal = 10;
maxVal = 100;

end = 0;
j = 0;
while ( time >= end){
  j += 1;
  seedRandom(j,true);
  start = end;
  end += random(segMin,segMax);
}
endVal =  random(minVal,maxVal);
seedRandom(j-1,true);
dummy=random(); //this is a throw-away value
startVal =  random(minVal,maxVal);
ease(time,start,end,startVal,endVal)
Randomizing Hues or Colors
Apply the expression in the color property of the layer.
// Expression for Random color

segMin = .3; //minimum segment duration
segMax = .7; //maximum segment duration
minVal = [0,0,0,1];
maxVal = [1,1,1,1];

end = 0;
j = 0;
while ( time >= end){
  j += 1;
  seedRandom(j,true);
  start = end;
  end += random(segMin,segMax);
}
endVal =  random(minVal,maxVal);
seedRandom(j-1,true);
dummy=random(); //this is a throw-away value
startVal =  random(minVal,maxVal);
ease(time,start,end,startVal,endVal)
Randomizing the properties of layers is an essential task for animators and motion designers. Thus the group of random expressions reckons as one of the most useful After Effects expressions for the users.
Conclusion
In this article, I mainly focused on random expressions. Doubtless, I got these from Dan Ebbert’s Motion Script that I already mentioned, but they’re not over yet. Please keep a close watch on this Blog as I’ll update shortly with more instances of using Random expressions in different ways.
The possibilities of using random as useful After Effects expressions are immense. My objective is to explore more such opportunities in upcoming posts.
Animators and motion designers are always on the lookout for searching scripts that help them work out complex animations in easier and more user-friendly ways.
I’ll continue writing on other useful After Effects expressions in the following parts, as well. Please don’t forget to share the article if you find it helpful. It will encourage me to write more such content.