
Creating Space Scenes in After Effects – How to simulate patterns of the astronomical scenes
Last updated on 5 June 2024, Published on 23 April 2023
Introduction
Creating space scenes in After Effects is a regular practice among artists for developing scientific documentation and communication material. On our planet Earth, Astronomy and After Effects do enjoy a close nit relationship.
The makers of documentaries and videos on Astronomy, doing the rounds on the internet, somehow used programs like Adobe After Effects. There are many other programs like After Effects though. But we’re, in this piece, discussing with respect to Adobe After Effects, certainly one of the most popular programs in the domain of multimedia.
There are mainly two different creations for space scenes. One is the objects, like planets, asteroids, stars, white dwarfs, etc. And there are galaxies, nebulas, or clusters of stars with space in their background.
In this piece, we’ll be exploring different ways of simulating those patterns while creating the space scenes in After Effects. You often have a look at the NASA repository or any journal or online portal on Astrophysics. Essentially, you’re looking at an image or a video that’s created simulating space science data regarding that region or extraterrestrial object.
Even for creating e-learning material on astronomy, the producers or the creators of the explainer videos require templates of space scenes. But to use those templates, it’s better to have an idea about a few techniques for creating the space scenes.
Table of Contents
Starry Background – Creating Space Scenes in After Effects
Perhaps the most evident, yet underrated feature of a space scene is its starry background. It’s always there with a galaxy or any
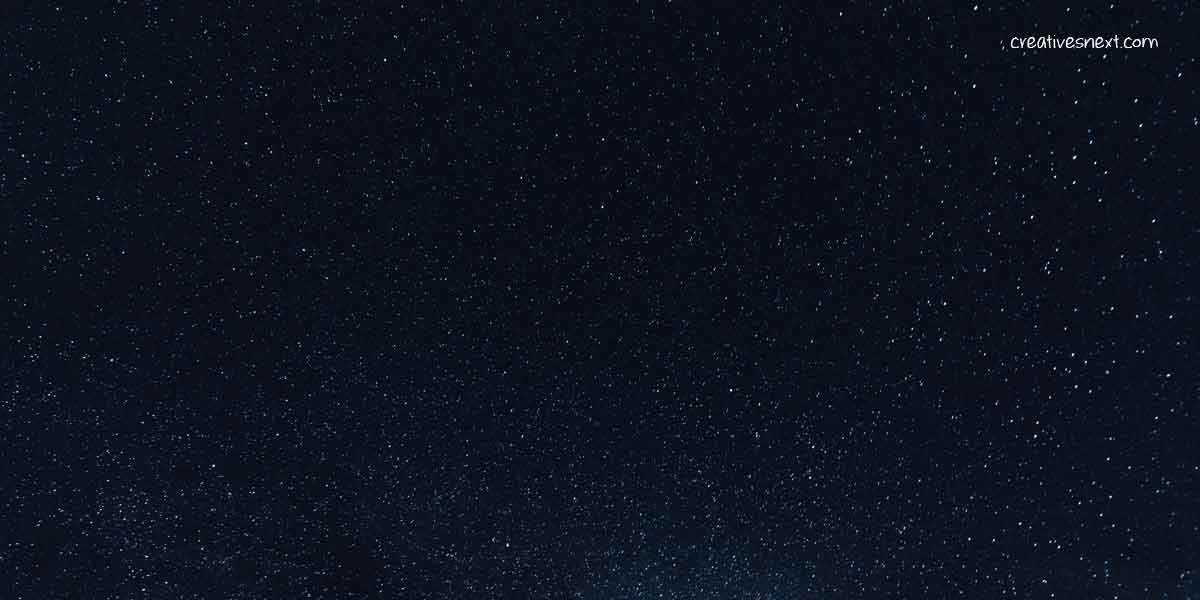
space objects in your scene. So let’s begin with an image. I have collected this image from the Freepik, just for reference.
Create a composition in After Effects > Create new solid (white)> Effects> Simulation > CC Star Burst. Tweak around the effect settings. I have left the speed at 0. If you change the Grid Spacing, you’ll see the size you the stars varying. Instead of animating
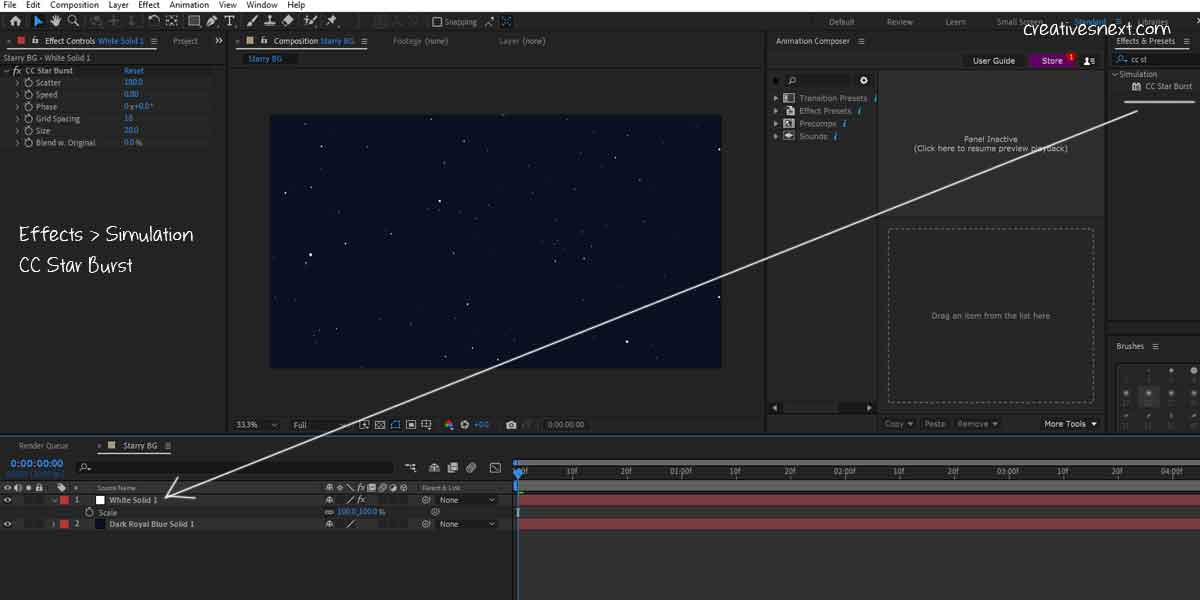
the speed of the particles, you could turn the layer 3D and use a camera to move the starry background in Z space. Besides, you can create several layers of Star Burst with a different Grid spacing value and mask them to form nonuniform distribution of stars across space.
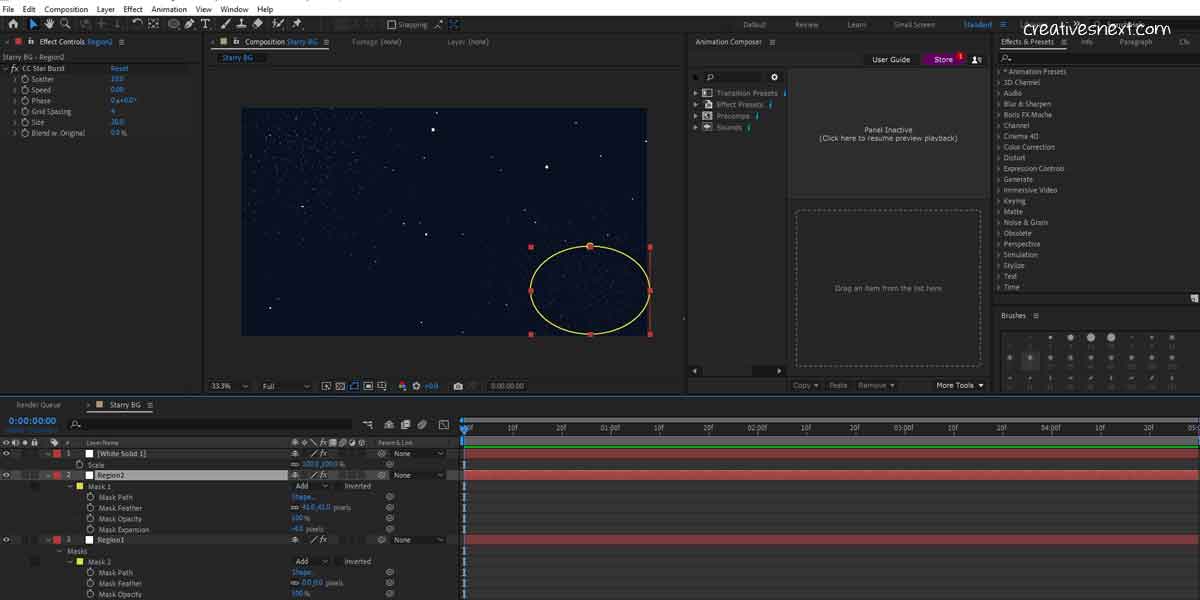
Here, I have created three layers with different settings in CC Star Burst. Because I want to create various patterns of star distribution across space.
Bigger stars (Layer1, in the image below): Scatter 180, Speed 0, Grid spacing 30, Size 20
BG distribution (Layer2): Scatter 55, Grid Spacing 4, Size 30
Region2((Layer3)): Scatter 10, Grid Spacing 4, Size 20
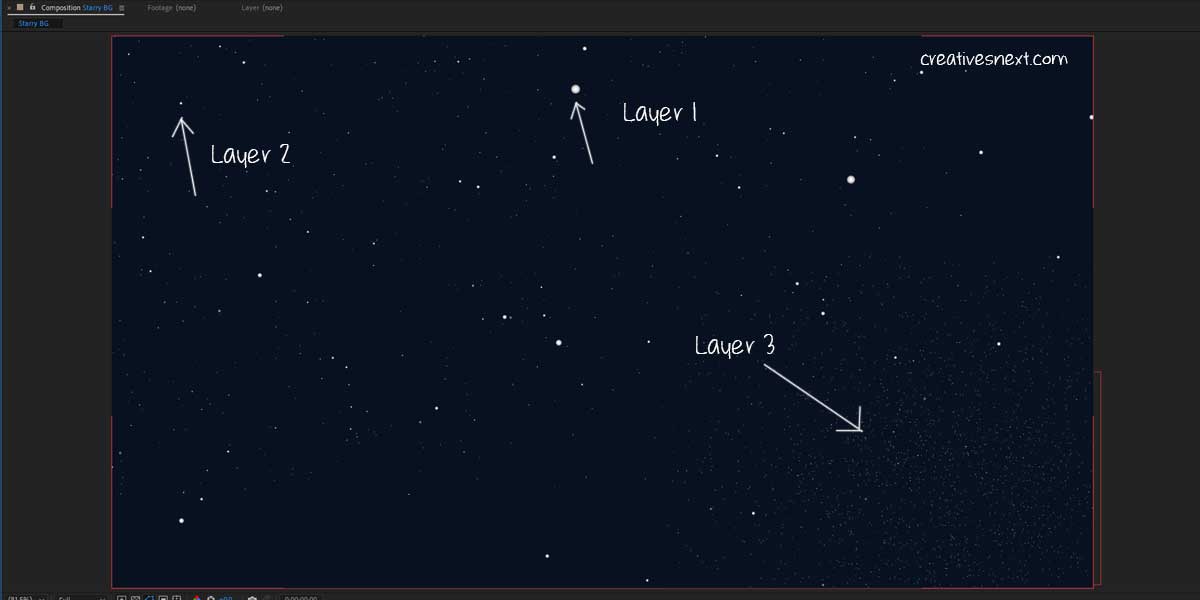
Therefore, here you get three different patterns of star distribution. One is the relatively bigger stars in the foreground which I have created using Layer 1.
Secondly, there is Layer 1 with a somewhat uniform scatter that fills the space. Finally, there is Layer 3 which presents a region of a comparatively dense collection of stars. Besides, both these layers have masks applied.
So, you get the idea. You have to assess your need and create layer by layer to arrive at a composition (Not the AE composition I meant) of different layers to simulate something close to your need.
Creating High Energy Region for Space Scenes in After Effects
Filmmakers often need to develop astronomical sets up containing high-energy regions whether to depict a star or a hot gas region. In this section, we’ll figure out the patterns and create a few ones. Here, we’ll use a free plugin called Saber from video copilot. You can download the plugin here if you want to.
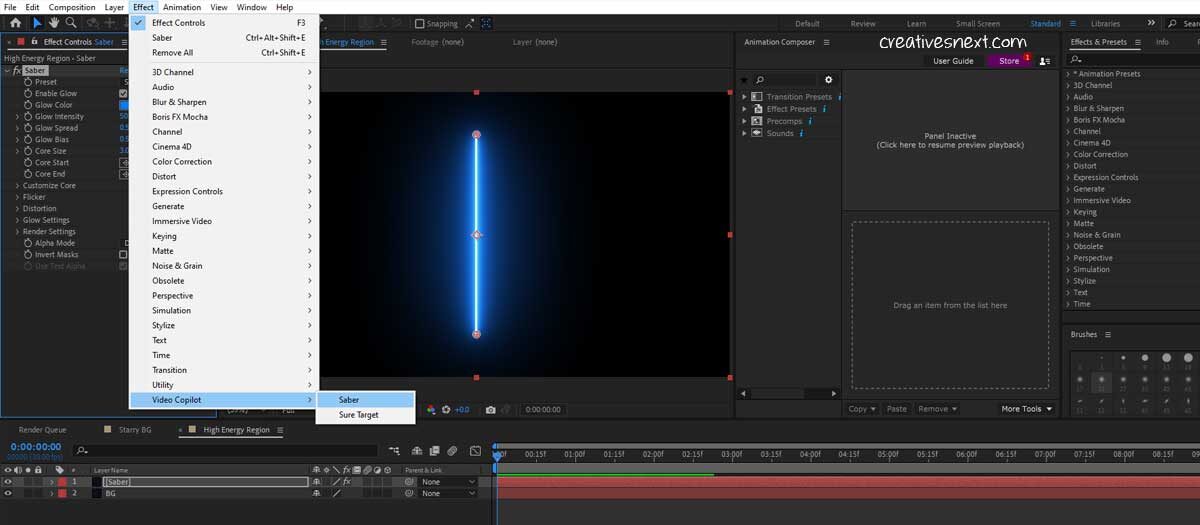
Pretty simple to create. You have one BG layer with a dark blue (#0B1019) and a duplicate of that renamed Saber. Just apply Effects> Video Copilot > Saber onto the Layer Saber. Make sure you crank up the Flickr Intensity (Under ‘Flickr’ of Saber Effects) to 30 % for the Saber Layer.
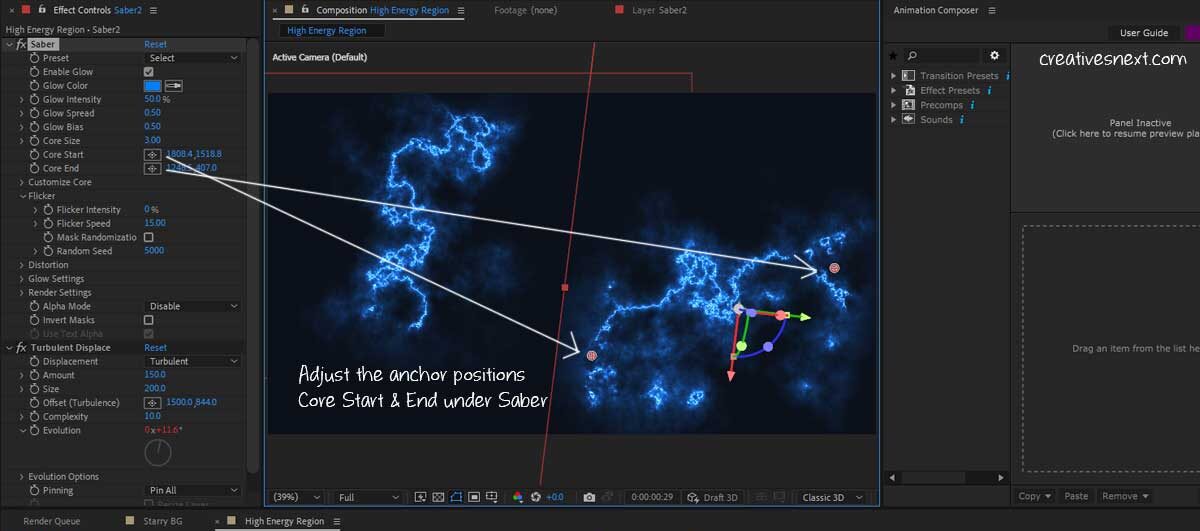
Now, you have to apply Effects> Distort > Turbulent Displace. Set the Amount in Turbulent Displace as 150 and Size to 200. You can also add the Time expression to Evolution, in case you want to have an animation for the High Energy region. Here is what you get.

So, you’re approaching nicely while creating a High Energy Region for the space scenes in After Effects. All you have to do, at this point, is duplicate the Saber Layer a few times and tweak them to bring some varieties.
Neutron stars, Black holes, supernovas, Supernova remnants, and Gamma-ray Bursts are some examples of High Energy regions studied in Astrophysics. Accordingly, you may have to create such impressions while creating your space scenes in After Effects.
Tweak the Layers for the High Energy Region and Create different Patterns
Set the blending mode of your Saber Layer to Add and create a few copies of the layer, adding some varieties to all those layers. Don’t forget to make them 3D. Now, while duplicating the layers, you may find hard edges around the layers. To fix that, you open the Solid Settings, Check on Lock Aspect Ratio, and increase the Layer width to, say 3200. That way, you fix the hard edges to some extent.
Now, to create different patterns for the copied layers, you better do a combination of things. In terms of size and orientation, you could tweak the scale, position, rotation, or orientation of the 3D layers. But to add more varieties to the structures, you have adjusted some of the parameters of Saber effects.
Under the Saber, you see the Core Start and End. Go and play around with the anchor points to bring changes in the structure of the layer for the High Energy Region. This will add distinguishing features to each layer. You could create more such layers. I have created just two for the sake of convenience.
So, I’ll leave you with your adjustment of layers here, in the sense that you could spend as much time as you want to get to the point of your satisfaction. Once you’re through with changing these Saber layers, it’s time for you to be able to change the colors.
Because, it’s evident that we see varieties of colors in the space scenes and in the documentaries on Astronomy, representing different types of regions.
In fact, one of the features of spectral physics explains the presence of certain elements, like oxygen or Helium or Hydrogen, in a region, analyzing the light it emits.
Change the Colors – Add Noise for Space Dust
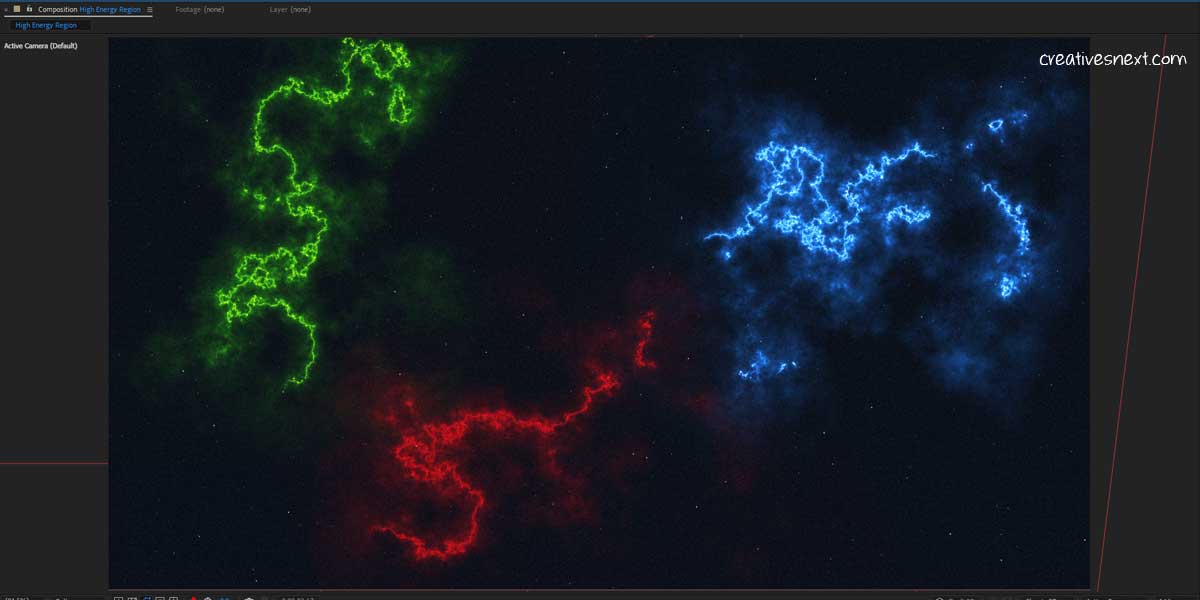
Here are the breakdowns.
- I have added an Adjustment Layer for adding Noise. Effects > Noise & Grain > Noise. I put 8% as the amount of Noise.
- Copied and created another Saber Layer to make the coloration more evident. Change the Core Start and End position under Saber Effect for the Layer (Red colored).
- Added a solid layer (white) just above the Background layer (Dark Blue) and applied CC Star Burst. You see the white particles representing Stars in space, spread all over the background. We have already discussed this in the previous section.
- Finally, I have applied Effects > Channel > Shift Channels
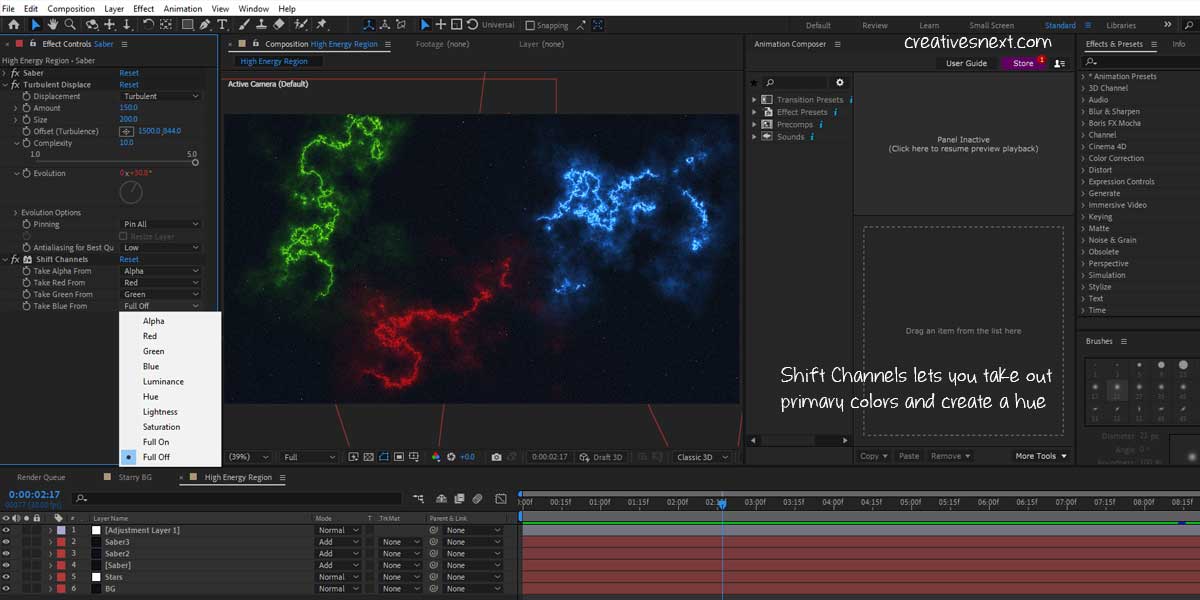
At this point, you have to play around with the parameters of the Shift Channels to get to the desired point. Spend some time and you’ll get to an acceptable point. You could use many other Color Correction Effects in After Effects to change the colors.
So, the idea here is, you have to attain a certain hue. And, the space scenes don’t usually have a mix of colors that we normally see on our planet. Rather, they simulate certain hues across a region.
Create a Galaxy for the Space Scenes in After Effects
Galaxies are mostly spiral, like our Milky Way. So, let’s try out making a spiral galaxy. I am not going into creating a star-studded background. You know how to do that. Instead, let’s get straight into forming the galaxy.
There could be many different ways for making a galaxy while creating the space scenes in After Effects. Here, we’re following one such way.
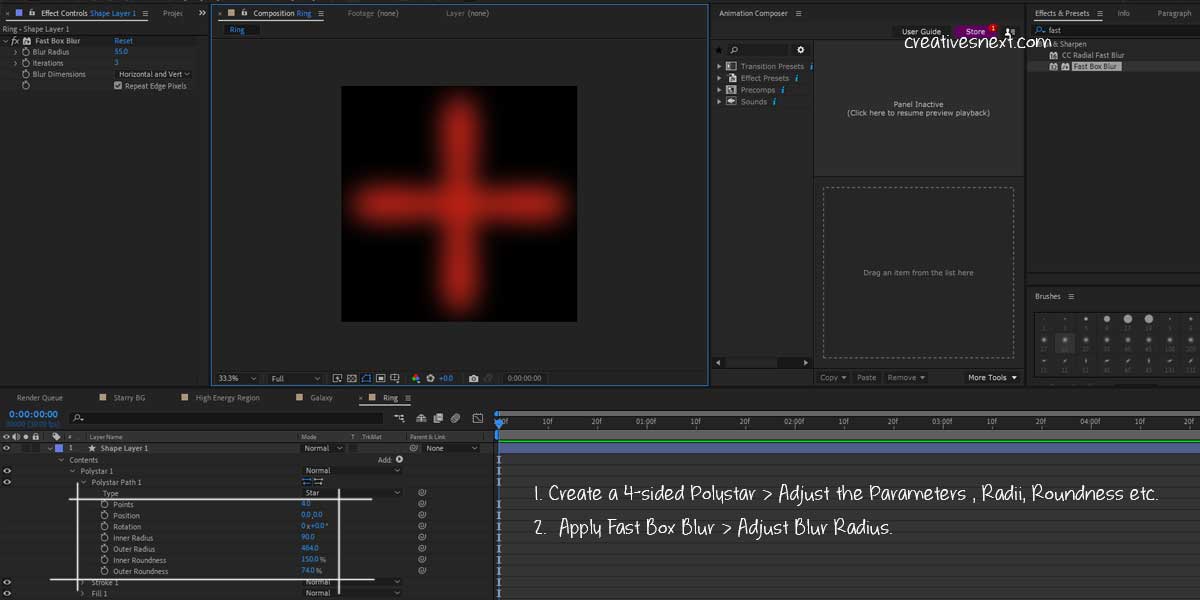
Create a shape layer with a 4-sided star. Adjust the inner and outer radius as well as the roundnesses as marked or in the way you like. Then apply Fast Box Blur on that shape layer and adjust its parameters to get to such a blurry shape.
Change the Composition Size (in the Composition Settings, Ctrl+K) to square, something like 1300 by 1300.
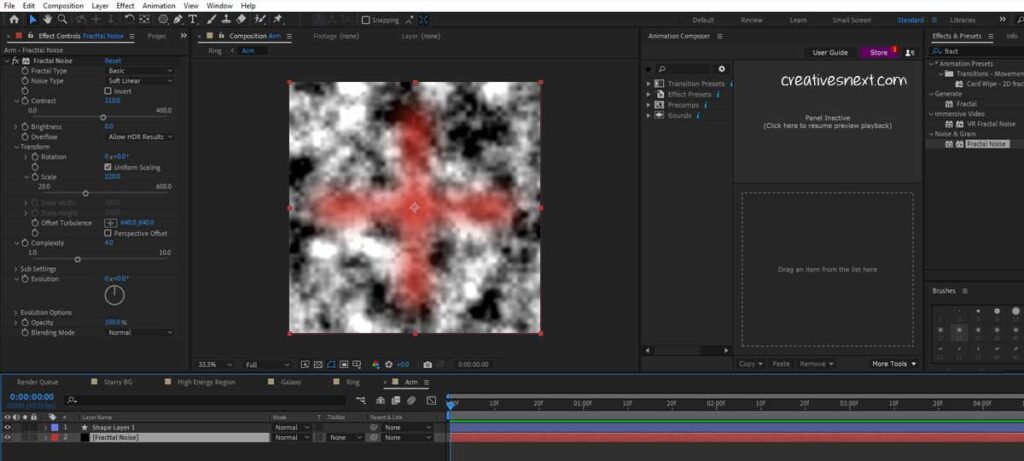
Let’s pre-compose these shape layers, say, Swirling Arm. Now double click that composition and there create a Black solid same as the Composition. Now apply Fractal Noise on the Black Solid Layer, also named Fractal Noise, and change some of its parameters.
Change the Contrast to just about 210, increase the scale under Transform to 220, and bring down Complexity 4. Now bring the Fractal Noise layer just below the Shape layer. We’ll now use this blurred shape layer in red as the Alpha Matte. I have also added Levels to
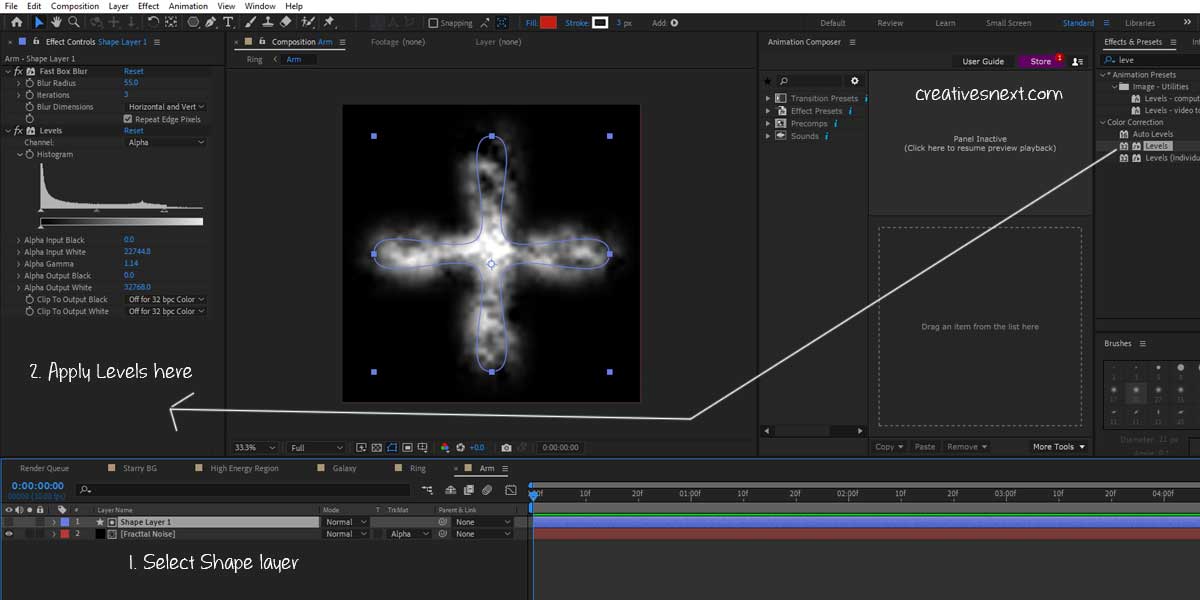
adjust the transparency of the Alpha Channel or Alpha Matte. At this point, I have also tweaked the parameters of the Fractal Noise layer a bit. Cranked down the Brightness to -20, Scaled up to 260, and increased the Complexity 5.
Let’s now add an adjustment layer, named Twirling Arm. Apply Distor > Twirl on the Adjustment layer. Change the Angle to 270 and
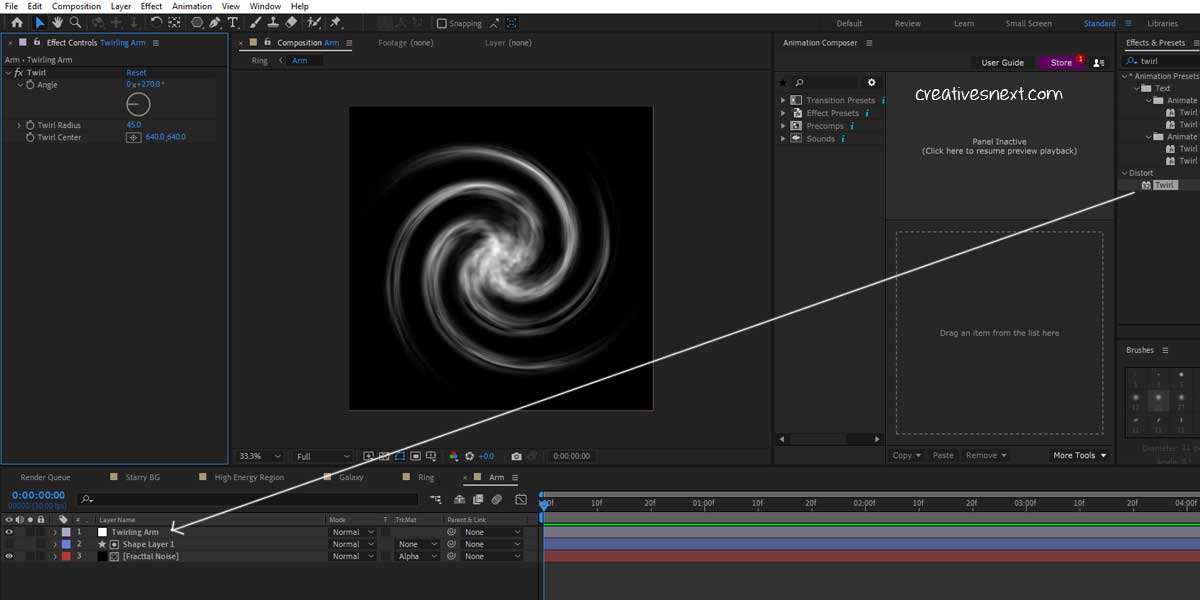
the Twirl Radius to 45. Now, you see there is a shape close to the looks of a Galaxy. You’re almost there!
Adjust the Position of the Galaxy – 3D Layer & Camera
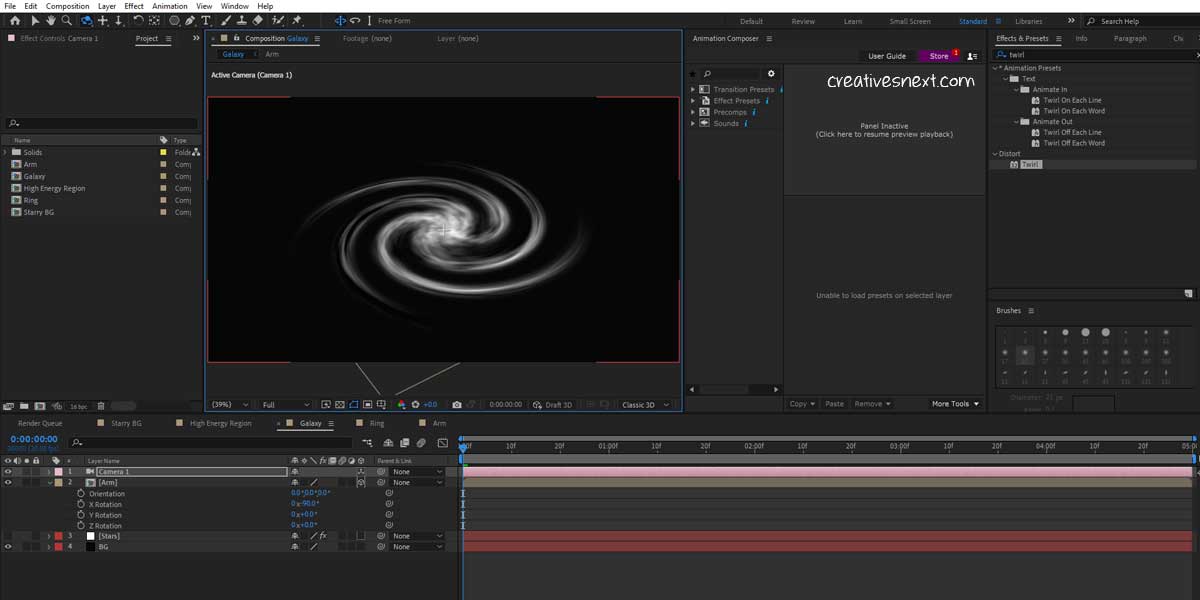
The very next step is to turn the Arm Composition (that we pre-composed a few while ago) into 3D and bring it to a master Composition, say Galaxy. Change the X rotation angle of the 3D Arm Composition to -90.
Now, you have to create a Camera either by going to Layer > New > Camera or by using the shortcut Ctrl+Alt+Shift+C. With the Camera layer selected, use Orbit Around Cursor Tool (by pressing C) to rotate the Galaxy.
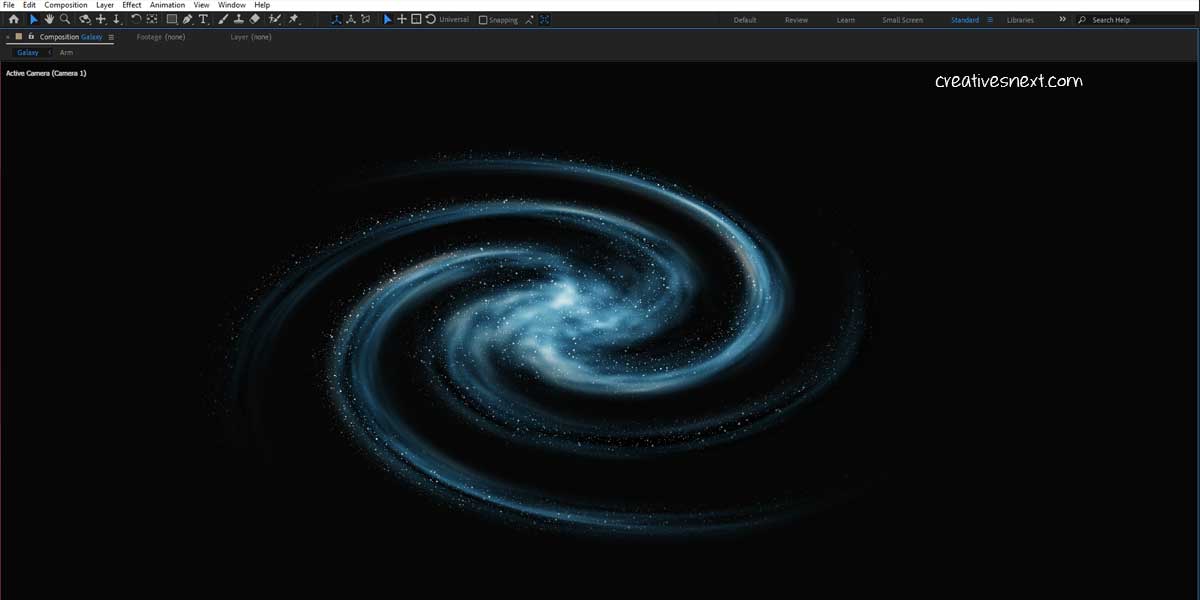
This orientation of the Galaxy is something close to what we see in the videos on Astronomy. It’s just the basic, barely scratching the surface by creating the basic shape and position. Still, a lot of variations, colors, and Glow could be added. But just imagine, you animate your camera in Z space following this galactic structure with some voiceovers explaining things.
Plausible, right? But, now you have to create some variations in the galactic arm.
Create variations in the Galactic arms – Make it more realistic
It’s not that these galactic arms do not look realistic. But to add more variations to these arms, you might have to do a few things.
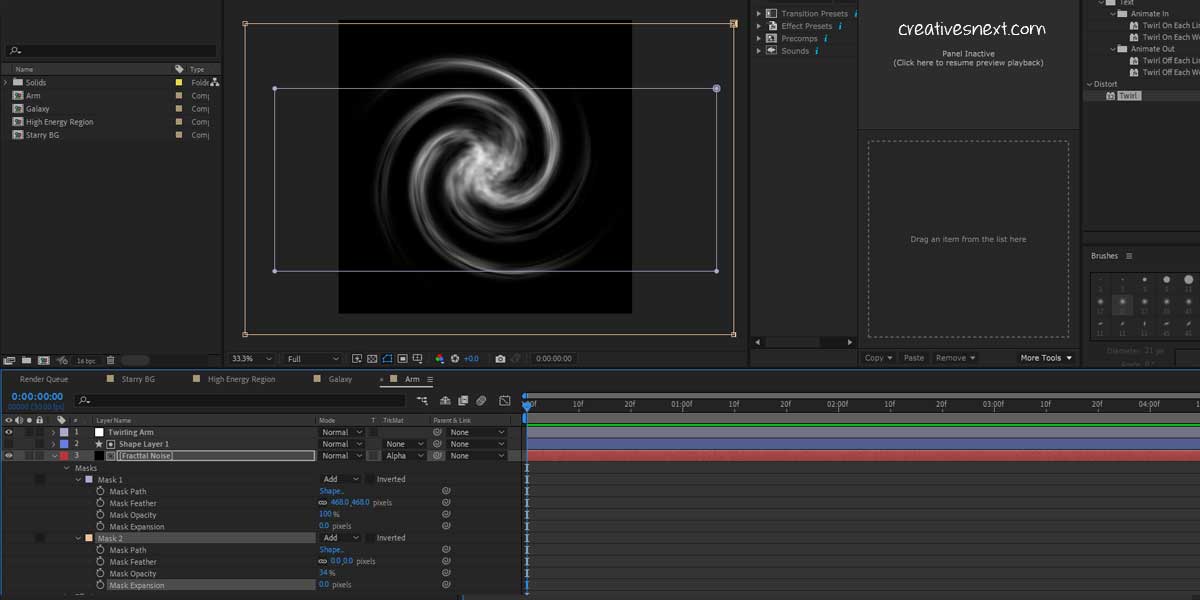
Get into the Arm composition and in the Fractal Noise layer, create masks, two in fact. Adjust the Mask feathers in Mask 1 and Opacity in Mask 2. This will create a variation in the ‘masses’ of the galactic arms. And now, it looks much more realistic. Even the Milky Way has arms with different magnitudes, in terms of their lengths and star aggregation.
Before wrapping up this Galaxy, while creating the space scenes in After Effects, we need to do two more things.
Distribute star aggregation along the Galactic Arm and a bit of Color Correction.
Star aggregation along the Galactic arms & Color Correction
Let’s first see the image of how it will look and then we’ll have the breakdowns.
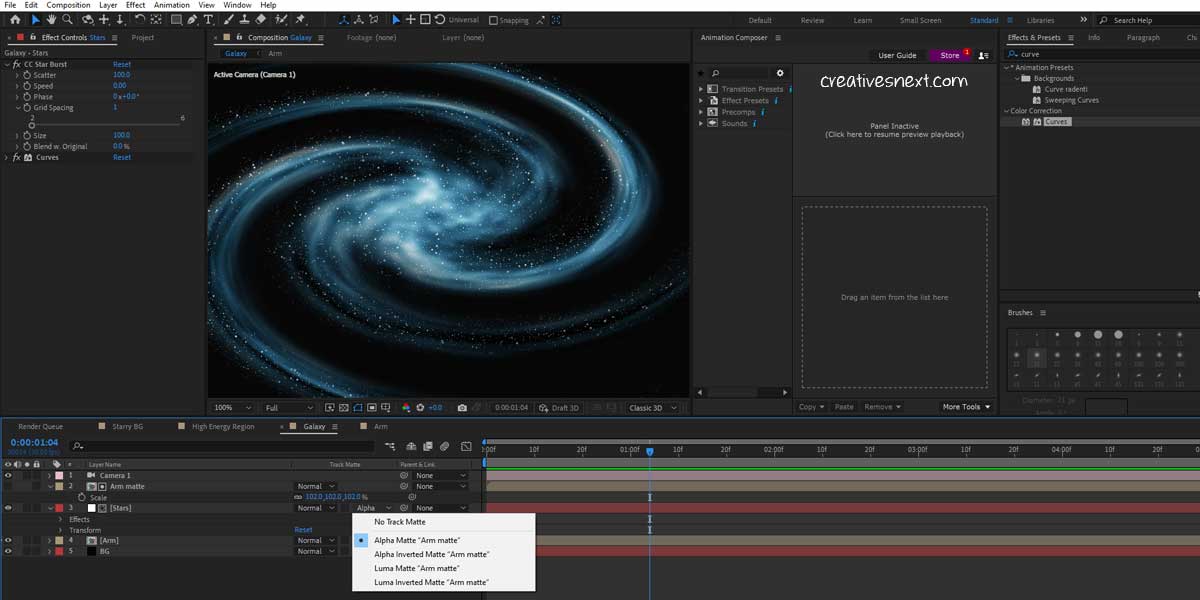
First, create a copy of the Arm Composition and scale it up a little bit. 106% may be. Put this duplicated and bigger Arm composition over the Star layer which we created at the very beginning for the starry background. Now, in the track mat, turn the Alpha matt for the Star layer.
It will distribute the stars along the galactic arm, for which we have used the duplicated Arm composition as the Alpha matt. Remember, you have to put the duplicated Arm composition right over the Star layer. You may have to adjust the CC Star Burst parameters to get to the desired level of star density, size, or quantum.
Now, you’re nearly in the last lap of this galaxy creation. Of course, you could add a lot of details to each and every step of what I have described. But that depends on the amount of time and effort you want to put in.
See the above image and you’ll realize this star distribution is pretty simple. All you have to do is use an Alpha Matt of the same Arm composition, a copy in fact and slightly scaled up, over the Star layer.
If you want to create some gas within the galactic region, you may create a layer with fractal noise or turbulent noise and then create a copy of that same layer. Then you could use that duplicated layer as the luma mat to distribute gas or space dust along the galaxy.
Therefore, you could create a lot of variations using track mats, especially using fractal noise or turbulent noise.
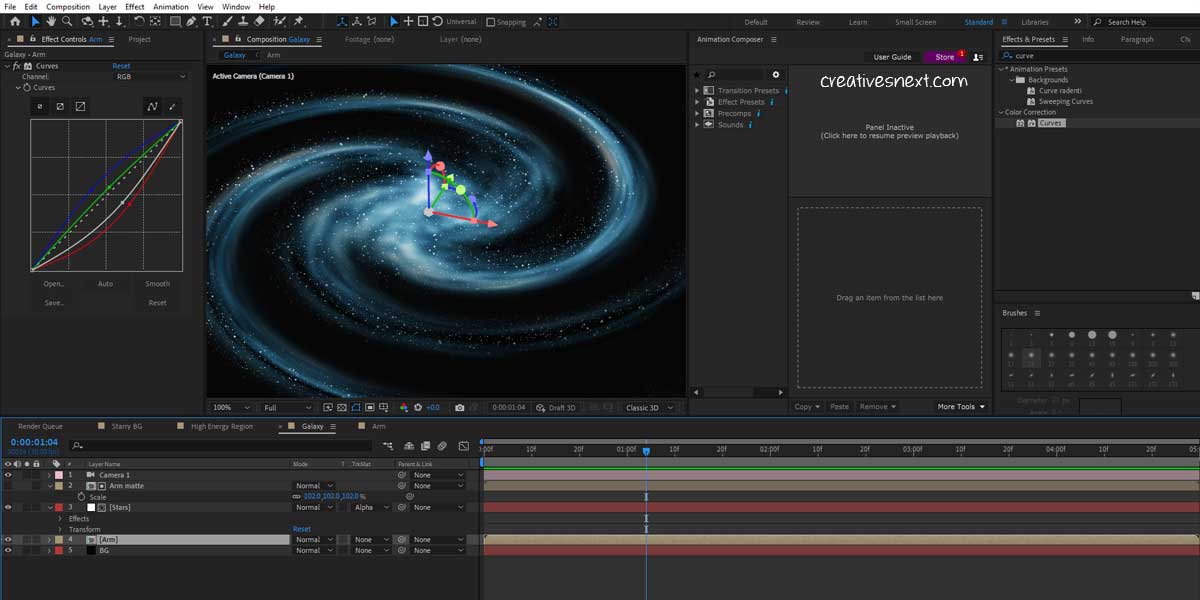
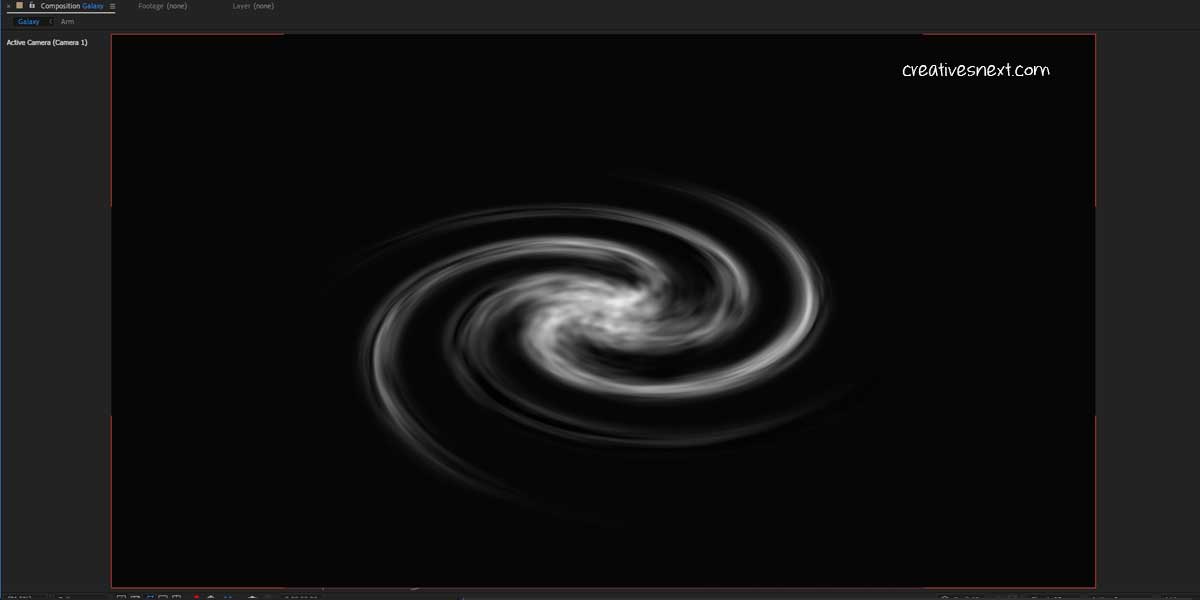
Pretty simple color corrections for the Galaxy we created. Bring in Curves and then adjust the hue that you would like your Galaxy to have. You have to do a little bit of study if you do any presentation at the professional level. I have gone toward a bluish tint for this galaxy.
Conclusion
There is a point in terms of animating the space scenes in After Effects. With the voice-overs explaining certain things in a documentary or in any video, the camera movement is usually slow and gradual to depict the vastness of space or universe. There remains the catch of using programs like After Effects which is a 2.5D program.
Projecting a 3D environment on a 2D plane is one thing, but animating the camera and maintaining its 3D orientation is another thing. The upside, here in the case of space scenes, is there is hardly any rapid movement of the camera around say a galaxy or a region. Because the extraterrestrial object, itself, could be hundreds of thousands or even millions of light-years wide.
So, passing by them in whiskers is unnatural. Animation is a separate topic that I’ll come about later.
I have shown a few patterns here. As I said, it’s like barely scratching the surface. There is plenty of stuff to add. I’ll add more such patterns in this blog or in an additional part.
Keep a close watch on this blog and please leave a comment about your take on this.