
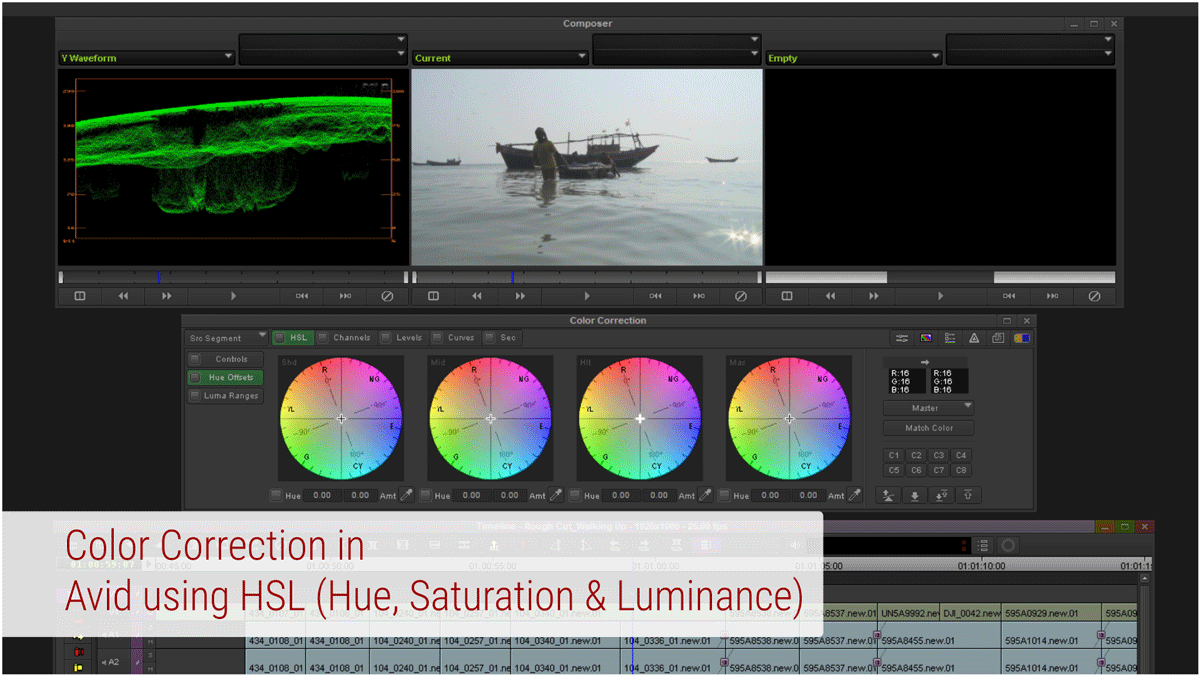
Color Correction in Avid Media Composer using HSL (Hue, Saturation & Luminance) – Fixing Black & White with Y Waveform
Last updated on 4 March 2024; Published on 5 May 2022
Introduction
Color Correction and Color Grading are completely different, and so are they inside Avid Media Composer.
Correction is fixing or compensating a shot for its deficit in terms of luminance or blacks and whites, lightness or darkness, and color cast.
Grading is adding a subtle or intense tone to a shot for its stylization or a cinematic look.
It could be tempting to conclude that color grading is optional and color correction is obvious. But that’s hardly the scenario. Almost all the shows on the web and TV, and feature films we watch out involve color grading to some extent.
Whether you’re in a commercial shoot or making videos for nonprofits, camera raw or rather clips or footage always require some sort of color corrections, if not rigorous.
Unless you’re creating an animated explainer, let’s say in Adobe After Effects, you’re likely to shoot.
Color correction always precedes color grading and not the other way around for the simple reason that you fix the issues of a shot before you enhance it.
Whether or not you perform color grading, it’s more or less certain that you need to perform color corrections over most of the shots, if not all. Especially, the exterior shots demand rigorous color corrections during post-production.
While big-budget films or productions have dedicated colorists for correction and grading, most productions with budgetary constraints require the editors to perform color corrections before mastering.
These days, however, mastering is not so common a term to digital video makers or content creators. But it was very much in use in the film and video industry before.
In this article, we shall focus on primary color correction in Avid Media Composer using the features under HSL (Hue, Saturation & Luminance) tab viz. Controls and Hue Offsets. There are different sets of tools for color corrections and grading in Avid Media Composer. While Avid Symphony has some additional features, compared to Media Composer, the HSL tab looks similar in both programs. We shall limit ourselves to version 8.4.4. of Avid Media Composer.
We may also touch on some additional topics that are relevant to the color correction mechanism of Avid, for a better understanding.
All the tools and features (of HSL and Y waveform) of color correction in Avid Media Composer may look a bit overwhelming at the beginning, but we shall continue to explore them step by step to decipher the process of color correction altogether.
At the end of this article, you will know
Table of Contents
What is Primary & Secondary Color Correction in Avid?
The color correction mechanism of Avid explained in this article is the primary color correction and not the secondary one (‘Sec’ tab as seen on the color correction tool sets shown later).
The primary correction has an overall effect on the image. It affects almost all the pixels of an image. But secondary color correction affects a specific color range of an image. A local change within an image is possible in secondary correction.
Since we have a lot of things to do to perform primary color correction with HLS, let’s chalk out an approach and move on.
To put it simply, we would move ahead in the following manner.
- Access the color correction tools inside Avid Media Composer or Symphony
- Perform a quick tour of the features that we will be using
- Assess the shot for its shortcomings and determine what is to be fixed
- Carry out different operations to fix or color-correct the shots
A quick note on bit depth & Avid’s standing
Both Media Composer and Symphony come with integrated 10-bit color correction engines. It can process multiple adjustments in real time.
Now, that’s a bit awkward, right?
Let’s have a quick run down through the bit depth of a color channel. What does it mean when we say, a video is with an 8-bit depth color channel or 10-bit depth?
Bit depth is the measure of all the color values in a video frame, from its highlight to shadow, which a camera can record.
More bit depth means more colors for detailed and high-quality shots.
Now, what’s the point of having a 10-bit video instead of an 8-bit video, since the difference our naked eyes can catch is very subtle?
An 8-bit video has RGB using 256 levels of color per channel, while a 10-bit video, can go up to 1024 levels of color per channel.
This leads to an 8-bit video showing 16.7 million colors and a 10-bit video using over 1 billion colors for display. That’s quite a difference, right?
10-bit videos provide much more flexibility in color correction during the post. But we’re still used to watching 8-bit videos.
Web streaming and video broadcast are still widely going with 8-bit videos.
Even the commonly referred to terms like ‘video black at 16’ or ‘video white at 235’ are based on the scale of an 8-bit color channel i.e. 256. It ranges from 0-255. More on this later.
With the advent of photographic and broadcast technology and 5G knocking on the door, commonplace 10-bit videos won’t be a far cry for long.
So, in terms of handling more bit-depth per color channel, both Media Composer and Symphony are keeping abreast of time.
How to access Avid’s Color Correction tools?
Once the final edit is over, in terms of cuts, effects, transitions, and even audio (I prefer editing audio before color correction, but that’s my take! ), it’s time to head on to color correction.
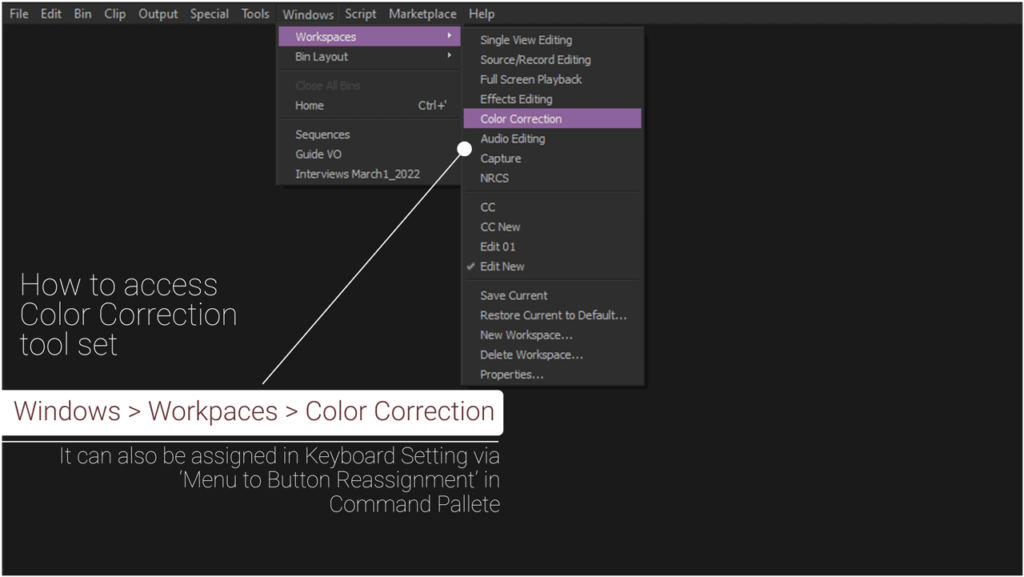
We can access the color correction toolset from the menu.
Windows> Workspaces> Color Correction
What are the tools you need to familiarize yourself with at the beginning?
There are many tools inside Avid Media Composer or Symphony for color correction and grading like HSL, Channels, Levels, Curves, and Secondary Color Correction or Sec.
But we shall, in this article, use the HSL tab only. HSL stands for Hue, Saturation, and Luminance. Even within the HSL tab, in this article, we shall use Controls for fixing Video Black and White. In an upcoming article, we will dive into Hues Offsets for removing the Color Cast.
Let’s dive in.
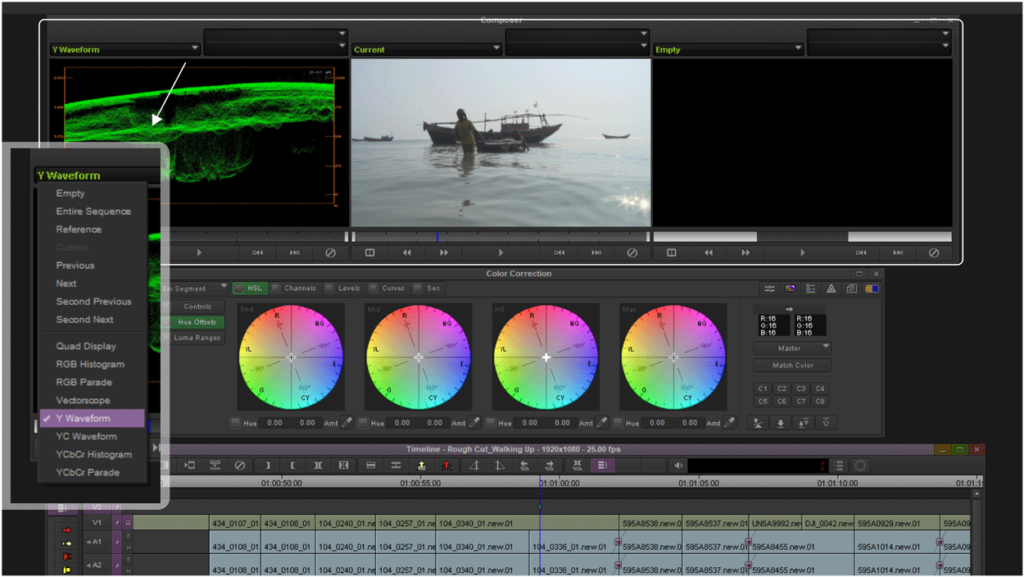
At the top, there are three different windows. To the left is the window, where we can load any video scope through the drop-down menu. We shall be using Y waveform to fix the Video in black and white.
There are other waveforms too. They include RGB Parade, Vector scope, etc, and see wide use to fix color cast and flesh tone. Editors and colorists use these waveforms for assessing and reviewing an image or shot before and during color corrections.
In the middle window, we can populate the shot we want to correct. To the right is another window where we can load the next shot. However, we are keeping the right window empty; just to concentrate on the left and middle windows.
Right beneath the top panels, are the color correction tools.
There are many different tools for color correction in Avid Media Composer and Symphony.
These are
HSL
Channels
Levels
Curves
Secondary or Sec
These are the group of color control tool sets that can be used interdependently or in combination with each other. Since we are focusing on using HSL only, we shall not touch on other groups in this article.
Just to mention, it’s always good to use the group of tool sets consistently. It’s better if you perform a set of correction using a particular group (let’s says HSL). Once it’s over you can switch to another set of tool sets (say, Curves) for further adjustment.
It’s better not to use too many groups or tabs randomly to fix the shots.
There is another point we need to mention here. In earlier versions, Media Composer used to offer two tabs only viz. HSL and Curves, while the editors using Symphony could additionally access Channels, Levels, and Sec or Secondary Correction.
For our purpose of working on the HSL tab, the dissimilarities of the two different interfaces hardly matter.
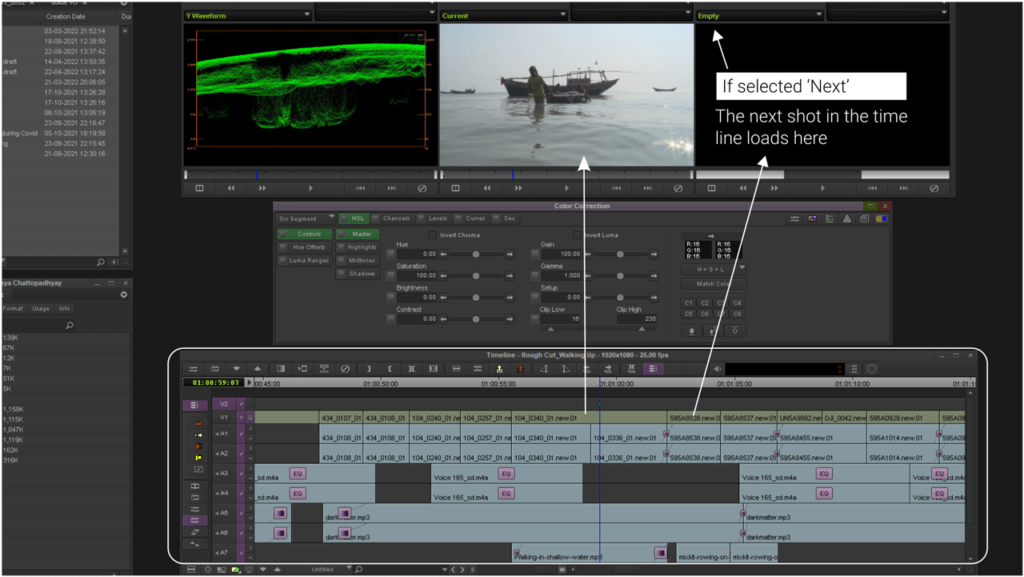
At the bottom is the timeline. See, the timeline with the play head parked on a particular shot! That shot pops up in the middle panel at the top.
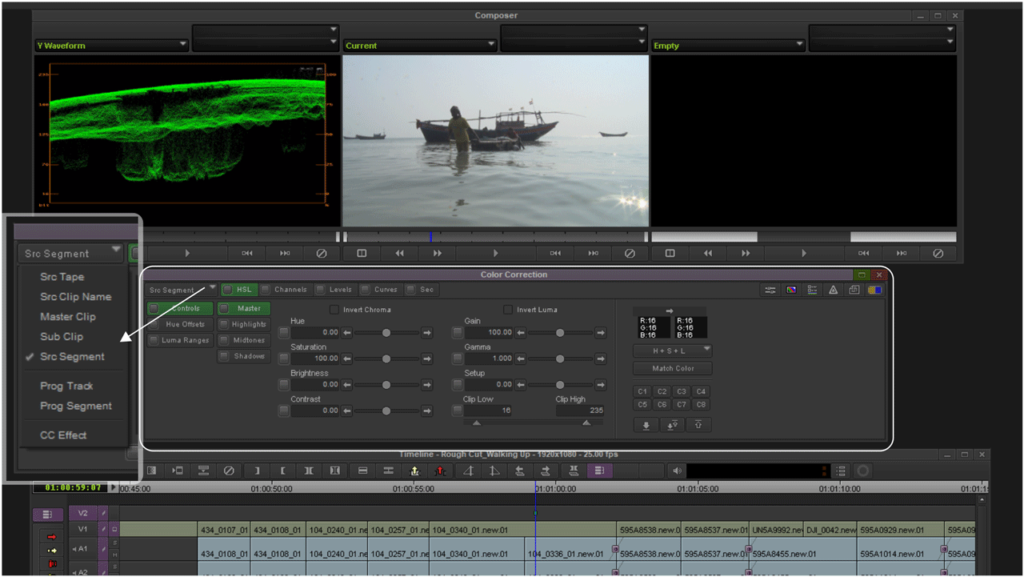
But before we move on to start working on the HSL tabs like Controls or Hue Offset, we need to talk a little bit about the Source Segment (seen as Src Segment) and Program Segment (seen as Prog Segment).
Though we don’t need an exhaustive discussion here for our purpose of color correction, a brief talk on these two will steer clear of any confusion.
What are the Source and Program level Color Corrections in Avid?
Avid was the pioneer in launching the Non-linear Editing program or NLE. It dates back to an era when films used to dominate the market followed by tapes. Digital video still didn’t come into being.
Avid’s tool set offers two distinct levels of color correction at the apex of its hierarchy viz. Source (Src) and Program (Prog) Segment of Color Correction.
Source Segment correction is usually carried out on the source materials like tapes, films, decks, etc while the Program Segment Correction is usually performed during post-production.
It conforms to the process of telecine and inverse-telecine, where rushes were processed for color correction twice, at least. Once before the post or and second during editing, or more precisely, after the editing.
The corrections done on the source materials were referred to as Source Segments while the ones performed over the sequence or timeline in the editing program were called Program Segments.
That convention is still in vogue in Avid’s interface. Just see, all the Color Correction tool sets like HSL, Curves, etc., and the tabs like Controls, Hue Offset, etc. are common to both segments of Color correction. The feature film industry now uses Non-Linear Editors.
Although both Premiere and FCP have a huge market share in the video production industry, Avid still enjoys patronage among the Hollywood feature film editors or ACEs (American Cinema Editors).
That’s why Avid’s interface still closely relates to feature film industry practices. And so are its color correction toolsets.
Extensive use of Source Segment Correction is required, when there is a need to match the colors of one set of source clips with the other. It may then follow further correction at the sequence level or timeline which is the Program Segment or Prog Segment. Finally, the shots or clips in the timeline show the result of two levels of correction.
And that makes sense. Because, a lot of time, especially outdoors, the shots vary widely in terms of colors and brightness due to sunlight, cloud, and other ambient props. Such wide variance must obviate a level of adjustment of the source materials even before it hits the post-production table.
It’s usually color correction that’s carried out at the Src segment, while both color correction and grading take place at the Prog segment.
Avid even lets you bypass one mode with the other just in case you wish to.
Let’s consider, you have a much brightened-up image at the Src Segment and you would like to suppress that brightness a bit. But, during the post, you find that’s not what you like and wish to tweak it a bit. You can then well define which level of correction is to bypass and when.
It comes particularly handy when you want to bypass one mode of correction for a group of clips with another mode.
Using both these levels simultaneously becomes a necessity where rushes are color corrected before and during post.
And that’s not exactly what is required for our purpose here, as we are dealing with a few HD rushes, shot in 1080p, which didn’t pass through any conversion except for transcoding. The footage, used here, was shot in Canon 5D Mark III in a progressive format and 25 frames per second.
What that essentially means is we can either select the Src segment or Prog segment while fixing the image. And that’s logical. Even though we are dealing with a file-based system and not films or tapes, consistency is the key for an editor or a colorist during post-production.
In this article, we shall do color corrections on the images selecting Src Segment throughout.

How do you assess an image or shot?
The first and foremost thing is you have to assess an image with your eyes for its issues.
Almost all the shots recorded in a camera come with some issues.
The video scopes, in Avid Media Composer, measure and provide different sets of values across the color space of an image. Primarily we assess an image with our eyes and then cross-check it with the video scopes.
A video scope, despite its different readings, does no good unless we know for sure which part of the image should be black or white or if the image is to be brightened up or darkened.
Here come the abilities of human eyes! Our eyes are extremely sensitive to black and white. Looking at an image, we immediately come to a conclusion if the image is bright, dark, or neutral.
Here is a table outlining the observation criteria and pertinent functions for a quick run-down just before jumping into the image. We shall be approximately following this while fixing the images.

How to read a Y waveform?
Perhaps, the most widely used video scope that the editors begin with while fixing shots in terms of luminance, is the Y waveform.
Through the Y waveform monitor, you can see the luma values of a shot from left to right in the waveform. Basically, it’s the image you are looking at through its luma values.
Vertically, the range spread from 16-235. Ideally, anything that’s white would be at 235 and anything black would be at 16.
We have to find the black and white area in the image and check if they are close to 16 and 235 respectively, in the Y waveform.
Anything below 16 and above 235 is considered an illegal range of black and white in broadcasting standards.
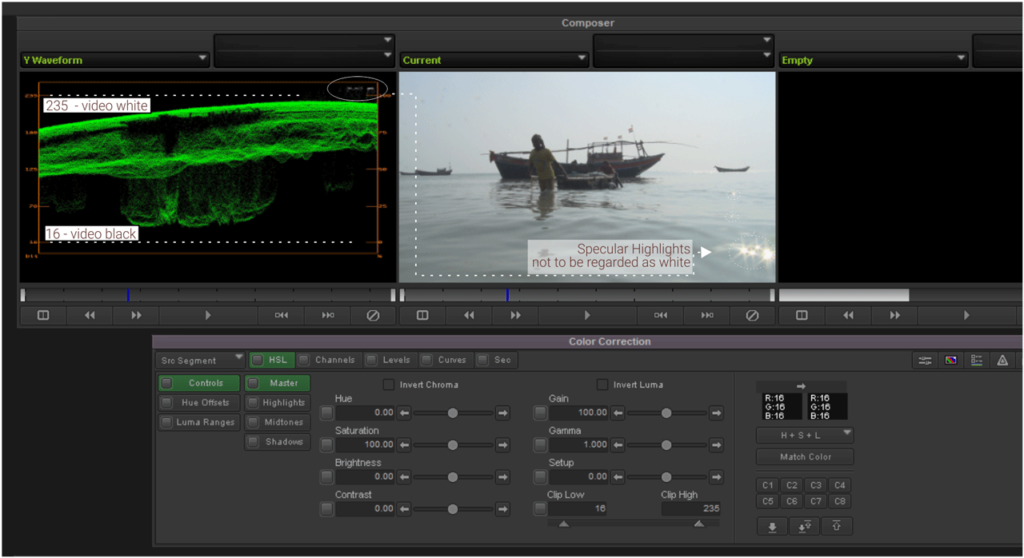
In the image shown here, we can see the waveform is showing the black-and-white distribution of the image from left to right and top to bottom.
In this shot, we can regard the face of the person and the frontal portion of the vessel (in the middle of the frame) as black.
Here is no ideal white in the image. So we consider the horizon in the right third as the areas close to white. Also, there are some specular highlights in the image.
Now, a few points about the specular highlights.
Usually, water, glass, or metal surface shine brighter than whites. We regard them as specular whites. It’s important that you mustn’t confuse them with the video white. Specular highlights typically peak above 235 and look brighter than the video white.
We have to find out the reference points for white in the image and we’ll also have to keep an eye over the specular highlights in the shot if any.
But we will not treat them as the reference point for video white.
So we have, in this image, found the areas that are black or should be black, some specular highlights, and some areas that are very close to white.
The black areas of the image are clearly lacking depth. The waveform confirms this too. The black remains, somewhere in the lower bottom segment of the waveform, at much higher levels than 16.
That means, we have to crank it down to 16.
Certain areas are peaking over 235, as marked in an ellipse, at the top right corner of the waveform. This corresponds to the water flickers to the bottom right of the image (also marked). Since they are peaking above 235, we have to bring them down below 235 within the legal range.
And for the white areas in the image or close to it, we would not do much except tweak the mid-range a bit, since the waveform shows a substantial distribution of white (also close to white) i.e. 235.
After fixing this image, we shall look at another image, where fixing both black and white will be much more pronounced. We have chosen this image for a reason. This distinctly shows the specular highlights with water flickers.
Let’s now go to fix this image.
We assessed the image with a Y waveform. Now how to fix the image?
Now that we have identified which areas of black and white of the image are having some issues, let’s first fix the black.
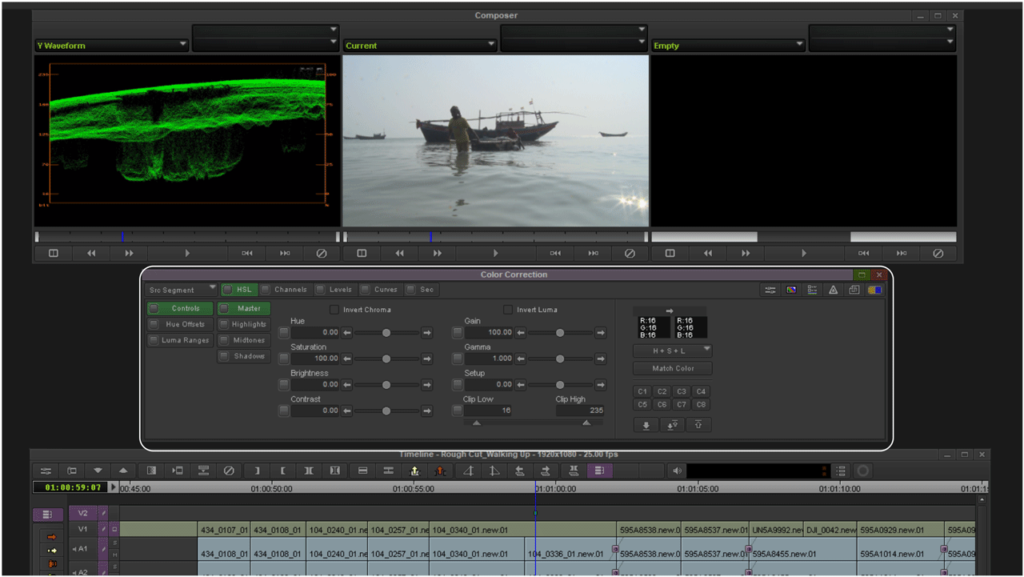
We are now at HSL> Controls > Master tab. There are three separate tabs Highlights, Mid-tones, and Shadows. But we are using the Master to access all four options of Gain, Gamma, Setup, and Clip Low and High at a time. The last one is not present in the tabs of Highlights, Mid tones, and Shadows.
As we can see in this image, Img09_FixingB&WwithHSLControls, there are three different sliders in the Control Tab under HSL.
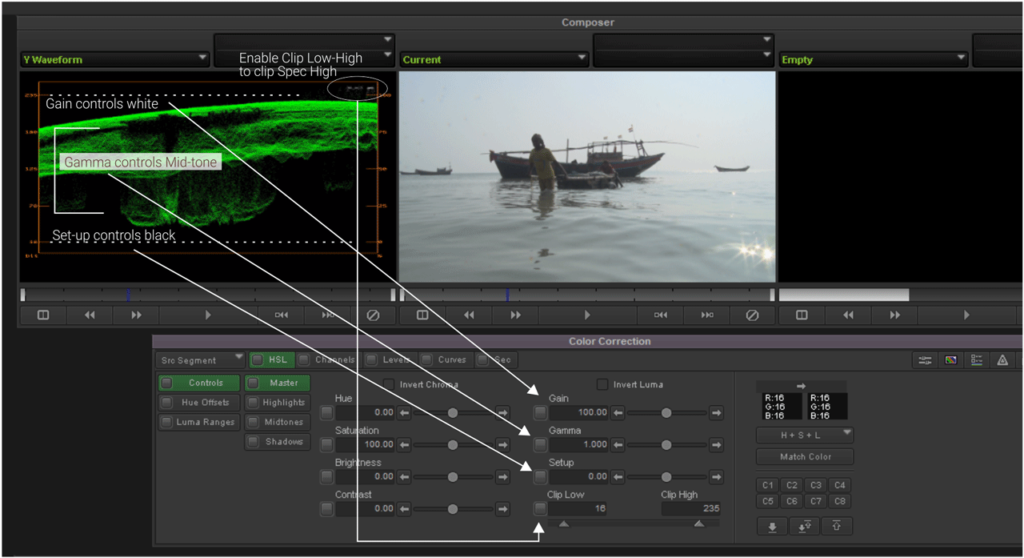
- Set up controls Black: If you move the slider to left, it will lower the value from its current level while shifting to the right will crank it up. We have to approach 16 or close to 16.
- Gain controls white: Move the slider to left or right; you get your video whites close to 235 or approaching.
- Gamma controls the mid-tones i.e. anything between 235 and 16. We usually operate this at the end.
- Enable Clip Low-High to clip the specular highlight. We have a few points with specular highlights in the image (refer to image no 8, with markings).
While dragging the slider, if you press down shift, the changes will be at the decimal level, which would otherwise be quite high. A little to-and-fro movement of the slider will also let you guess what could be an approximate value under Gain, Gamma, or Setup that you can put to attain the desired range.
Let’s see this image: 10_SetupAdjusted_BlackTo16
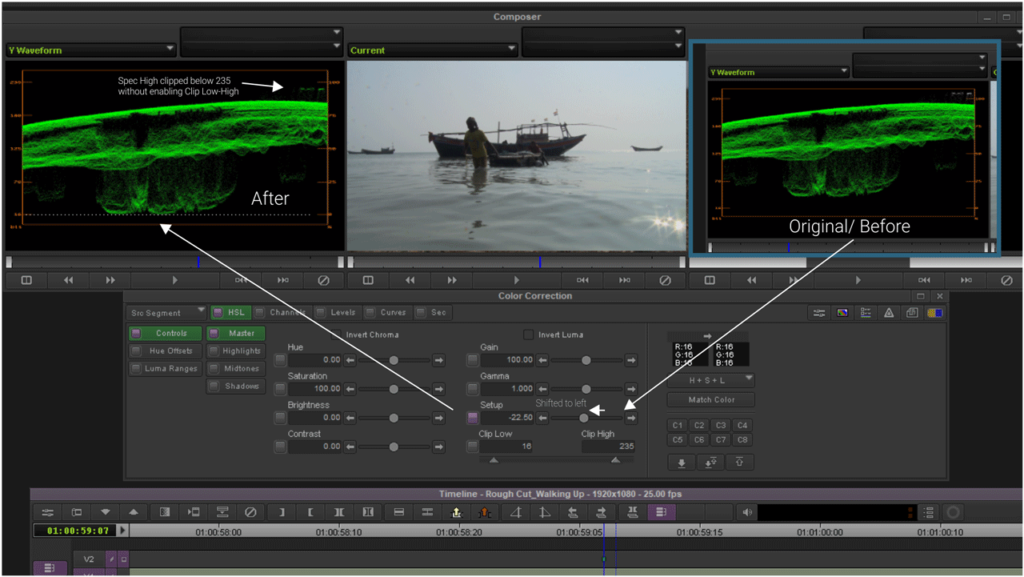
We have adjusted the setup slider. After a few try out, we have taken it to -22.5 and that leaves us with the black of the image at 16. Note, that it has also clipped the specular highlights on the top right of the Y waveform (the water flickers at the bottom right of the image).
Now we have to fix the white and for that, we have to adjust the slider of Gain control.
Let’s see the image 11_GainControlForWhite
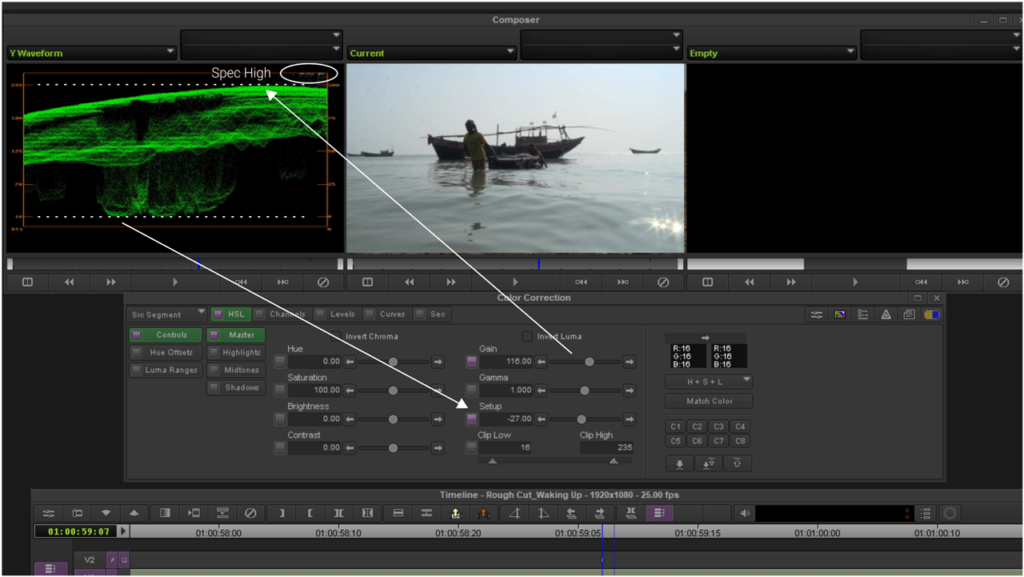
We have shifted the Gain slider to the right. But it affects the black level, set to 16. After several dry runs, we have attained this level, where Gain is at 116 and the Setup is brought down to -27.
It gives us a satisfactory level of black and white in the image, with white hovering at 235 and black at 16.
But it takes the specular highlight of the image clipping over 235, which we have to clip below 235.
Before, clipping the specular highlight, we would turn to mid-tones for a little adjustment. This image, with a person trawling a cart in knee-deep water and a vessel in the background demands a fine adjustment of the mid-range to boost its silhouette effect.
Let’s turn to this image. 12_GammaLowered
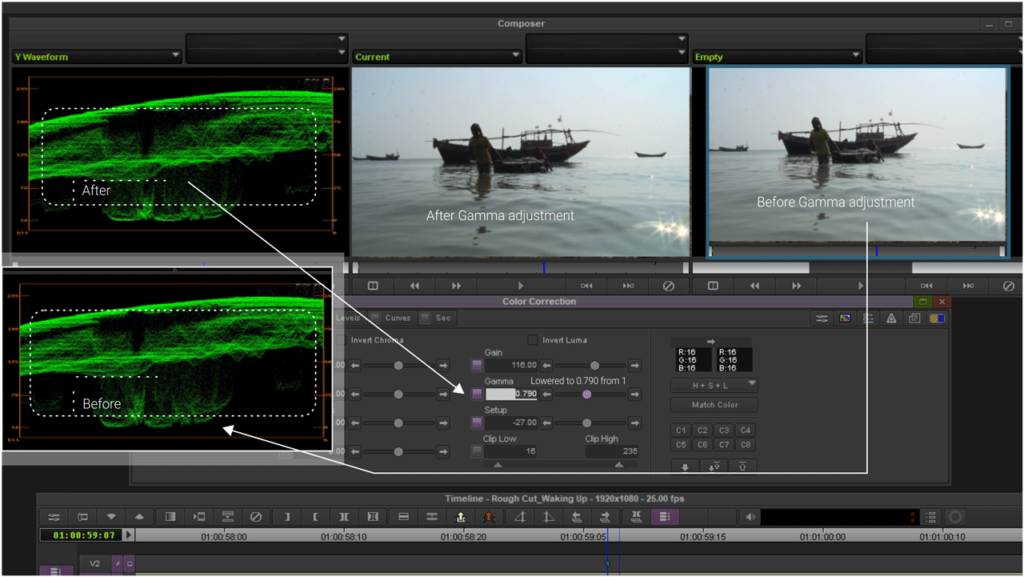
We made a fine adjustment, and brought down Gamma from 1 to 0.790, moving the slider slightly to its left. It has certainly darkened the midrange, intensifying the silhouette of the image.
The water droplets collected over the lens have become a little more evident.
But that’s a different story!
The image certainly looks much corrected after the Gamma adjustment.
Let’s now turn to the final section of this correction phase, which is clipping the specular highlights.
For that, we just have to enable the button to the left of Clip Low. And it instantly brings down the Specular Highlights to 235.
See the image: 13_ClippingSpecHighs

And we will now see another instance of Avid’s Color Correction using HSL with a different image.
Another Instance: Case Study II
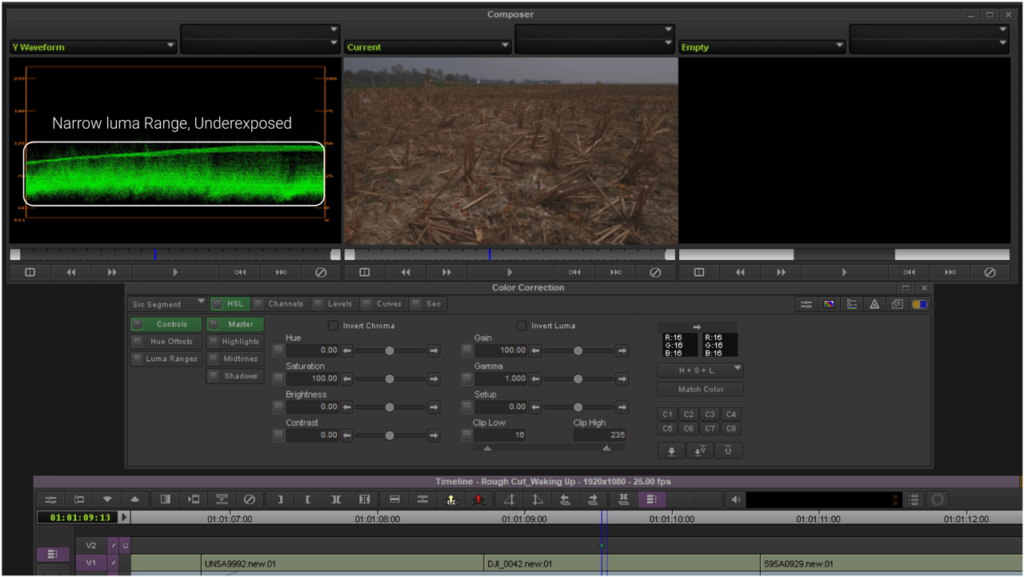
Let’s see the image and assess it.
This image with a narrow luma range points to underexposure. Why is it underexposed? Because the range is close to the level of Video black i.e. 16. A reverse position, close to 235 would make it overexposed.
The image doesn’t have an ideal black or white point for reference. In this case, we will follow ‘Approach Black and Approach White’. That means, we open up and broaden the narrow luma range. And in doing so, the range may not fully extend to 16 and 235 but could remain somewhere in between.
- The first thing is to fix the black with the Setup control. It may further darken the image, but that’s okay.
- The second task is to boost the Gain. It will surely open up the range.
- The third one is to adjust the Gamma for the mid-tone.
- No points in clipping high or low, so no need to use enable Clip low-high.
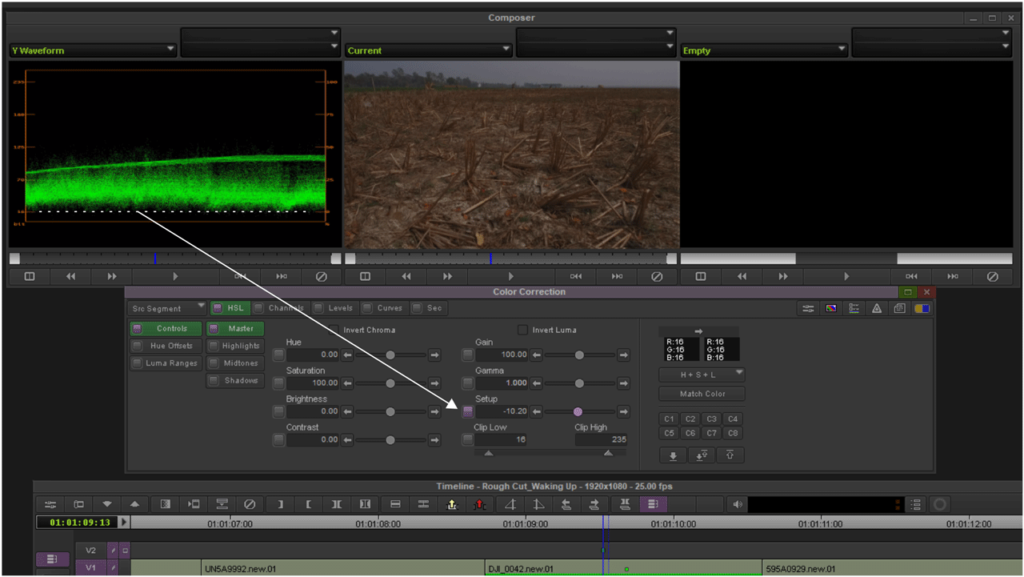
Setup brought down to -10.2 brings the dark area to an acceptable level of black.
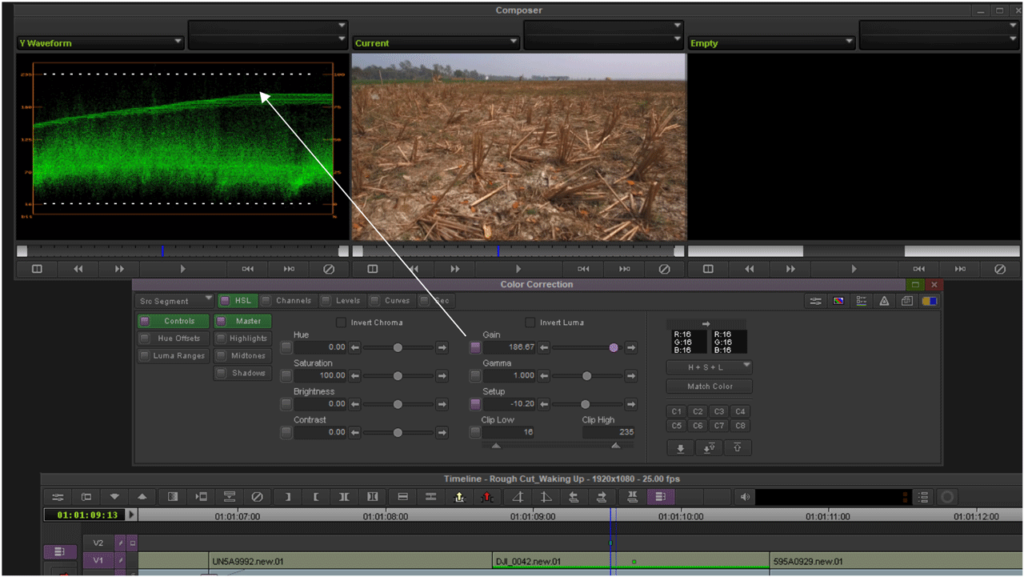
Gain, boosted over 186, yields a much-widened luma range. The image looks much clearer now. But, the Setup has to be reworked as the ‘luma range’ shifted upward.
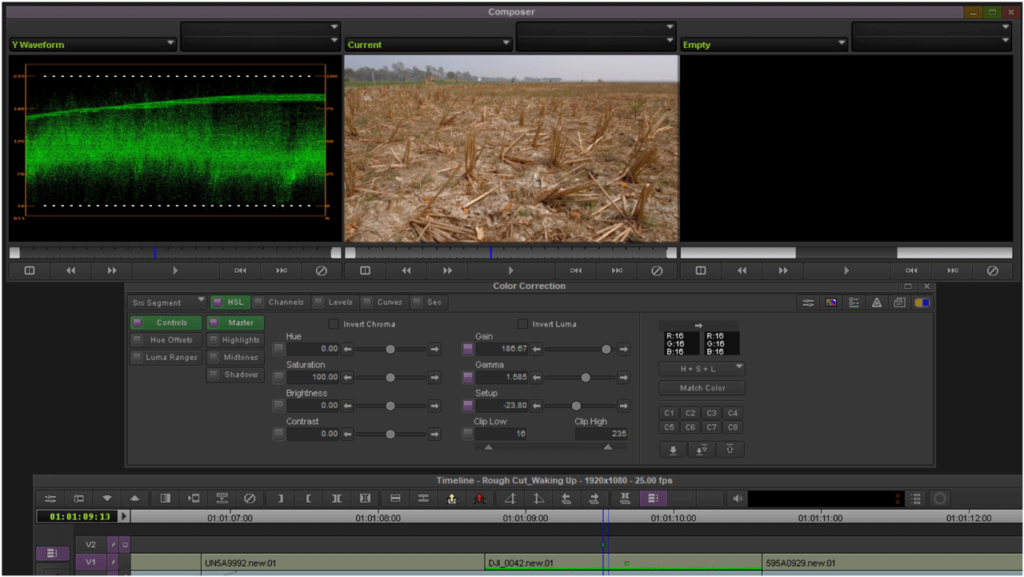
With Gain at its adjusted level, Gamma cranked up to 1.585 and Setup brought down to -23.8. This is a great improvement. We are close to the final adjustment.
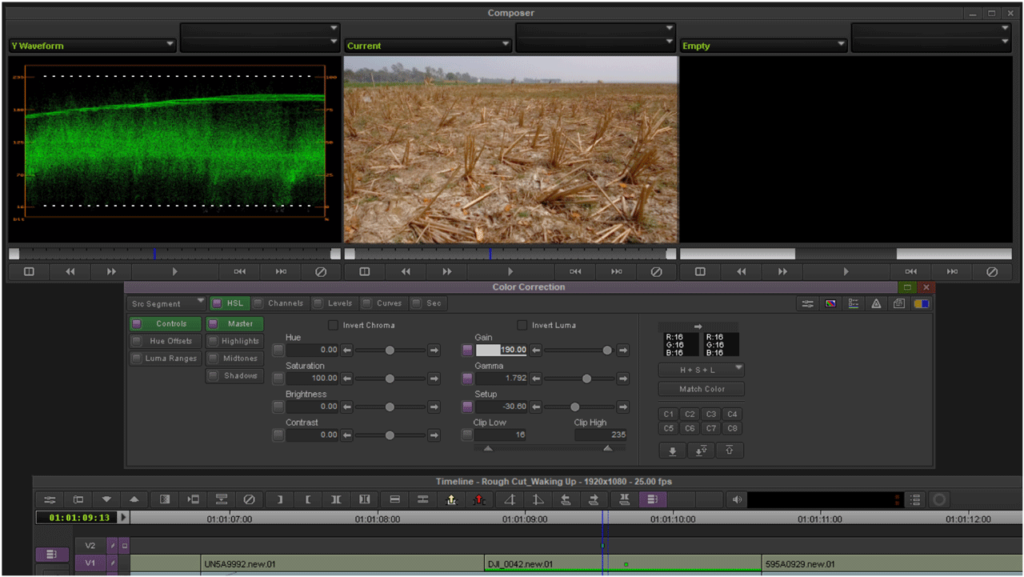
Gain: 190, Gamma: 1.792 & Setup: -30.6
This has opened up the range to a pretty decent level, where the field is great. This is a ‘dolly’ shot. The image looks a little reddish though, we would learn in an upcoming article ‘Fixing Color Cast with Hue Offsets’.
Conclusion
Avid offers a huge set of functionalities for color correction. In this article, we have just learned how to assess an image with regard to its luma range and fix it. We kept ourselves within the Control Tab of HSL under Source Segment level color correction.
In doing so, we also have discussed the primary and secondary level of color correction and their interface inside Avid, the bit depth of video, and Src and Prog level correction.
Most of the time shots, without any color cast, see a great improvement even with Setup, Gain, and Gamma Control using Y waveform.
We shall come up with how to deal with color cast in a separate article shortly.
Images/ shots courtesy: Creatives (creativesnext.com)
Shot in villages near the Bay of Bengal, South 24 Parganas, West Bengal, India in Dec 2018 under a livelihood management program implementing aquaculture practices.