

11 Things You Must know in DaVinci Resolve 19 for Video Editing – Part 2
Published on 25 June 2024
Introduction
Black Magic Design’s DaVinci Resolve 19 for video editing is arguably the best non-linear editor (NLE) available free of charge, today.
With every release, it’s adding more and more features to the program, adequate for any professional production pipeline. In this piece, we’ll take up from where we left off in the Part 1 of this series.
We have already discussed the Project Settings and Media Page in the last piece. Here, we’re going to first have a brief look at the interfaces of other pages and then discuss how to edit in this NLE. As for the title of this series, I have structured more or less 11 headers as follows.
- Installation
- Launch
- Interface
Media – Cut – Editing – Fusion – Color - Editing
- Motion Control
- Transition
- Effects
- Titles
- Audio
- Color Grading & Corrections
- Delivery/ Output
Let’s stick to this structuring, take up from the interface of the Cut & other pages. As I said, after getting familiar with rest of the interfaces, we’ll jump into exploring DaVinci Resolve 19 for video editing.
Just to remind you, you may like to go back to the Part I, just in case you need to refresh your memeoryu with the Project settings and Software settings (Yes, they’re different) before getting down into its different pages or interfaces.
But, I would like to have a look at the Software settings of the program very quickly, since I didn’t touch that in the preceding part.
Accessing the Software Settings in Preference Tab in DaVinci Resolve 19 for Video Editing

This is, as I said, the software settings, which you can access at the Top left menu, DaVinci Resolve > Preference.
This pops up a dialogue with different tabs mostly for controlling the hardware settings. You may like to walk around a bit for tuning your system according to your preference.
Clearly, it’s not the project setting and it remains unchanged till you tweak it and is not a function of any project. In plain language, it’s not dependent on your project.
Let’s now get to other interfaces that we didn’t talk about in our previous post with the structure I had had mentioned above.

If you look at the contents of the previous post, I have talked about the ‘Media page’ under 3.1 sub header. Let’s start with the ‘Cut Page’ under 3.2.
Let me refresh your memory once again with the video where in we could what are the clips we’re using in this piece like before.
3.2 The ‘Cut Page’ interface in DaVinci Resolve
It’s kind of bit counter-intuitive why even this page or section is there in spite of an Edit page. Cutting is an integral part of editing, so what’s the point of letting it be there as a separate interface?
You can think of this section as a quick tool of editing. Also, there is another aspect of it. Black Magic Design makes different hardware apart from its software solutions like this NLE. This Cut page is to some extent a hybrid of hardware and software editing altogether.
The Cut Page is more like an on-the-fly editing and naturally amucher faster editing tool, while the Edit page is a dedicated NLE interface.
3.2.1 Old-day-like VTR controller or editing on-the-fly right after location shoot?
It’s kind of mimicking the gone-by era of VTR-controlled editing on the fly. You can sync you camera shoot with a workstation and use the monitor to switch back and forth between shooting and cutting. This certainly lets you have a faster edit on location without having to getting into a studio set up.

To run down quickly with our clips for DaVinci Resolve 19 for video editing, once you get into the Cut Page, you’ll see the folder (in this case titled as ‘Concrete Works’) containing clips.
Once you double click the folder, it’ll show up the clips within and I brought one into the viewer and then dragged it down to the timeline.
The timeline in the Cut Page has two segments. The upper part is the zoomed out version of the timeline where you can see everything inside the timeline, while the lower time line has a play head fixed for now and it make you have a zoomed in view of the clip.
3.2.2 How to make the ‘fixed’ Play head move by changing the Timeline Options in the Cut Page of DaVinci Resolve 19?

If you uncheck the ‘Fixed Playhead’ in the Timeline Options in the Cut Page, the Fixed Playhead will no longer remain fixed and instead will start moving.
Now, I don’t know if you would want to do that making both the play heads move together, one showing the entire timeline, while the other moving over the clip.
My idea is Black Magic has, with the ‘Fixed’ and ‘Moving’ Playhead, imitated the jogging and shuttling action of the NLEs. Whatever it may be the case, I find a fixed play head, rather than its moving counterpart, is more helpful. Again it’s a personal preference.
3.3.3 Cut page is all about Fast Editing – Trim back and forth fast in Lower and Upper Timeline

Just hover your cursor over the front end of the clip in the lower timeline and you’ll see one icon. Drag that back where you think it’s right and you’re cut is done. Same way you can do it on the other side of the clip too.
3.3.3.1. How to trim clips in the Upper Timeline of the Cut Page of DaVicni Resolve 19 for Video editing
You can edit the clips in your upper timeline as well. Look at the screenshot below. It’s not that you can only edit the lower timeline

of the Cut Page of DaVinci Resolve 19 for video editing. Just drag the front end of the clip in the upper timeline and position the end somewhere you like. Once the trimming is over at one side, you can continue doing it on the other side of the clip.
You can even bring clips onto the upper timeline. Sounds weird ! Let’s do that.
3.3.3.2 Bring Clips onto the Upper Timeline in the Cut Page of DaVinci Resolve
Select any other clip inside the Master folder or project panel. Bring by dragging the clip onto the upper time line.

Cut page is somewhat different an interface for live sync with your camera and fast processing of your footage. It’s particularly helpful for journalistic assignment, when a journalist or a photojournalist has to perform a fast edit on location and upload the story to the cloud for review of the executive producer.
You can perform almost all the video editing tasks inside the Cut page of DaVinci Resolve, with fast and easy access of the tools.
3.3.4 The relation between the Cut Page and Edit Page within DaVinci Resolve for Video editing
As I have already said, it’s somewhat counter-intuitive to understand the necessity of a Cut Page separately, when there is a dedicated editing interface inside DaVinci Resolve.
In plain language, Cut Page is a miniature version of a much larger and robust Edit Page of the DaVinci Resolve. The former lets you perform an edit task or rough cut or creating an assembly line quickly, while the latter brings all the necessary tools possible for a professional video editing program for its finalization.
The point is whenever you make any change to the Cut page in terms of editing your clips, the Edit Page also gets updated instantly. Let ‘s see how do the changes in the Cut Page (the above Cut page) affect the Edit Page.

Clearly, the Edit Page gets instantly updated with the changes you made in the Cut Page.
3.3.5 How to do ‘Trim to Audio’ inside the Cut Page in DaVinci Resolve 19

We have seen that when you make any change to the clips in the upper timeline, the trimming takes place according the video, or more precisely the video frame thumbnails, which you can clearly see. But what if you want to trim according to the audio ? There is a technique. Let’s see how can we do that?

- Click on the Timeline options
- Select ‘Trim to Audio’

So, you get the idea how to get the audio waveform just in case you want to editing keeping an eye to the audio of the clip. Let’s now move to see what other features are there that we can use inside the Cut page of DaVinci Resolve 19 for video editing.
3.3.6 Use Multi Source option to view the clips inside the Master Project Folder in the Cut Page
As a video editor, you may want to see all the clips together, at times. It’s particularly helpful for match cut. In the screenshot below

you can see all the clips at one place. Although it says Camera1, Camera2 and so on so forth, essentially it shows all the imported clips/ media in a single viewer window. As I said, it’s really helpful for creating a match cut .
Besides, it’s convenient to be able to look at all the clips at one place. If you import more clips, the size of the video thumbnails will adjust automatically to accommodate the added clips in the viewer.

I have imported another clip, by right clicking over the Master/ Concrete Works panel, with the Multi Source option still selected and the viewer window instantly updates.
The updating of clips being shown on the viewer window inside the Cut Page of DaVinci Resolve is truly dynamic. You’ll see the number of clips being shown changes dynamically, as you scrub through the viewer window.

3.3.7 The ‘Source Tape’ Feature in the Cut Page – See all the B-rolls at once
As we know for sure by now, the Cut page is all about speed editing in DaVinci Resolve that offers a tool set for fast operation. One of the foremost things in video editing is watching the B-rolls before you even start assembling your shots.
The ‘Source Tape’ feature brings an extremely useful function inside the Cut Page to help you watch all the clips one after another without you having to bring (or double click) each one of them separately. Let’s see how does that work.

With the project master folder opened and the clips visible, Click on the icon ‘Source Tape’ as shown. What it does is, it shows all the clips laid in the viewer window, one after another. You don’t need to bring each one separately.
It’s helpful, as it cuts down the use of tools to an extent. It also shows the audio-video content of the clip. Many video clips do not have audio and that’s even showed up here. Look at the last clip, it doesn’t have any audio and the space for meant for the audio wave form for this clip is blank.
The Source Tape feature shows up all the clips one by one and a single clip on the viewer window, while the Multi Source feature shows all the clips together on the viewer window.
3.3.8 The Inspector Tool of the Cut Page in DaVinci Resolve 19 for video editing
The inspector tool inside the Cut Page of DaVinci Resolve 19 for video editing is very helpful as it contains all the necessary audio, video and file info of the clips and a handful of tool sets for speed editing .
All you have to is select one clip and you’ll get to see the panel al the right side of the screen. Let’s have a quick look over the functions of the tool sets.
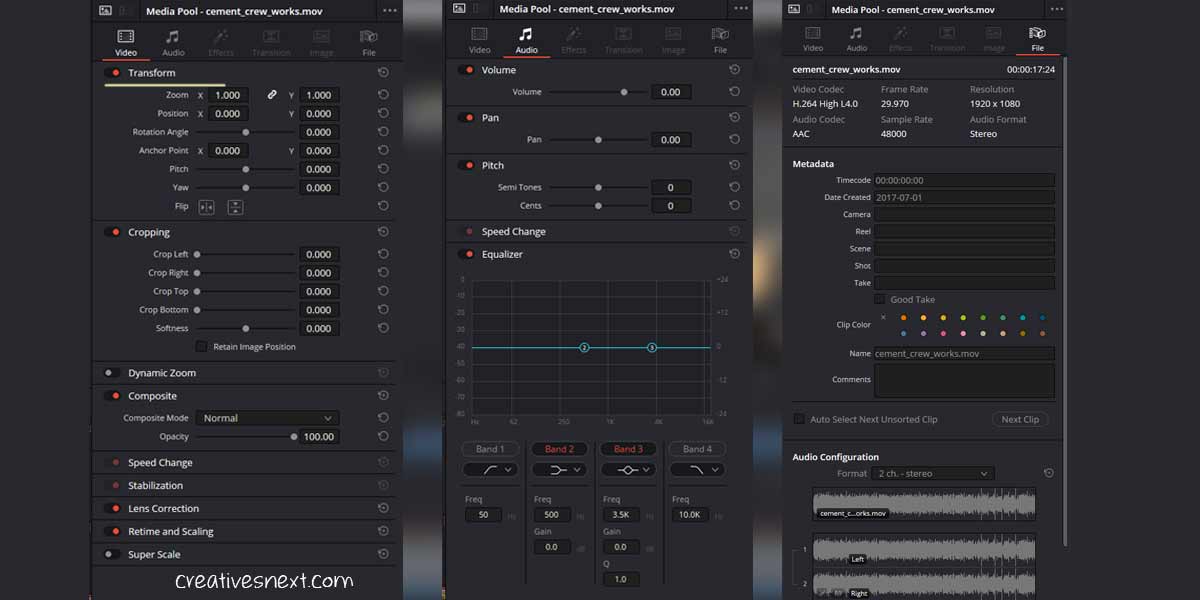
If you select any one of the clips (you will have to, to activate the inspector tool panel), three panels will be highlighted, viz. Video, Audio and Files.
These panels, as the names suggest, carry some tool sets speed editing and accessing the video information. If you click any feature, like Transformation (this remains open, by default), the feature will open its functions right beneath it and lets you have related controls.
It’s intuitive, right! I am not going into details of these functions as you’re most likely familiar with these settings some where else. You can quickly access some controls and tweak the parameters.
The same mechanism applies for the Audio panel where you can adjust the volume, pitch and even equalize using different bands. The File panel makes you access the clip information, often helpful during editing.
The panels for Effects, Transition and Image are greyed out because I haven’t applied any effects and transitions yet and there is no image either inside the mater project folder.
Let’s now move to the Edit Page which is at the core of DaVinci Resolve 19 for video editing.
4. The ‘Edit Page’ in DaVinci Resolve 19 for video editing
It’s pretty obvious that you’re here at the core while at the Edit Page of DaVinci Resolve 19 for video editing. You already got the idea that whatever changes you made to the Cut Page, the Edit Page gets instantly updated.
Whether or not, you use the Cut page for your speed editing, you can always start from scratch inside the Edit Page for editing.

You have arrived at the Edit page just after where we left off the Cut Page in the previous section. See the underlined ‘Media Pool’ on the top left corner! It’s a toggle and you click on it to open up the Master Folder containing media clips, images, image sequence and any other files already imported.
Or, you can also create a new bin by right clicking on the empty space, as shown in the above screenshot, just in case you’re starting everything from scratch here at the Edit Page. With that Bin created and opened (by double clicking), you can import your media inside that Bin.
4.2 The Media Pool Button – Toggle on/off for the Bins containing Media files
If you toggle off the ‘Media Pool’ the source window, viewer window and the timeline will stretch to fit the entire screen.

I find this useful with a hotkey assigned to it and that enables you instantly switch on and off the media pool dialogue occupying a large space of the editing real estate. We’ll come to the Keyboard customization in a later section.
Let’s again bring back the Media Pool by clicking on it.
4.2.2 Hover over the clip thumbnails in the Media Pool to preview the media on the Source Viewer

There are three different mode of viewing a clip icon or media inside the Media Pool. From the left, as marked in the top left, these are listed below
- Metadata
- Thumb
- List
Remember, to preview a clip on the viewer just by hovering your cursor over it, you need to select either of Metadata or Thumb view inside the Media Pool. Just hover the cursor and you’ll see a play head which you can move along the clip thumbnail. This way, you can watch the clip fast.
You can anytime double click a clip to load it onto the viewer, which is essential for editing, we’ll be coming shortly. You can also drag any clip from the Media Pool and bring that onto the Time line.
I don’t like this method of adding a clip onto a time line, unless there is a specific purpose, like Trimming a long Interview in chunks or something like that.
Loading a clip by double clicking on the Source Viewer is also possible with the List view selected. With these usages inside the Media Pool, let’s move on to the different editing techniques in DaVinci Resolve 19, by creating a fresh time line within our Resolve project.
4.3 Different techniques in DaVinci Resolve 19 for Video Editing – Create a New Timeline
Let’s create a fresh time line and start with bringing a clip on to that time line. Let’s call it Concrete Works_Part2.

Let’s see what is happening here, quite a few things in fact.
- If you’re already within a Timeline or sequence, which we’re actually when we made a few changes in the Cut page and thereby getting the Edit page updated, you have to first get out of that Timeline.
- Actually, you have gone through the clips imported in a folder called ‘Concrete Works’. So within, the Master folder there is one Folder called ‘Concrete Works’ and a Timeline, in this case Timeline 1. We want to create another Timeline at this level.
- Click on the Master, as shown in an inset image and it will take you one level up.
- Right Click anywhere in the Master Folder and you’ll get to see one dialogue. Select Create New Timeline.
- It will pop up a Dialogue box with a few details you have to enter. I have made one change apart from the Title or name of the Timeline, i.e. Mono as the audio track. With all these entries, click create to make a new Timeline. Creating a new Timeline is a necessity, if you want to start afresh inside the Edit Page.
Any change in the Cut Page automatically produces a Timeline in the Edit Page and we don’t want to work on that. That’s why we did all these to create a new Timeline.
Now, you have created a new Time line which is essential for working inside the Edit Page of DaVinci Resolve 19 for video editing.
4.4 Insert Edit – How to insert a Clip in the Timeline within Edit page of DaVinci Resolve 19

Insert Edit is the simplest form of edit where you just add or insert a clip in the timeline. It could be a bare clip, right after or before a clip or in between two clips. In this case, let’s just insert a clip in an empty Timeline that we have just created. So, what have I done here!
- Loaded one clip on the viewer.
- Selected on portion of it. Simply, position your cursor in different positions, the former would be the In point and the later would be the Out point, as marked.
- Press F9 or just drag that portion from the viewer window to the Timeline. There are quite a few commands in the Edit menu drop down, that we’ll come to one by one.
4.4.2 How to Zoom in Timeline – DaVinci Resolve 19 for Video Editing

- Zoom in: CTR + =
- Zoom out: CTRL + –
- Zoom to Fit: Shift + Z
You often need to zoom in and out the clip segments in your timeline and for that the shortcuts are an absolute necessity.
4.5 How to trim a clip in its front and back & ‘snap-trim’ to the play head position

- Just hover your mouse at any end and a trim icon will appear.
- Drag the clip end to your desired position
- You can also park the play head at a certain position and then use a shortcut for Trim Start for the trimming at the beginning of any clip: Shift + [
- For Trim End this command is Shift + ]
- Keep you Snapping tool (N) enabled as that dragging will help you snap at a specific position.
- Also enable the Linked Selection tool, since it’s important to trim both the video and audio track together.
4.6 Extend Edit in DaVinci Resolve 19 for video editing – Extend a trimmed clip to the play head positioned beyond its current segment length
Let’s say you have a clip segment (that means already trimmed) and you want one end (or both) to extend to the play head, parked before or after the clip. It’s called extend edit, since its segment is extended and it’s extremely useful a function for any non linear editor.

- There is a catch though. After positioning your play head, you have to select the end of the clip nearer to the play head.
- The clip segment end, once selected, will turn greenish and ready for an extend edit.
- Press E or Select Extend under the Trim Menu (pointless, why won’t you use the shortcut instead!)
- You’ll see the clip end extended to the position of the play head.
Trimming and Extend edit are opposite to each other, in terms of where you want to shorten the clip or expand. And they are extremely useful functions for video editing.
Let’s now move to see how we can use other types of Edit in different ways inside DaVinci Resolve 19.
4.7 Insert Edit – Place a clip segment between two clips with no change to their lengths
If you want to place one clip segment, selected with In point and Out Point, between two clips, just select the clip segment in the source viewer and Press F9.
This will move the latter clip by the same duration as that of the clip segment inserted.

Now, to reverse this process, that means getting rid of a clip in between, there are two different ways.
4.7.2 Remove the Clip and the Space it was occupying together – Ripple Delete
- Select the clip you want to get rid of.
- Press Delete or Shift + Backspace. It’s called Ripple Delete

4.7.3 Remove the Clip only – Leave the space in between empty
- Select the clip
- Press Backspace to remove the clip
Both these operations are useful in video editing. So, you have to use both the Delete Key and the Backspace as and when necessary.
4.8 Overwrite Edit in DaVinci Resolve 19 for Video Editing

Pretty Simple. You overwrite one clip or clip segment with another.
- Select a clip segment with In point and Out point
- Press F10 or Edit> Overwrite
4.8.2 Ripple Overwrite – You overwrite a clip by removing it totally and then replace with another clip or clip segment
This is yet another useful feature that DaVinci Resolve added for video editing. Let’s see what happens in case of Ripple Overwrite.
- You select one clip segment in the source viewer.
- Position your play head over a clip in the time line.
- Use Edit> Ripple Overwrite or press Shift + F10 to Ripple Overwrite the clip selected in the time line

What happens in case of Ripple overwrite is the selected clip in the time line gets completed overwritten and replaced by the clip or clip segment selected in the source viewer.
Interestingly, ripple overwrite replaces the clip in the timeline in similar way there is a clip after it. And this is again very much helpful for video editing quickly. You make the changes in the clip without affecting the length of the next clip in the timeline as well as the length of the clip you brought over from the viewer window.
4.9 Replace Edit – Difference between the Replace Edit and Ripple Overwrite edit in DaVinci Resolve 19 for Video editing
It may seem a bit counter intuitive why are both Ripple Overwrite and Replace Edit, when the former does the work of replacing a clip altogether!
But it’s not. In case of Ripple Overwrite the length of the clip overwriting the clip in the timeline doesn’t get affected at all. Whatever you set in and out in the source viewer, that gets placed in the time line in its entirety.
In case of Replace Edit, the length of the clip segment in the timeline doesn’t get changed. Let’s understand this with an example.

Here is an instance, where I have selected a 3 sec clip segment in the source viewer. Also there is a clip segment in the time line of 2:13 sec. Let’s understand what happens in case of the both these operations.
In Ripple Overwrite
The whole portion of 3 sec clip selected in the source viewer will overwrite and replace the 2:13 long clip in the time line. That means the space between the previous and next clip changes from 2:13 sec to 3 sec.
In Replace Edit
The first 2:13 sec of 3 sec clip segment will replace in the 2:13 sec long clip segment in the time line. That means the space between the remains unchanged.
4.10 Replace Edit in the light of 3-point edit in DaVinci Resolve 19 for video editing
4.10.1 What is a 3-point Edit?
It’s very common technique for video editing, no matter whether you’re are newbie or a seasoned editor. While the pros can skip this section, let’s have a quick brush up of the concept of 3-point editing before we actually use this edit technique inside the Edit Page of DaVinci Resolve 19.

What happens in case of 3-point edit?
- You specify three different points in source and timeline. These can be either of In point and Out point in Source and any one in Timeline or just the opposite, i.e. In point and Out point in the Timeline and any one (either In point or Out point) in the Source.
- When you insert the clip in the Timeline, the fourth point automatically get defined or marked by other three points. Let’s understand this in the light of the above image.
- Let’s assume that we have marked a segment of 3 sec in the timeline with In and Out points and marked the In point in the source where the clip segment is more than 3 seconds (this is important, else the 3-point editing won’t work).
- Now, when you insert or replace the clip in the timeline, 3 sec of clip segment from the source will be laid or inserted in the Timeline, since the length of the clip segment that you have marked by placing In Point and Out Point in the Timeline is 3 sec.
- Similarly, this can take place if you marked an Out point instead of In point in the source viewer.
4.10.2 How to apply Replace Edit for 3-point editing in DaVinci Resolve 19 for video editing?

Let’s see what I have done here.
- This time, I have just positioned the pay head somewhere in the Source Viewer, not the timeline without marking In and Out.
- I have chosen a clip (in the middle) and parked the play head somewhere close to the middle of the clip segment. I want this clip segment to be replaced with the one loaded on the Source viewer, a segment of it to be precise.
- With the source viewer selected, I have done Edit> Replaced Edit or F11. What happens here, during Replace, is the frame matching with the play head in the source viewer replaces the frame at the play head position over the clip segment in the timeline.
- With this frame placed at the Play head position, the backward (X) and forward (Y) segments get laid automatically.
You can ask why is it a 3-point edit, while you’re having to define only two different points with two play head positions! The thing is your clip segment’s In and Out points are already defined. That’s why it’s a 3-point edit.
Even if there is no clip after the clip segment you select on the time line, you can perform Replace Edit, since the clip you selected has an In point and an Out Point, no matter whatever is there or not after that clip to be replaced.
I am almost nearing to the end of this piece, though we have scratched the surface of the video editing only. But the operations I have explained till now are good enough for professional video editing.
I leave Edit> Place on Top and Edit> Fit to Fill for you to explore as they’re easy to understand. But there is another feature under the Edit menu that can come handy in DaVinci Resolve 19 for video editing.
4.11 Understanding Edit > Append to End of Timeline in DaVinci Resolve 19 for Video Editing
You can access this feature either by Edit> Append to End of Timeline or Shift + F12. I have done an instance for you. Let’s first see the screen shot and then analyze what took place.

- I have selected a portion of clip in the Source viewer, either by positioning your play head. Whatever remaining of the clip till the end of the clip will be used for this edit in the timeline.
- Now position your play head in the timeline, anywhere. It doesn’t matter.
- Use Edit > Append to End of Timeline or press Shift + F12.
- The selected clip segment in the source viewer will be placed right after the last clip in the sequence or Timeline.
- It’s useful when you know in advance how do you conclude a sequence or micro-sequence with a shot or image or image sequence.
- Remember the length of the clip segment depends on the position of your play head in the source viewer. If you place it at the very beginning, the whole clip will be place at the end of the sequence. If you place the play head 5 sec before the end (in the source), the length of the clip to be appended will be 5 sec.
Conclusion
We have covered quite a few useful things in the piece on DaVinci Resolve 19 for video editing. There are many more that I’ll come up with in the coming days.
For now, it’s important you get to familiarize with these operations, by as many practice as possible. For someone who has used Avid Media Composer for decades and Premiere Pro for years, like myself, I can say this NLE still has much value to add for video editing.
Especially, if you consider it has a free version. And by the way, I have been using the free version for this writing this blog. DaVinci Resolve 19 has a paid version too (I have used yet used that though).
This piece is on editing. I’ll soon come up with more on DaVinci Resolve 19. Till then happy practicing.