
Basics of Avid Media Composer; Part 2 – Editing
Last updated on 26 May 2024, Published on 18 April 2023
Introduction
Learning the basics of editing in Avid broadly covers five areas. They are editing, Audio, Effects, Color Corrections, and finally the export setting.
We have already covered the File and folder systems, Media Management, and the Interface of Avid in Part 1. Just in case, you’re a newbie to Avid, I would recommend you first have a look at Part 1. Then come back to this piece to get along.
For any, NLE or Non-linear editor like Avid, editing or the workflow takes place in layers.
First comes media management or more specifically transcoding of your footage inside Avid. This is followed by getting your bins and folders properly arranged within the Bin container and editing.
During the first draft editing, you create the first lineup of edits following the structure of your sequence. This is barely scratching the surface, like shot selection, their arrangement, and removing the NGs (Not granted). Once the lineup is ready, editors call it the first draft of the sequence, you move to the next one.
After the first draft or assembly, you move on to apply Effects. Then tweak the audio settings of the edited segment followed by a color correction. There is no hard and fast rule whether you perform the audio edit first or the color correction, so long as you’re performing the whole thing yourself.
If there is a dedicated color grader or colorist, you have to hand him over at the end after finishing the audio stuff. Export or rendering of the timeline naturally takes place at the end. So in this piece, we’ll go through the basics of editing in avid with regard to the following.
Contents
Fixing the Media Creation Settings before Editing in Avid
It’s important to fix this settings even while learning the basics of editing in Avid Media Composer.
Let’s go straight into it. We have created a sequence within an already existing project titled ‘Test 1080p 25’, somewhat self-explanatory. You have to check the Media Creation Settings either by accessing File > Media > Media Creation Settings or by pressing Ctrl + 5.
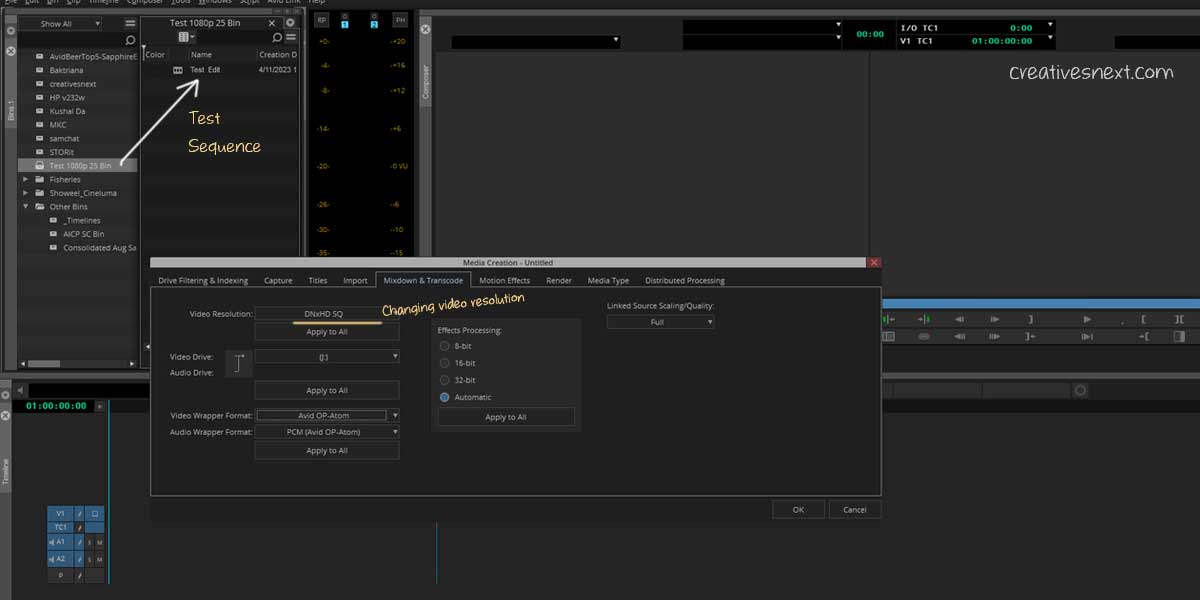
Visiting Media Creating Settings should become your habit by now as you must assign all the media types and formats-related settings prior to editing, here. I have changed the video resolution to DNxHD SQ since my footage was shot in Canon 5D in 1080p with 25 FPS.
There is something called Video Wrapper Format within the Media Creation Settings that basically defines the video file format or container. You can see two types of Video Wrapper Formats.
Understanding the File Formats for Basics of Editing in Avid
Avid Op Atom
This container lets you have a pack of separate MXF files for each of the image and audio tracks.
MXF OP1a
This one is for professional digital and audio media defined by SMPTE standards that puts image, audio, and metadata in a single file.
For our purpose, I let it remain as the Avid OP – Atom. For the Audio Wrapper Format, I have selected PCM (Avid Op-Atom). You can see there is also an option called AIFF-C (OMF). You have to select if you need to switch to Pro tools or other third-party applications.
Once you’re through with the Media Creation Settings, go ahead and transcode your clips or footage in the respective drive. You know how to transcode, right? Just in case, you don’t have a clear idea, here is the guideline from our previous post.
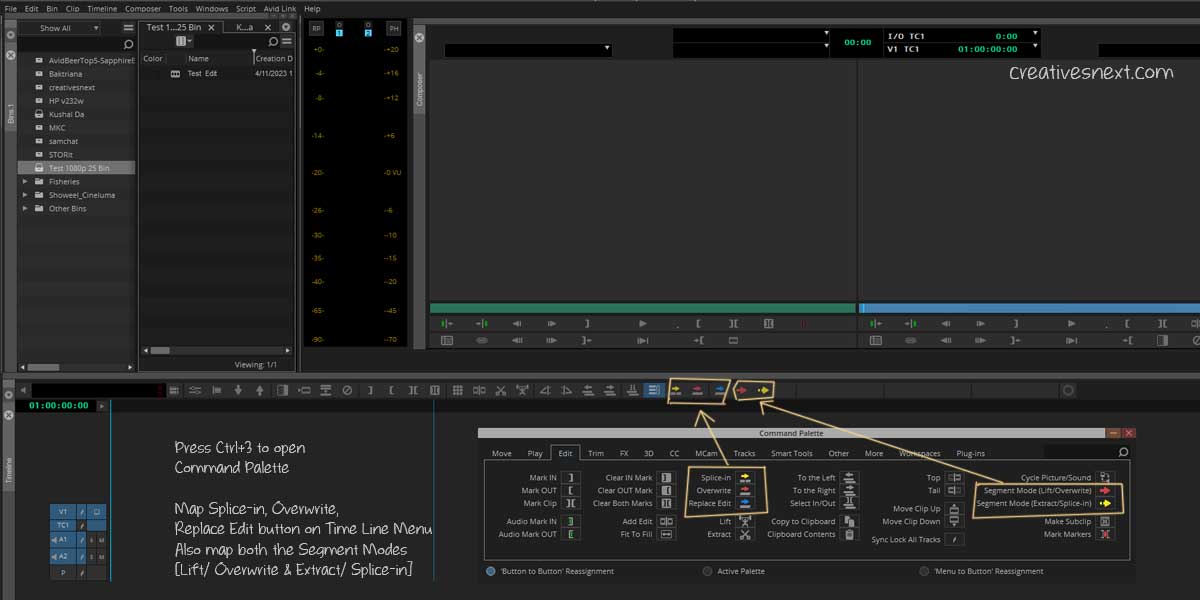
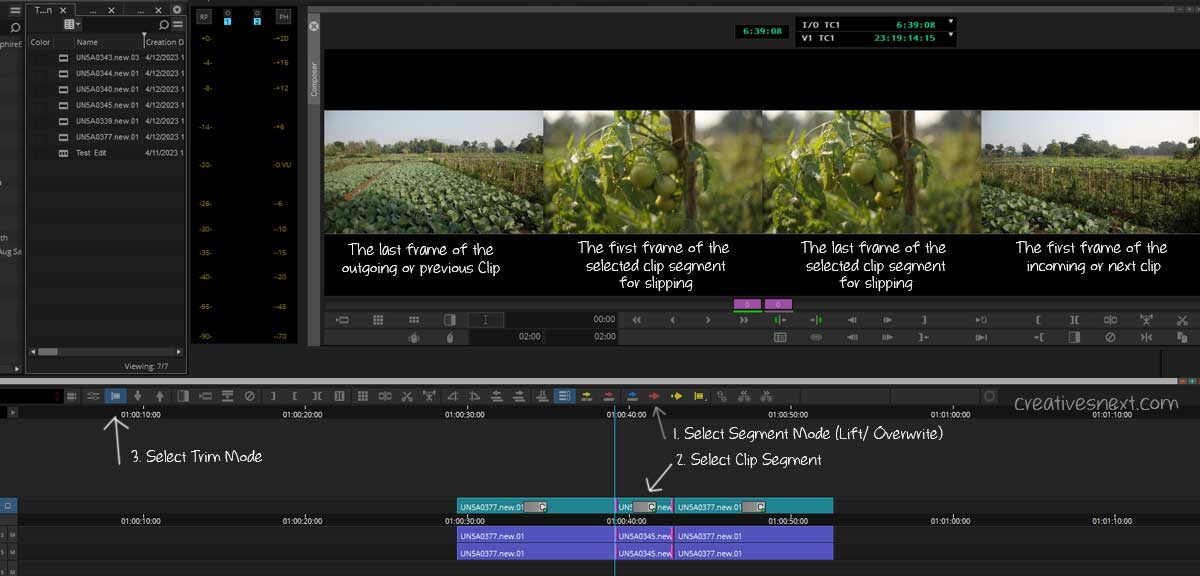
I have transcoded a few clips already. But before that, you have to do a small task. Now, you don’t have a few keys mapped by default in your timeline, but they are essential for editing. So all you have to do is map them to your timeline menu.
Map a few Edit buttons on Timeline Menu in Avid – Lift/Overwrite, Extract/ Spice-in & Segment Modes before editing
But why do you even need this?
Because when you want to insert a certain portion of your clip using In point (I) and Out point (O), the mode of insertion is important. Just have a look at the image below and you’ll get the idea. The main purpose is to insert clips differently
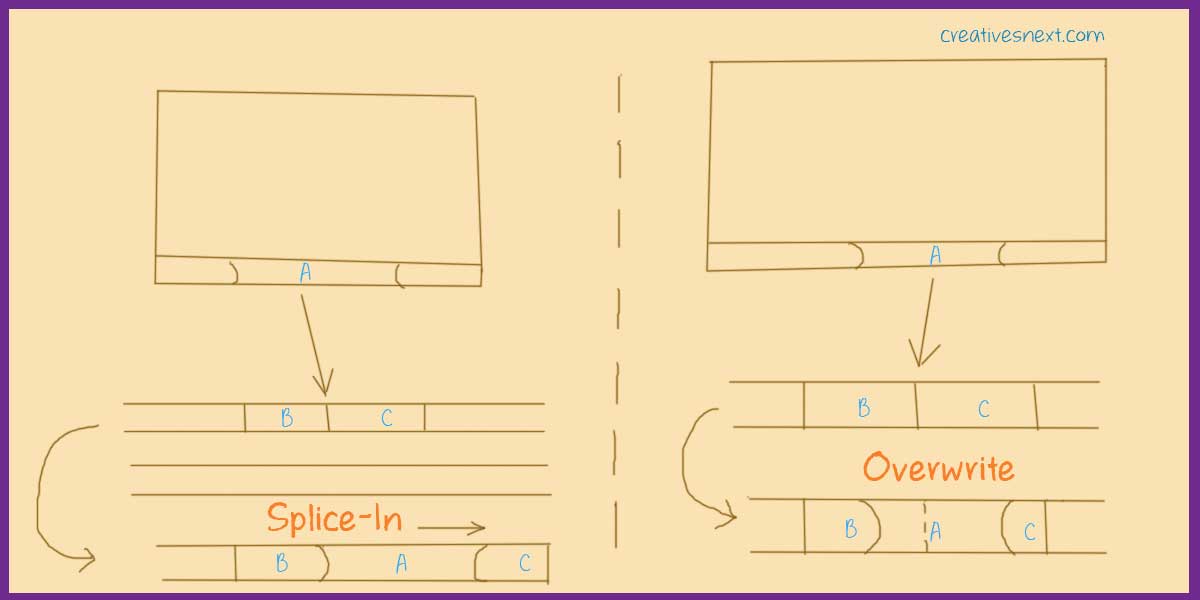
as per your requirement. In one case, you insert a clip or its segment (A) between two clips (B & C) changing the overall length of the edit. In this case, you’re pushing one clip viz. C to place A between clips B and C. This is known as a splice-in insert.
In another case, you just want to place clip segment A over an aggregate of B and C. In this case, you’re overwriting portions of B and C with clip segment A. It’s pretty obvious you would need both of these functions while editing. You may like to map these functions at your convenience.
Here is a screenshot of such mapping, just in case you like to have a sneak peek. Below is a summary of the workflow. It would be useful for learning the basics of editing in Avid Media Composer.
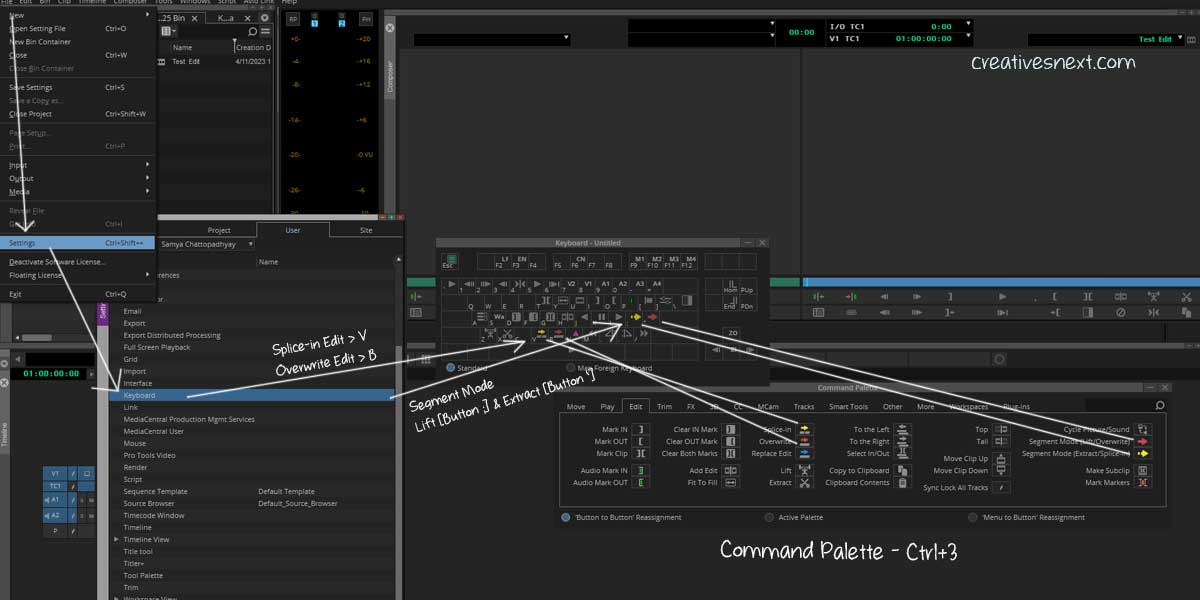
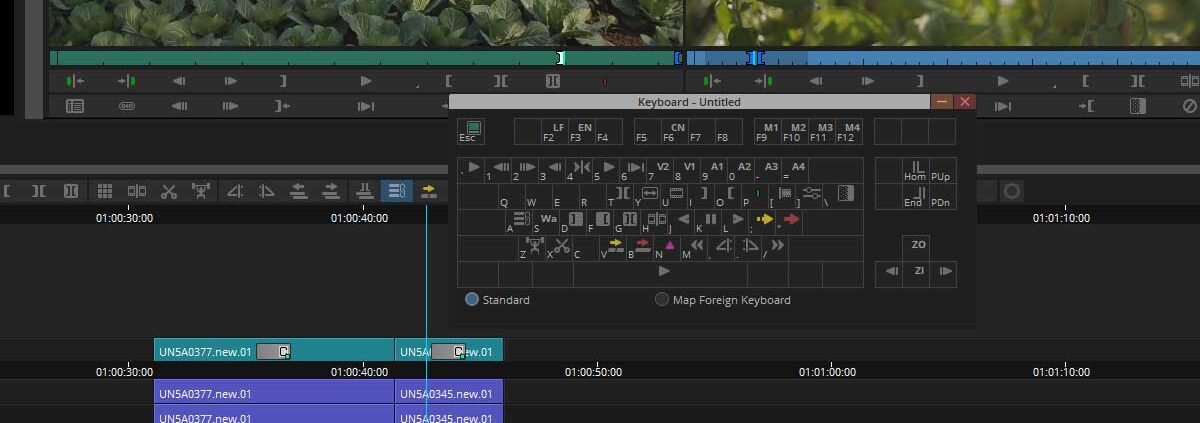
- File> Settings [Or Ctrl+Shift+ =]> Keyboard
- Tools > Command Palette [Ctrl+3]
- Select Button to Button Reassignment in the Command Palette
- In the Edit Tab within Command Palette select Splice-in, Overwrite & Segment Modes separately and drag them to Keyboard
- In this Keyboard, Splice-in mapped to V, Overwrite to B, Lift/Overwrite Segment Mode to ; (semi-colon), and Extract/Splice-In Segment Mode to ‘ (single quote)
- In this mapping, you have to activate the Segment mode with the keys used. Remember, the Segment Mode keys are toggle i.e. on and off with the same button. You use hotkeys like B (Overwrite) and V (Splice-in) when you do need their functions during editing.
A Simple Edit – An Instance with the Basics of Editing in Avid
Let’s first see the edit and then analyze the timeline view. This is an instance of a simple edit or timeline. The person is a farmer who was talking on camera regarding his farm and yield in the outgoing season. Here we had shot him taking on camera, some actions of
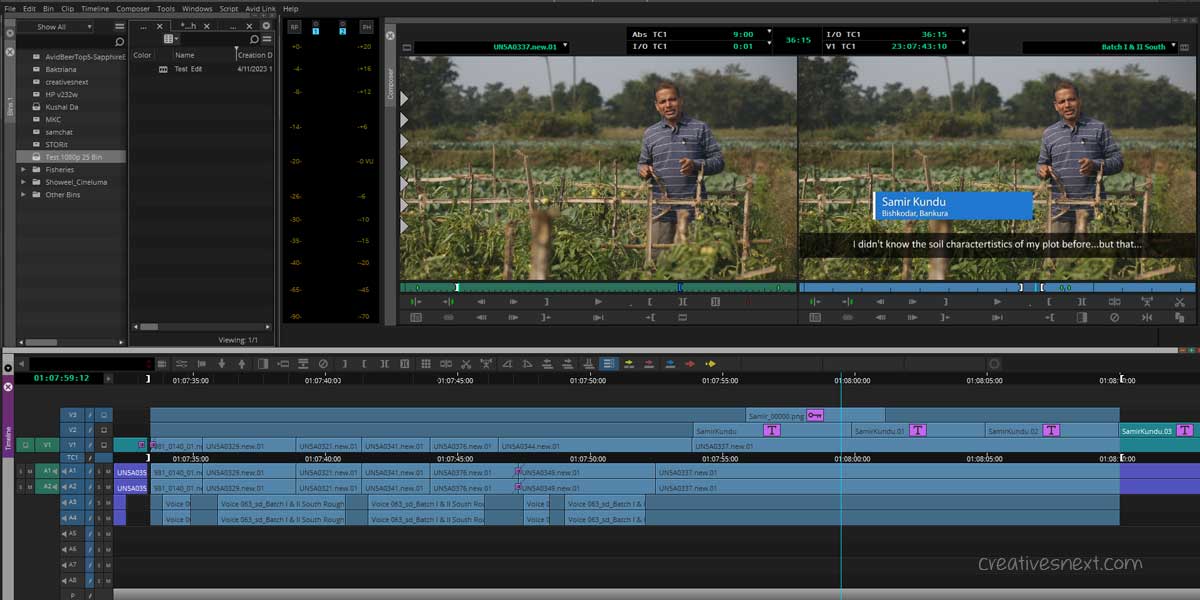
him and a few cutaways. Looking at the marked (blue) portion of the sequence, you can figure out that the editor has inserted the clips in a pretty simple way using the splice-in technique, one after another.
I recommend using a spice-in insert when you assemble shots for the first time. At this point in your edit, you’re still adding your clips one after another and have yet to start refining. Once you finish your lineup, approximately, and you’re starting to refine your edits, start using overwrite method of the insert. Overwrite becomes particularly useful when you use 3-point edit, which we’ll discuss shortly.
Understanding J-cut & L-cut for basics of video editing
In this edit, you can find a J-cut. Watch out for the edit above at the 19th sec of the edit. You see, there is him, Mr. Samir Kundu, still checking the plant health while his speech started off-voice (over a separate visual), and then the edit leads to him talking on camera, standing.
Editors call this editing technique of inserting audio beneath the outgoing clip’s video the J-cut. An L-cut takes place in the reverse scenario, where the audio of a clip extends under the video track of the incoming clip.
How to turn the Source clip audio to mono from the stereo in Avid Media Composer while editing?
You may often encounter situations when you insert a source clip into the timeline and you found it to be a stereo track. This is annoying, right? You want to get the mono tracks while editing unless you want the track to be stereo on purpose.

All you have to do is Right Click on the Master Clip (You may select multiple clips at a time) in the Bin> Modify > Modify Clips > Set Multichannel Audio > Mono

This is important because dealing with the stereo audio tracks in the basic level editing often becomes annoying. You would rather want to use mono tracks.
3-point edit
This a very useful editing technique for any editor, whether he is a beginner or intermediate, or advance level editor. Look at the above image and you’ll get the idea.
3-point edit occurs in two ways. One way, you can put In-out marks in the source clip and an In or Out mark in the timeline. Now you insert or overwrite the clip from the source and it will be placed on the Timeline.
Another way, you put an In or Out point in the source clip and mark out In and Out in the timeline. Now insert or Overwrite from Source Clip (with respect to In or Out Mark) and it will fill the section between In and Out points in the Timeline.
So, the idea is you mark out three areas and the edit operation will complete the loop by placing the exact portion of the clip within In and Out marks either from Source or in the Timeline.
You may consider using 3-point edit on several occasions. One instance could be inserting cutaways over a talking head. You mark out three areas and the rest is done by ‘insert’ or ‘overwrite’ edit.
This editing technique helps you fill up with B-rolls faster than when done manually.
Use of Trim Mode for Editing in Media Composer
Mastering Trim mode in Avid Media Composer requires quite some time and effort. Trimming itself is an inseparable part of editing and obviously pivotal to the basics of editing in Avid. Let’s see some basic features of editing that will help you get the foundation for the concept of trimming. You can straightway access
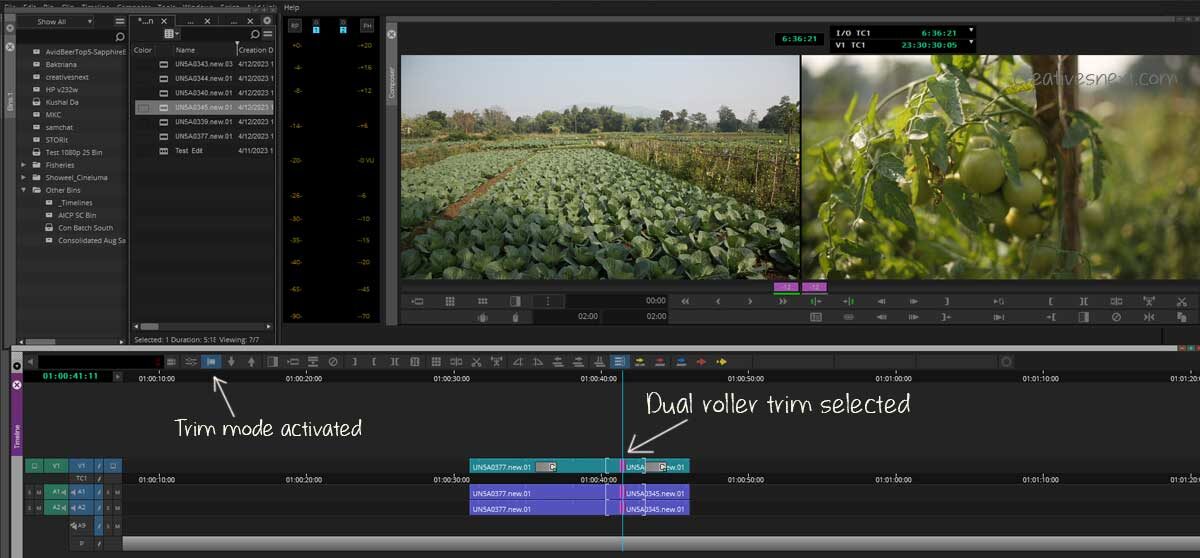
the Trim Mode in the Timeline icons at the top (see the marked icon in the image). Mainly, there are four different types of Trim edits.
Dual Roller Trimming for editing in Avid
In this case, you change the transition point between the outgoing and incoming clips without changing the overall duration (sum) of the two clips. It’s like a roller sliding left or right and changing the position of the transition point. During Dual Roller trimming, the length of one clip changes at the cost of the other. That’s how the duration of the sequence, remains the same after trimming. You may Alt+click on the Trim icon in the Timeline to activate the Trim Mode.
Overwrite Trimming during editing in Avid
Overwrite trimming does it differently. It takes up or overwrites the frames of the outgoing or incoming clips respectively, depending on how you move the trim slider between the clips. If you click on the right side, the incoming clip will have its trim slider activated. In this image, I have clicked on the left side and that made the outgoing clip has its trim slider activated.
Overwrite trimming has a red icon for its slider associated, while Ripple Trimming has a yellow slider for its icon. That way these two trim sliders distinguish from each other.

Ripple Trimming for editing in Avid
Ripple trimming also acts upon individual clips, when activated. Except for the fact that, during ripple trimming, the clip with the trim slider activated pushes forward or back the other one without affecting its length. Ripple trimming has a yellow trim slider, unlike the overwrite trimming, which has a red one.
You may map the trimming tools separately or collectively as the Trim Type using the Command Palette. There are also Overwrite Trim
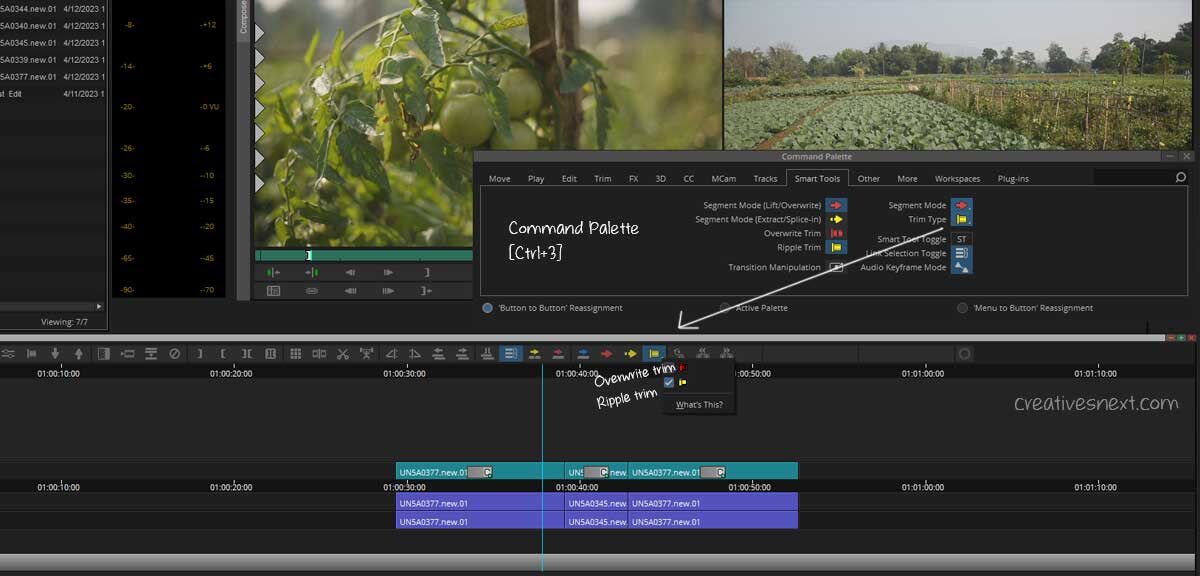
or Ripple Trim that you can map separately in the Timeline. Also, you can map these functions with the Keys that you find convenient.
Slip Trimming in Avid Media Composer
There is another type of trimming that affects the whole clip segment when selected. In this type of trimming, you need to activate the Segment Mode (Lift/ Overwrite) and then select the Clip segment. This will make you slip the clip along its length.
Here is the idea. See the image below you’ll get the concept. Instead of changing the opening or hiding the frame of a clip’s one side, in
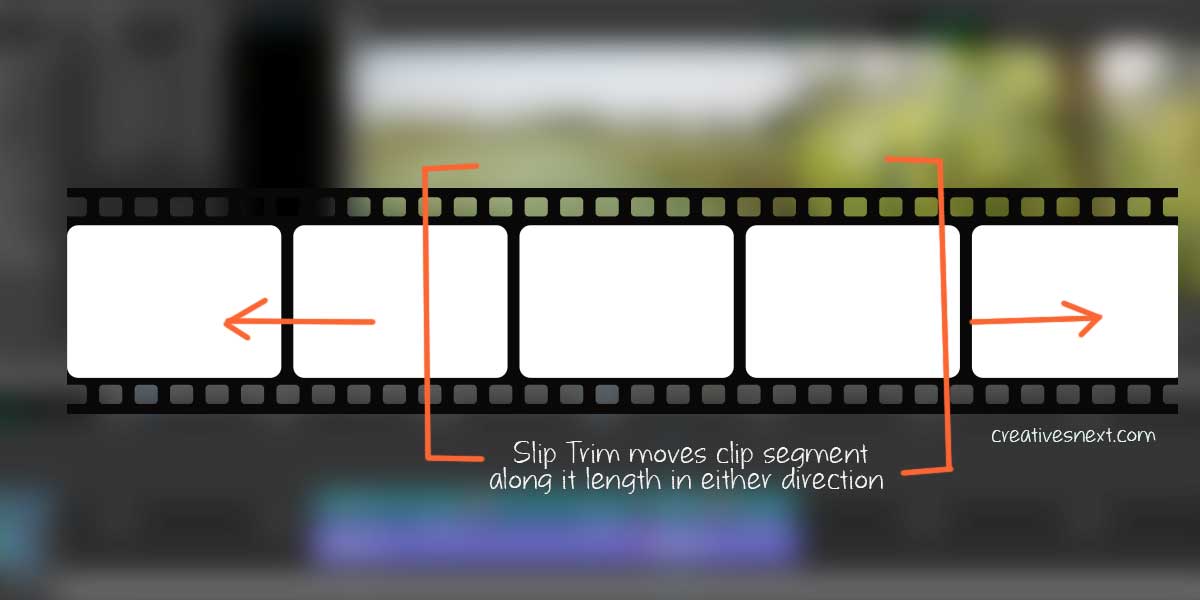
this type of trimming, you move the whole clip segment. Think of the clip segment as a mask and you slip the clip itself along with the mask revealing the segment that you find appropriate. Here is how the slip trimming preview window shows.
How to quickly switch back and forth between Trim & Segment Modes during editing in Avid Media Composer ? Map your keys conveniently
You can map the Trim Mode on your Keyboard and use it conveniently, which is crucial for learning the basics of editing in Avid. I have mapped it to ‘[‘ right above the single quote ‘ where I have mapped the Segment Mode (Extract/ Splice in). Left to that is my Segment Mode (Lift/ Overwrite) mapped to; i.e. semicolon.
Let’s just have a look at my keyboard settings. You can have your own though. Using Command Palette and mapping the Keys in your ‘Avid Keyboard’ is essential for getting hold of the basics of editing in Avid. It’s just an idea of how can I quickly use my left index and middle finger to switch back and forth between the Trim mode and two Segment modes.
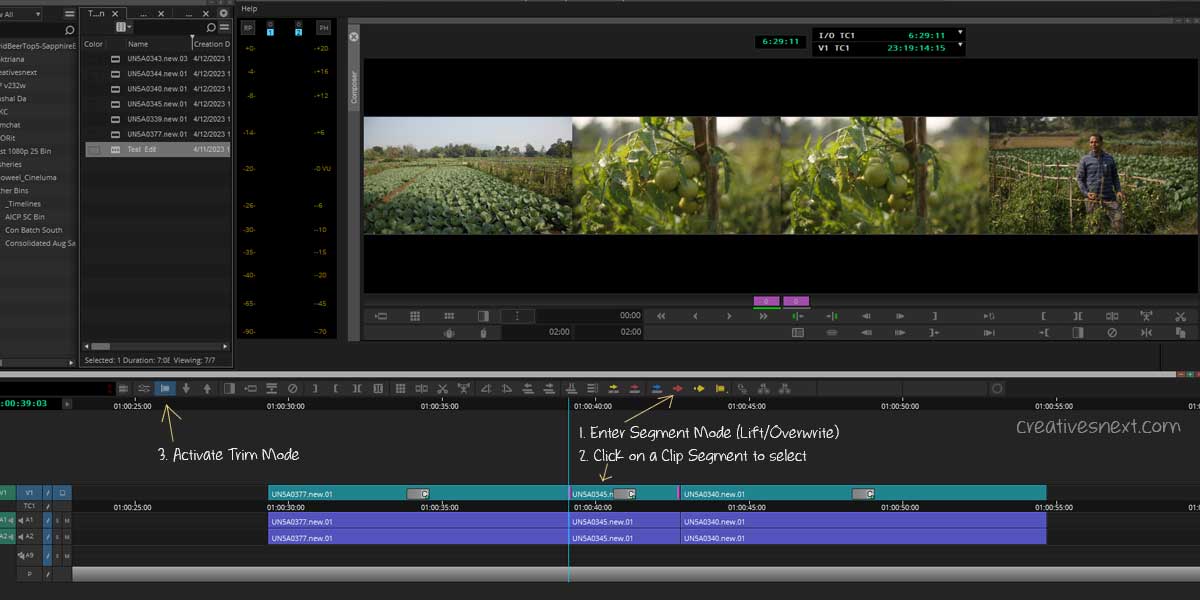
Understanding Segment Modes in the basics of editing in Avid Media Composer
Segment Mode (Lift/Overwrite) for editing in Media Composer
The Segment mode in Avid offers different ways of selecting the clip segments on the timeline. Eventually, it lets you perform editing in different ways, in terms of moving clip segments with or without the fillers in between.
First things first. You have to activate the Segment Mode buttons from Command Palette to the Timeline., which we already have.

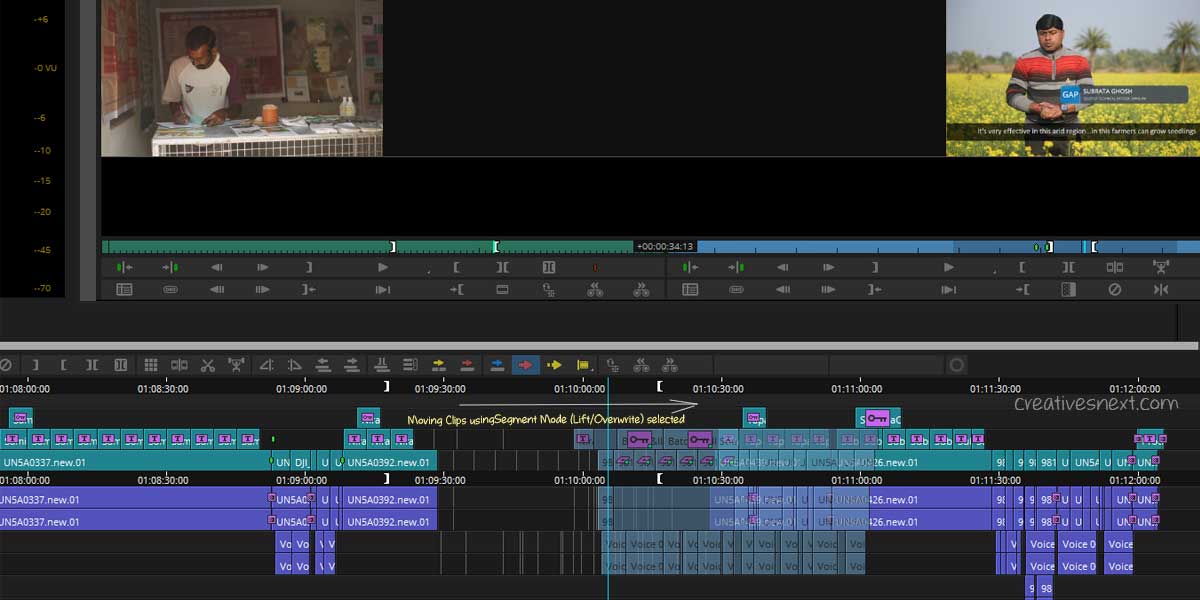
Here, with another sequence, I have activated the Segment Mode (Lift/Overwrite) button and then used Shift-click on a number of clip segments to select a portion of a sequence. The idea, here, is to select a chunk of the sequence, in case you want to move that to another place.
You may hold Alt and drag while selecting the group of clips for shifting, with the Segment mode selected. You can also shift-click to select multiple clips, instead of dragging with the Alt button pressed down. In order to get rid of the black fillers or empty segments, you can shift-click and deselect them, before making the move.
Remember, when you move the segments of a sequence, using the Segment Mode (Lift/Overwrite), it leaves an empty space there. You have to fill up these blank spaces either with additional edited material or close in the gap. There are a number of uses for selecting clips or segments of a sequence using Segment Mode (Lift/Overwrite).
Premiere Pro and FCP users, especially, feel at home while using this method of selection. In one scenario, I find using this is particularly helpful. Suppose, you have to replace a portion of a sequence, yet you don’t want to delete that portion, just in case you may get that back again.
In this case, all you have to do is select those clips or sequence segments using Segment Mode (Lift/Overwrite) and move them to an empty of that sequence or in a new sequence (Copy and paste followed by delete).
There is a difference between Segment Mode (Lift/Overwrite) & Segment Mode (Extract/Splice-in).
Segment Mode (Extract/Splice-in) for editing in Avid Media Composer
There is a difference between the Segment Mode (Lift/Overwrite) & the Segment Mode (Extract/Splice-in) in Avid.
Let’s see what’s that with an instance. Let’s first carry out the operation and then we would summarize how the Segment Mode (Extract/Splice-in) functions during editing in Avid.
Now, why did I do this? I have done it to show you that what are the clips in this three-shot edit. First, there is a shot of a cabbage field, in the middle is a Tomato plant in CU, and in the end, is a person standing in his field. Now. let’s get out of the trim mode and select the yellow button which is the Segment Mode (Extract/Splice-in) in Avid.
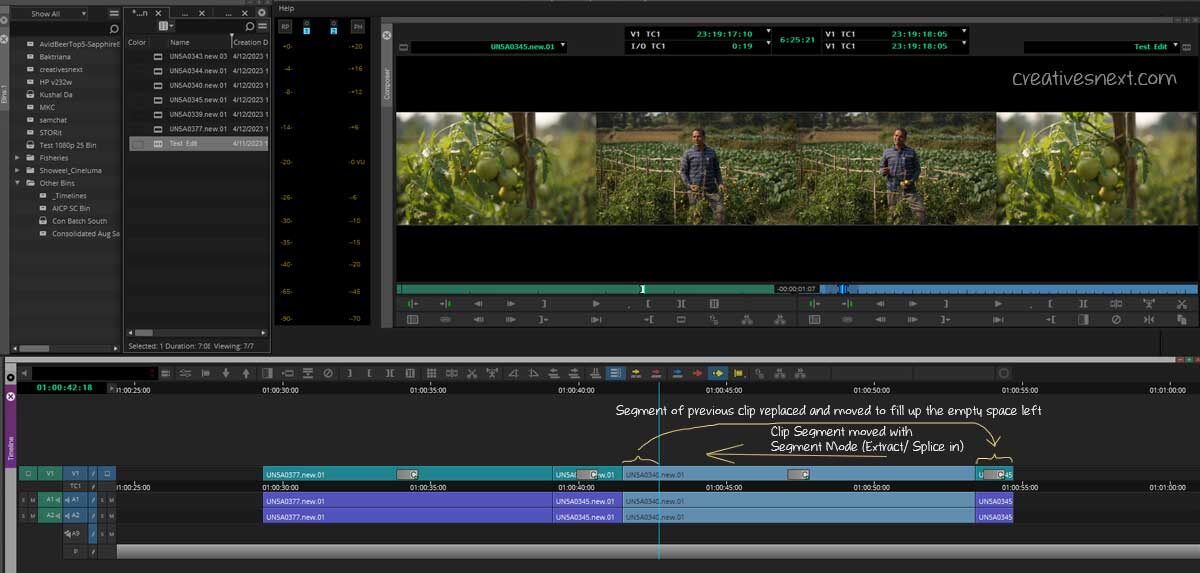
With the yellow button for the Segment Mode (Extract/Splice-in) activated, I have selected one clip and moved to the left overwriting its latter part. What happens is this portion which got replaced, shifts to the space right after the clip that’s selected and moved. So there are two different movements taking place here with the Segment Mode (Extract/Splice-in).
One is the clip that you select and move. Two is the portion of the clip overwritten and shifts. This method of selection and movement is crucial when you need to interchange the position of two adjacent clips or two adjacent groups of clips.
Use Load Fillers to create blank space between the clips in a sequence in Avid Media Composer
This is a trick I often use to create a blank space between the clips in a sequence. But don’t forget to keep all the tracks synced before.
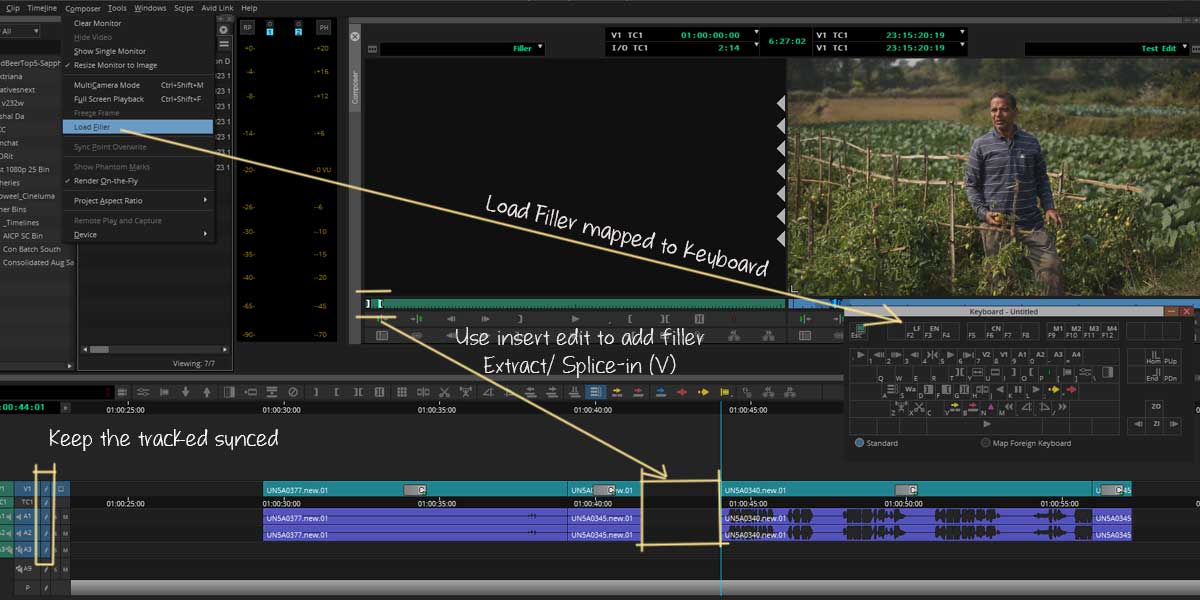
What it does is loads black fillers on the composer monitor. You then just have to add those black fillers to the position you want on the timeline. So park your play-head on a certain position and then insert a portion of the black fillers using the Insert Edit command of Extract/ Splice-in.
You have to keep all the tracks synced (colored blue or any). Just click on the icon beside TC1 in the timeline and they will all be synced.
You may access the Load Filler from the Composer Menu which will load black filler on the composer monitor. Alternatively, you could map this on your Keyboard, which I have with F2.
This operation is very helpful in creating gaps in the middle of a sequence just in case you need to insert them there.
Conclusion
We have just scratched the surface of the basics of editing in Avid. But that should be the starting point. Let’s wrap up.
For editing on Avid, you have to start with the Media Creation Settings to fix the drive, video resolutions, video formats, and audio formats as well. These are essential in setting up your project. Once you’re through with the Media Creation Settings, you move to your Bin and timeline.
Transcoding is what you need to ingest your materials inside Avid’s Media Files folder. You may have a look at Transcoding in Part 1 of this series. At this point, you get all your transcoded Master Clips inside the Bin you created. I have created, shown, and used a sequence Test Edit, inside Test 1080p 25 Bin.
Now, you start playing around with your edits in Avid Media Composer. Different sorts of inserts, cuts, and using Lift/ Overwrite and Extract/ Splice-in buttons. You can map the buttons with your favorite hotkeys using the Command Palette and Keyboard.
After you get the hold of the insert buttons, it’s time to start using Trim mode in Avid Media Composer. Trimming is at the center of any editing, especially at the stage of refining your edits. Mastering trimming requires a little time and effort.
The Segment Mode of Avid is also important for making selections once your sequence gets heavier with many tracks, both audio, and video.
The techniques I have discussed for the basics of editing in Avid will not make you a master editor. That’s not even the idea at all. But it will help you start working on the program.
With the Files and Folder system in Part 1 and with the basics of editing in this piece, you’re moving bit by bit to get a firm hold on Avid Media Composer.
In a few pieces I’ll, shortly, come up with Audio, Effects, Color Color Corrections, and Export to help you grow with Avid Media Composer. Till then, wishing you some nice edits on your Avid Timeline.
The graphic for the featured image was taken from Freepik.