
Basics of Avid Media Composer- Part 1- All you need to know for starting up
Last updated on 4 March 2024, Published on 18 March 2023
Introduction
Let me clarify that this piece on the basics of Avid Media Composer is not intended to make you a master editor at the end of it. That’s not the idea. The purpose is to make you familiarize with the basic features of this robust non-linear editor or NLE for starting up your learning. It will help you ease your steep learning curve to grasp the robust program.
I have been with Avid since 2005 when Express DV 3.5, followed by Avid Express Pro was doing the rounds. Then came Avid Media Composer, actually, it reemerged. I remember seeing Avid Media Composer 2.5 or 3, for the first time, in 2007 or 2008.
Like many NLEs, Avid has tons of features that may look daunting, to begin with. But, you don’t have to know every little detail of the program. The point here is I, as a Documentary filmmaker and the maker of nonfiction videos, still don’t use many of its features since I don’t require them. And so could you!
Because Avid is an NLE, it caters to the post-production of every genre of video production and filmmaking. Be it corporate filmmaking on a manufacturing unit, or a documentary for a certain non-profit or CSR, the timeline remains the same. It just the rhythm of editing changes.
And most of us, as professionals, work in certain niches or domains. So you could rather use a set of the features, or at least could start with, and then spread your hold to many other features that are not so common for the beginners.
Knowhow of the basics will lay a foundation for learning how to edit using Avid Media Composer. So here are the things, in the contents below, that we’ll unfold gradually as we make progress through this article (with reference to the Windows OS). Our approach would be to figure out the pattern of various features and functions of this program in this basic guide, instead of delving deeper into each of them.
How to initiate with the basics of Avid Media Composer?
Launch the program and explore the ‘Select Project’ window
While launching Media Composer will ask you to select various options for the program. Let’s select Avid Media Composer with the Symphony option. The image below shows two different screenshots combined together.
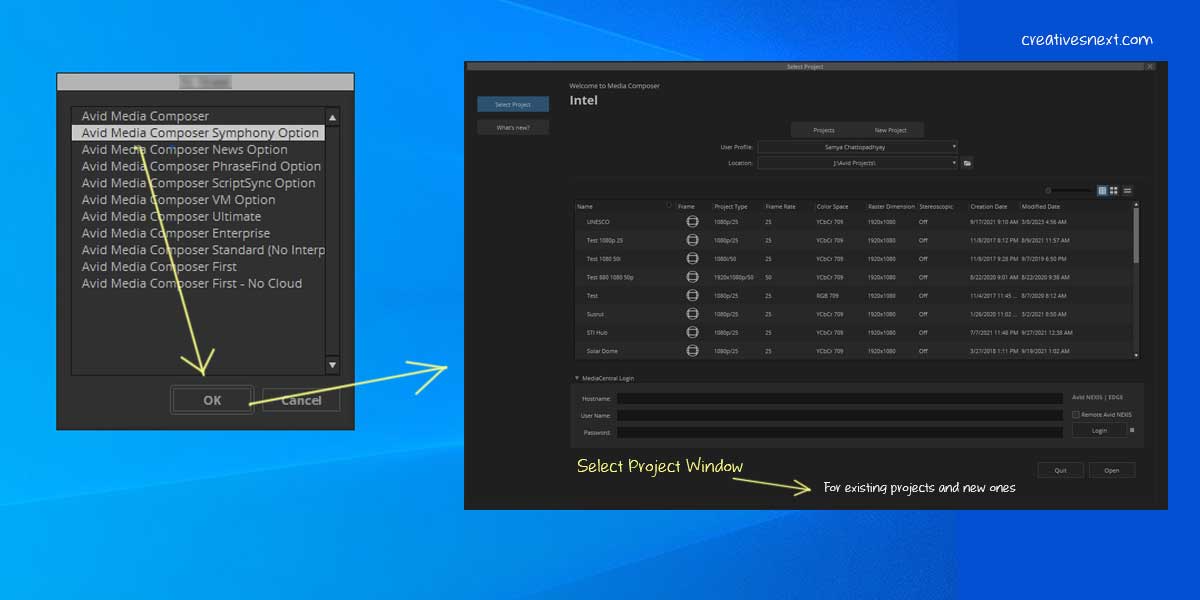
What the Symphony option offers is more features than the Media Composer without it. It’s particularly especially in the case of color correction which we see will later.
I’m referring to version 2022.10 for Media Composer. Once you launch the program, it’ll straightway take you to the Select Project window which lets you either select a project from the existing ones or create a new one.
By default, you land up in the existing queue of projects where you can select one. And we’ll select one in a few moments to refer to the examples throughout this article. But let’s first see what’s there in the New Project section just beside the Project tab.
Let’s focus one by one.
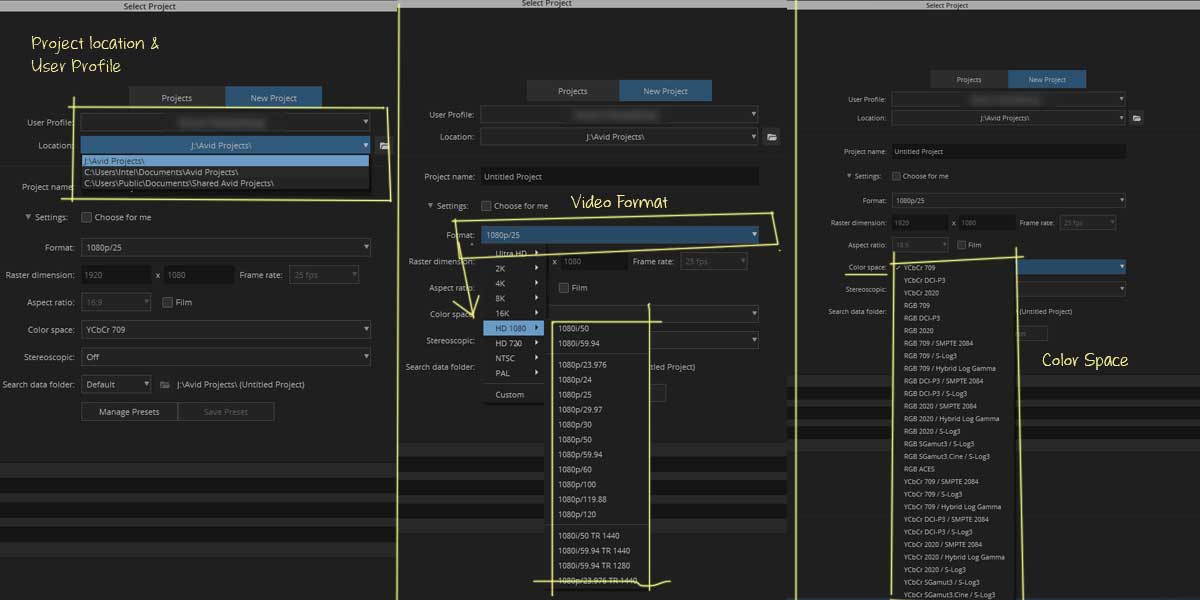
We’ll come to the User Profile section in a few moments because that calls for greater attention. It’s something like a user setting that has all the data regarding the workspace a user creates and saves while editing inside Avid.
The location is pretty intuitive. It’s the location where you create your Avid Project. The paths are defined and don’t tweak this. You just have to put the title of the project.
The Format is where you have to assign the video format considering the final output resolution. It’s related to Video size and frame rates. Check the resolution for footage too, that you have to ingest.
Color space lets you choose the Color Space as per your deliverable. YCbCr or YCC was the choice for SD, but for HD it must be YCC 709 or RGB 709. If you’re looking for HD broadcast TV, you should go for Rec 709. There are options here aplenty.
You don’t need to tweak much at this moment while dealing with the basics of Avid Media Composer. Just pick up a Format of your choice and select the color space either YCC 709 or Rec 709. Click on Create and you’ll land inside the Avid editing interface.

But before going there, we have to get a small tour around the Avid Files and Folder structure.
The Files and Folder structure of Avid Media Composer
Like every NLE, compositing, and 3D program, Avid maintains a certain hierarchy in its folder and file structures too.
Avid Project Folders and Files
Avid generates two Avid Projects Folder in the location you selected. Private and Shared. Private projects are created on a network where access to a project is to be limited. But you go for the Shared project while working on a stand-alone system. The paths are like these.
Private drive: Users\user name\Documents\Avid Projects
Shared drive: Users\Public\Documents\Shared AvidProjects
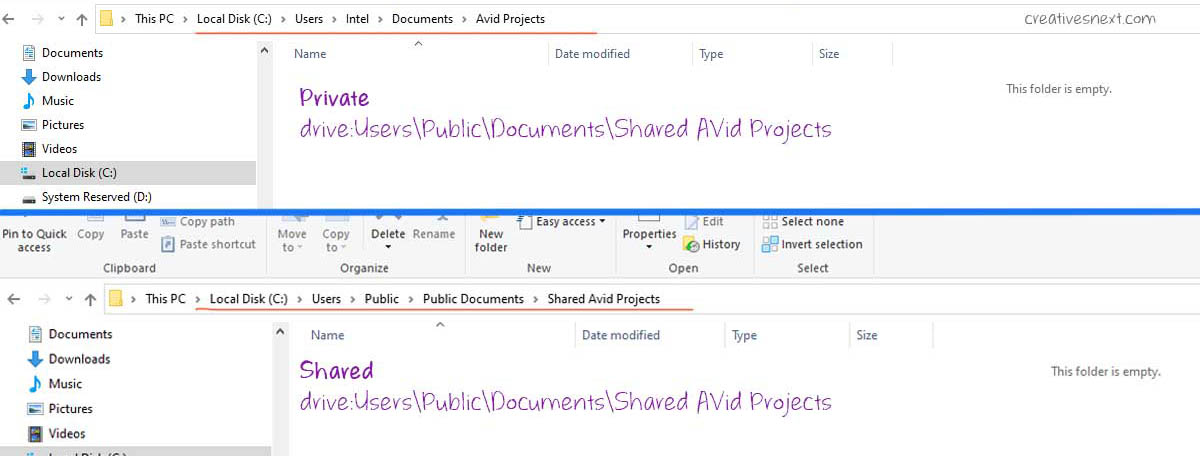
These folders are showing empty as I haven’t created any Private projects and changed the destination drive for the shared projects to a separate drive.
Now, why do you need to know this? Because you may have to move projects from one system to another, to their respective destination, depending on whether the project is private or Shared.
When you create a project, Avid generates three types of files inside the Avid Project folders. They are a Project file (.avp), a project settings file (.xml), and a bin file (.avb). Let’s have a look at one of my projects in the drive I had set.
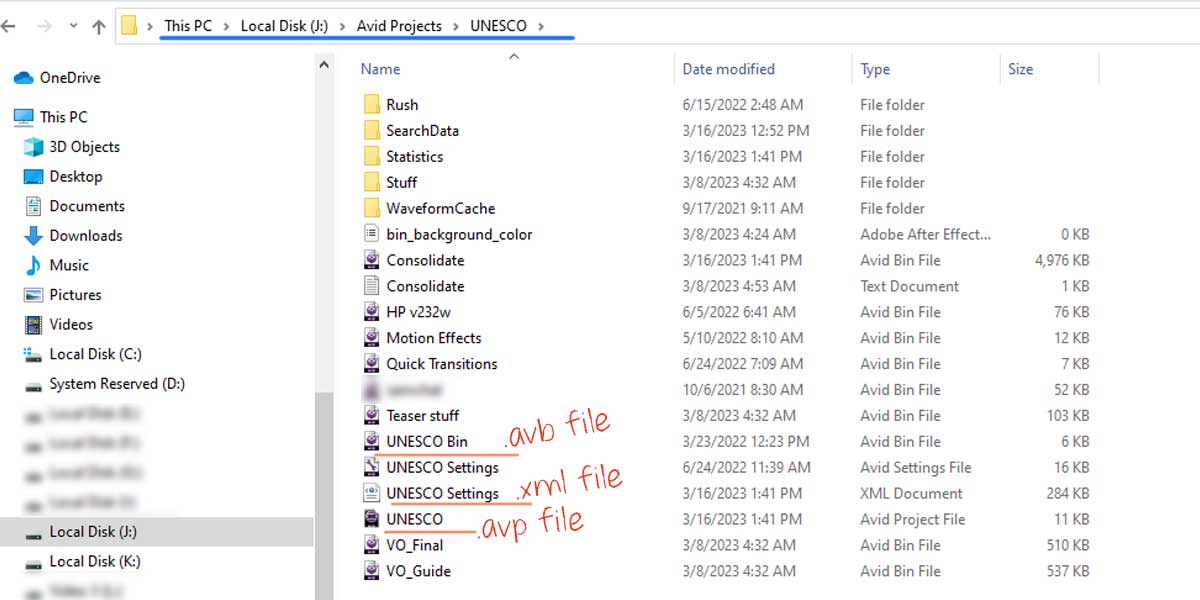
Avid instantly creates these three files, marked, within the Avid Project Folders. There are many more created during editing. They are not created at the time of new project creation.
Avid User Profile Folders and Files
Any NLE has too many features and so does Avid Media Composer. As an editor, you do work in stages. First, create an assembly, then rough cut, audio edit, color corrections, and many more. And all these have respective tool sets and parameters that you require in a certain combination. Not everything at a time.
So, as an editor, you need to create a workspace and save those settings. You may even want to create different workspaces for different types of editing like effects editing, audio editing, color corrections, etc. All these workspace-related settings are held in an Avid system called Avid User. And the specific User setting you create for your won is called Avid User Profile. All you need to use your own Avid User Profile in a different system is to copy certain folders including files onto a specific destination of that system. Let’s see.
Avid creates two different files in the Avid user folder. One user file is in .ave format and another user settings file is in .xml format.
This folder can be accessed here. Drive\Users\Public\Documents\Avid Media Composer\Avid Users\User Profile

So, here is the idea. When you create or import a User profile, Avid accesses the location mentioned and shown above. The folder has the files shown at the bottom of the screenshot.
Therefore, you have to copy and put your User folder content following the same path in a separate system. And then import the User or User Profile in the New Project Window. You can, however, import the User Profile later too.
The Avid Media Composer interface – at a glance
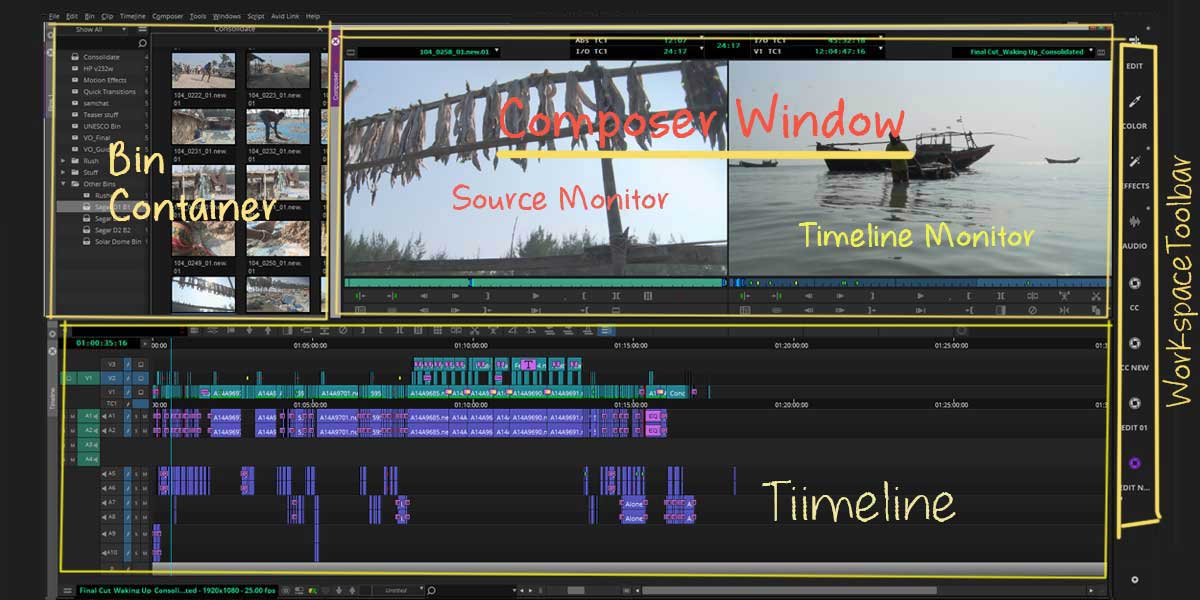
Anyone, familiar with a video editing program, knows the architecture. There is a project window kind of thing where you interface that lets you bring all the files from outside. Avid calls it the Bin container, an old days film can or Bin connotation. In the older version of Avid, there was Bin and Super bin, but since 2019, Avid introduced Docke, Floating, and Tabbed windows for the Bins too.
If you look at the top left, you see there are many Bins that extend open the content of each Bin. Avid Bins can think of as Folder or Container, although A folder and a Bin are not exactly the same. In the hierarchy, they are in different orders.
Bin Container > Bin > Files. So you get the idea. I have, on purpose changed the thumbnail views of the clips, that are visible adjacent to the selected bin the Bin Container. When you create a project, Avid creates a single Bin in the name of the project. You can then create numerous Bins to ingest files inside that Bin. Create Bins according to the file categories, like Rush, Audio, Graphics, SFX, Tracks, and Sequences.
Arranging Bins and their content are of utmost importance to the editors. Orderly management helps you find any file at once and saves you time.
There are two monitors, called Composer Window. One is for source files in the middle-left and the other is for the timeline view. There are numerous controls to adjust and change the setting for these monitors. I am not delving deeper into those settings in this treatise on the basics of Avid Media Composer and leaving that touring to you.
At the bottom is the Timeline and on the right is the Workspace toolbar. At this point let me draw your attention to a particular toolset before dealing with the media. Go to File > Settings>User. As I mentioned before, you can create, import, or export your User Profile after project creation within Avid’s editing interface. The Format, Project and Site tabs have respective controls. But it’s the
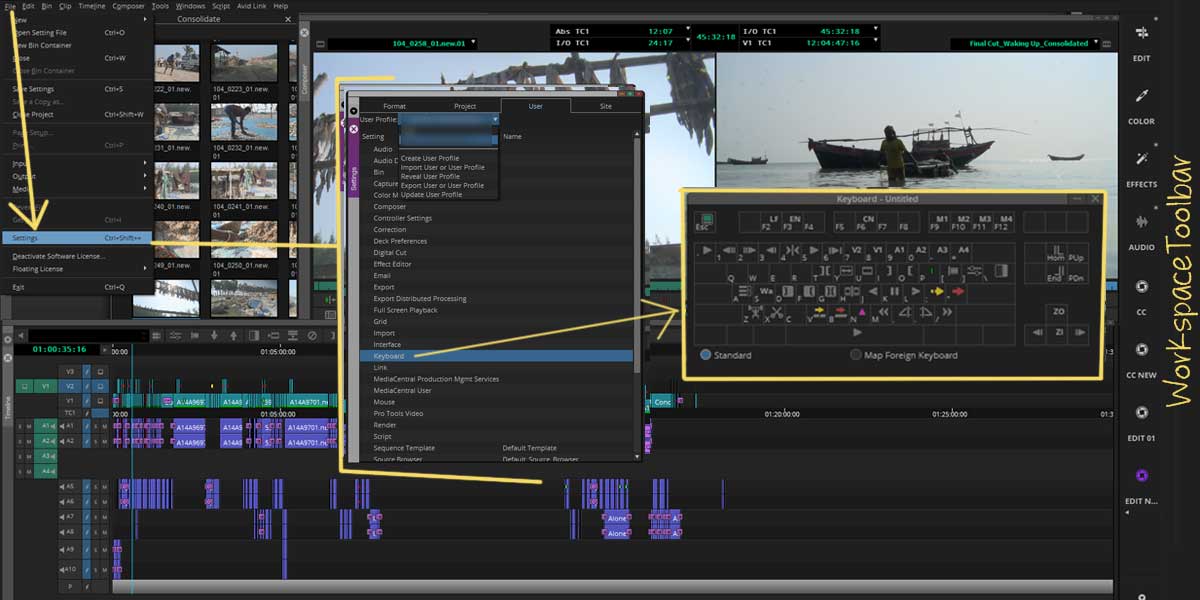
user tab has many controls which let you change the settings of the workspace and related interface. There is the Keyboard setting, clicking on it pops up the Keyboard settings. You could use another tool called Command Palette in combination with the
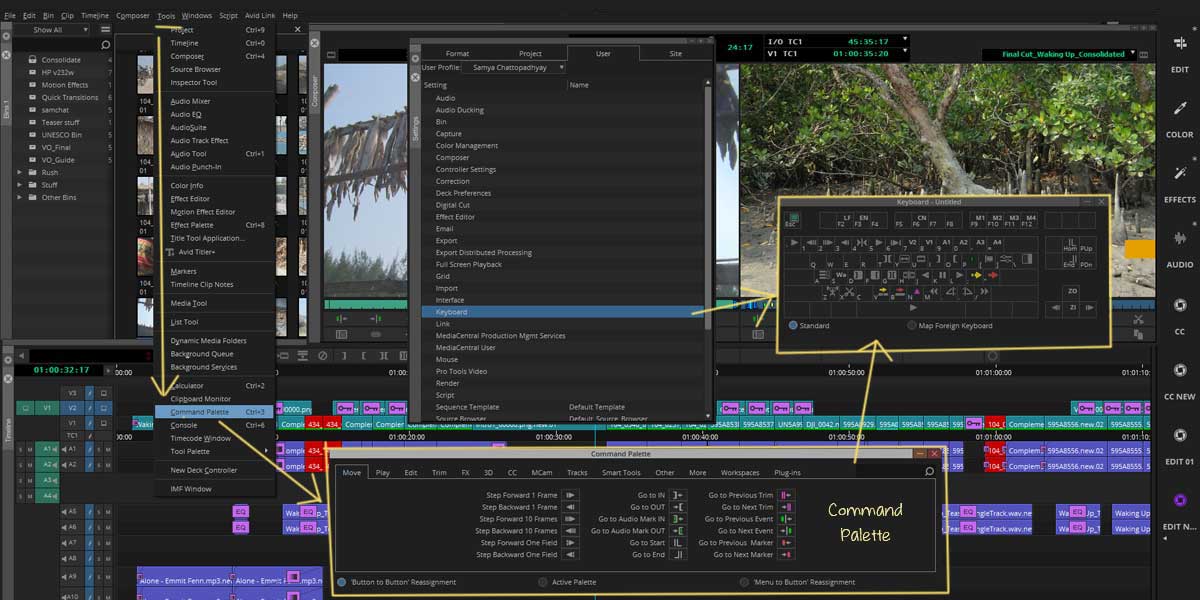
Keyboard to assign different hotkey controls for different functions. There are many controls here and I would invite you to explore one after another.
Media Management in Avid Media Composer
One of the key things that make Avid Media Composer perhaps the most coveted program of all.
Now, why is this such a big deal? If you make videos, in your home studio wearing shorts, and dealing with clips of one or two-hour length, you might consider avoiding Avid Media Composer, simply because of two reasons. One is it’s a bit pricey and it has a steep learning curve. The YouTubers generally prefer Adobe Premiere to Avid.
But when you’re dealing with many hours of footage, in big productions, we must have technical support and a backup plan, and certainly robust media management. To my understanding, Avid beats its peers hands down in this aspect. Let’s dive in.
Media Creation Tool
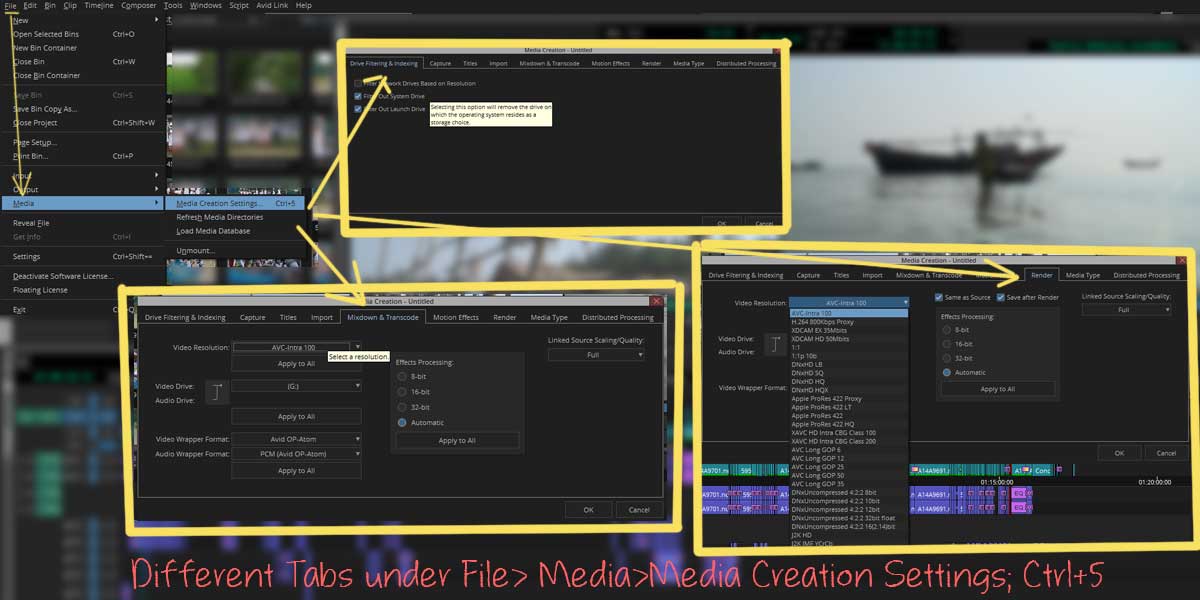
Before, bringing any clip inside Avid, check out Media Creation Settings (Media Creation Tool, Ctrl+5 in older versions). It lets you set the destination drive you want to set for your media for Transcoding, Effects, and Rendering wherever Avid generates any file.
You have to filter out the System drive and Launch drive first by checking then on to bar Avid from creating files there. Else Avid will create an Avid MediaFiles folder there too burdening unnecessarily. You only want to keep your media in the storage drive.
There are different options in Media Creation Tab, including video and audio formatting, codecs, and other parameters that you have to explore and find suitable for your media to ingest and export.
It’s a toolset with an absolute necessity for learners of the basics of Avid Media Composer.
Avid MediaFiles Folder
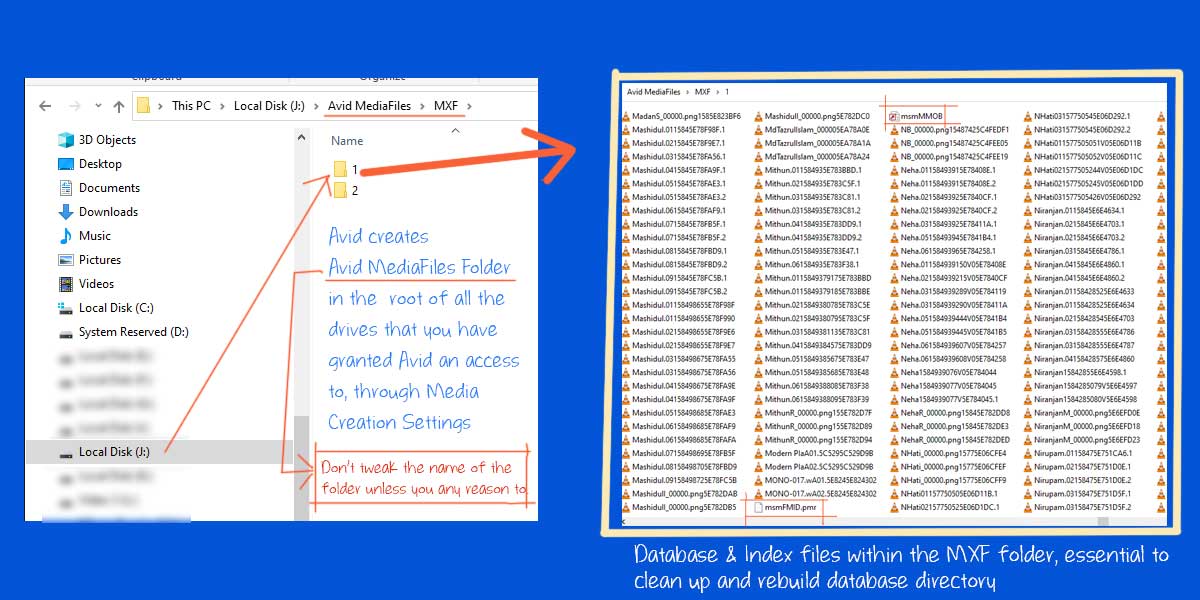
Avid creates a folder named Avid MediaFiles (exactly) in all the drives that you have given Media COmposer access to. All the media files generated through Transcoding (to be discussed shortly) and Import are stored there. Don’t tweak the name of the folder or move it anywhere else or Avid will fail to recognize the media within.
Inside this is an MXF folder which contains one or multiple folders numbered with significant digits. These numbered folders are what contain material that is ingested (transcoded) into Avid Media Composer.
You have to take note of two files here, besides others. There are .pmr and something as xxxMMOB which are Index and database files. These are crucial for Avid Media Composer to recognize the content or media files inside these folders. In old days, we used to shut down Avid, delete these files and launch back Avid again, should there be any issues with Avid Media directories.
What this used to do is clean up the database and rebuild the index for the media directories. Now, that we know how to use the media creation tool and how the Avid MediaFiles folder works.
Transcoding
Camera raw files of the footage, which are extremely compressed, despite all the timeline-friendly codecs these days, still fail to run seamlessly (or at least they used to) on the timeline. So you need to decompress them to edit them out smoothly on an editor.
Avid runs an operation called Transcode (convert through a codec and then transfer) which is nothing but converting the footage in Avid-friendly formats and ingesting it into a dedicated folder. The files, thus created, are native to the Avid Media Composer and can’t be accessed elsewhere.
In plain language, you have footage or clip and if you want to get them inside Avid, you have to transcode.
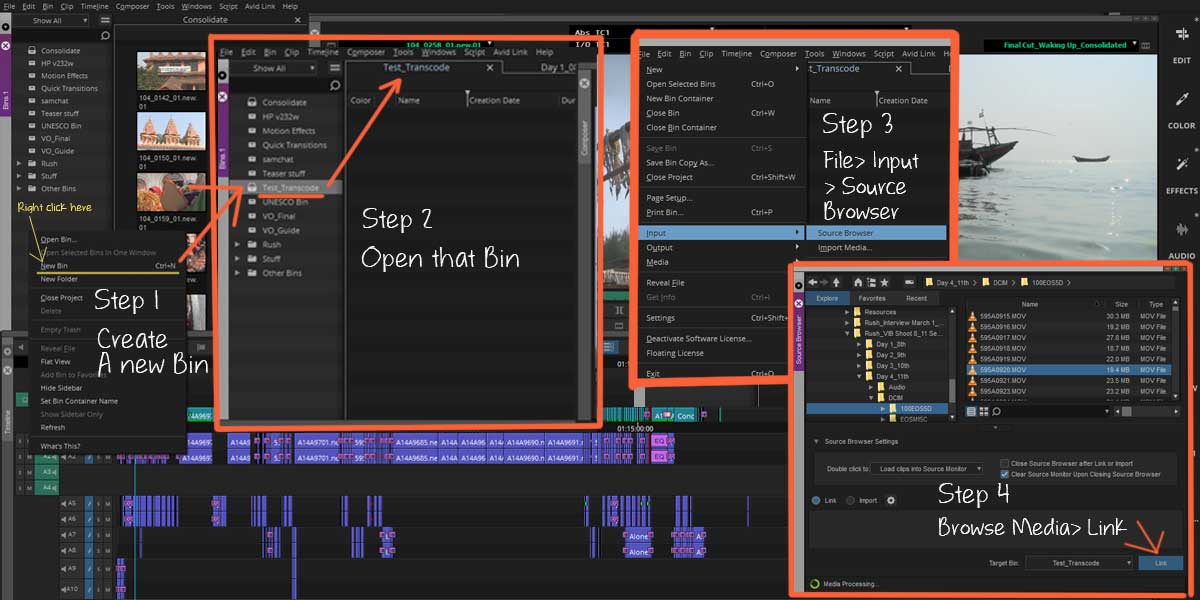
So the steps are somewhat like these.
- Create a Bin in the Bin Container, let’s say Test Transcode > Open the Bin by double clicking
- Open Input Source Browser either through File> Input > Spurce Browser or Right Click on the selected Bin (Test Transcode) and then Input > Source Browser
- Browse media > Select > Link
Now, this brings the clips to the Bin. I have one for you. The operation has got the media into your Bin, ready for transcoding. Remember, these clips, that we all see in the Bins are master clips and they are all reference files, not physical files or data. The physical files are the ones that you have seen within the Avid MediaFiles folder.
What the editors or assistant editors usually do is select multiple clips and transcode. The operation takes some time to complete. I usually prefer to organize multiple Bins for transcoding rushes as it helps organize and find the footage later no.
I have selected DNxHD HQ and AIFF-C for video and audio format in the drop-down.
The Transcoding dialogue pop-up shows the space you will be requiring and the available space as well before you hit the button. So you know in advance which drives to select and go ahead with.
We’re nearing the end of Media Management as well as the first part of the basics of Avid Media Composer. There is one more feature of Media Management to talk about and that is Consolidating.
Consolidate
‘Consolidate‘ is done after your editing is over and you want to move the final sequence into a separate drive. Let me explain a bit.
When you work on a project, you may have to take many clips, I mean camera raw, graphic material in the form of image sequences, tracks, sound effects, etc. But once the project is over and you may want to get only the material, including clips in the final sequence to a specific destination drive. Now, why would you want to do it? Simply to save space.
Because there are many files and material that remain unused in the final timeline or sequence and you, as an editor, are very conscious about, the ‘space economy’ do want to get rid of the unused martial.
So to keep only the final sequence and the material used in it, just in case you have to re-edit in the future, you need to consolidate. The difference between transcoding and consolidating is the former is done on clips/ rushes while the latter is performed over a sequence.
Let’s see how the Consolidate is performed over a sequence. And this time I could make a small video.
So, you got the idea. Remember, it’s always good to consolidate once the edit is over, preferably before moving the project out of your system. These days, we all use external drives so as not to burden our system. But a sequence or timeline backup is essential just you need to re-edit any part of it or re-use it somewhere else.
That’s all about Media Management in the basics of Avid Media Composer. Even for a basic guide, it’s kind of an outline. But the things discussed above are adequate as the fundamentals.
Conclusion
In this article, we have covered the basic interface of Avid. From project creation to different panels and project windows inside the program.
We have also seen how the files and folder structures of Avid work. The interface and settings are the very basics of any NLE you’re working on. The idea is to help you with the patterns of Avid Media Composer in regard to its architecture. How the mechanism plays out and how you can explore things that will come useful at different points of time during editing and before it.
As I repeatedly pointed out Avid offers the highest level of efficiency in terms of media management which is why many of the big production houses, be it in the broadcast industry or feature film studios, still prefer Avid to its peers.
That Avid was the pioneer in coming up with Film and Video editing solutions as early as the late eighties of the last centuries doesn’t alone attribute to its market share among professional filmmakers and studios. When you deal with huge rushes and many editors, assistant editors, and graphic artists, you must have a backup support system.
Media Management is one of the key things that makes Avid Media Composer an irresistible choice for a professional film editor. Adobe Premiere has the largest market share among consumer and semi-consumer-level editors, possibly.
Even the basics of Avid Media Composer are quite large content to fit in a single piece. So, I have decided to split it into a few parts. There are many more features of Avid Media Composer that I’ll discuss in the next part of this article including Editing, Effects Editing, Audio Editing, Color Corrections, and Export.
The background in the featured image was collected from Avid. Please share the article, if you find it useful and subscribe to our blog.