

How to do Screen Replacement in After Effects in 5 minutes?
Published on 27 April 2024
Introduction
Yes, you can do it in 5 minutes. Here is a short piece on screen replacement in After Effects. This is a pretty easy and entry level stuff of compositing for any After Effects user.
We often require to perform screen replacement for TV commercials, spots, explainer videos and other compositions. So, a quick rundown of the techniques will be useful and trust me, you can do it in 5 minutes.
But before plunging into the procedures, let me spill out the source for the footage that you see in the header image.
I got the rushes from vecteezy. There are two clips I used here. One with a green screen matte of a wall-mounted Smart TV and another is of an Asian couple having tea or something. I have separately mentioned the links to these clips so that you can follow along if you want.
Also, the clips are in 4K and I have scaled them down 1920X1080 for convenience. Let’s now get down to the business. Let’s see what are there in our kitty and what the final result will look like.
Table of Contents
1. Screen Replacement in After Effects – Get your footage ready

Both these clips are 4K i.e. 3840X2160 and of 25 FPS. I have scaled them down to 50% at 1080p. Also, I have chopped out a few portions of the clip for screen replacement (the Asian couple) to get to a position where we can see both the persons.
It’s 2:24 sec from the beginning of the clip i.e 2 sec and 24 frames. I have created a new viewer to show both the clips side by side. Also, we’ll be working on a 6 sec composition to get the effect of screen replacement as the length of one of the clips is just so.
Here they are.

Now we’ll be working on the the BG_green_matte clip (I’ll call this way henceforth) first and let’s turn off the visibility of the layer of the Asian_couple clip.
The idea is to track the motion of the BG_green_matte clip and then use the tracking data to place the Asian_couple clip over the green matte.
2. Track Motion in After Effects – Use Perspective Corner Pin

- With the BG_green_matte clip selected and Asian_couple clip turned off, click on Track motion. Get it from the Window menu, if it’s not there anywhere among the docked panels.
- You should see the selected layer as the Motion Source.
- Go to to the Track Type > Select Perspective Corner Pin. Now you have to position the Corner Pins before tracking. Let’s go and do that.
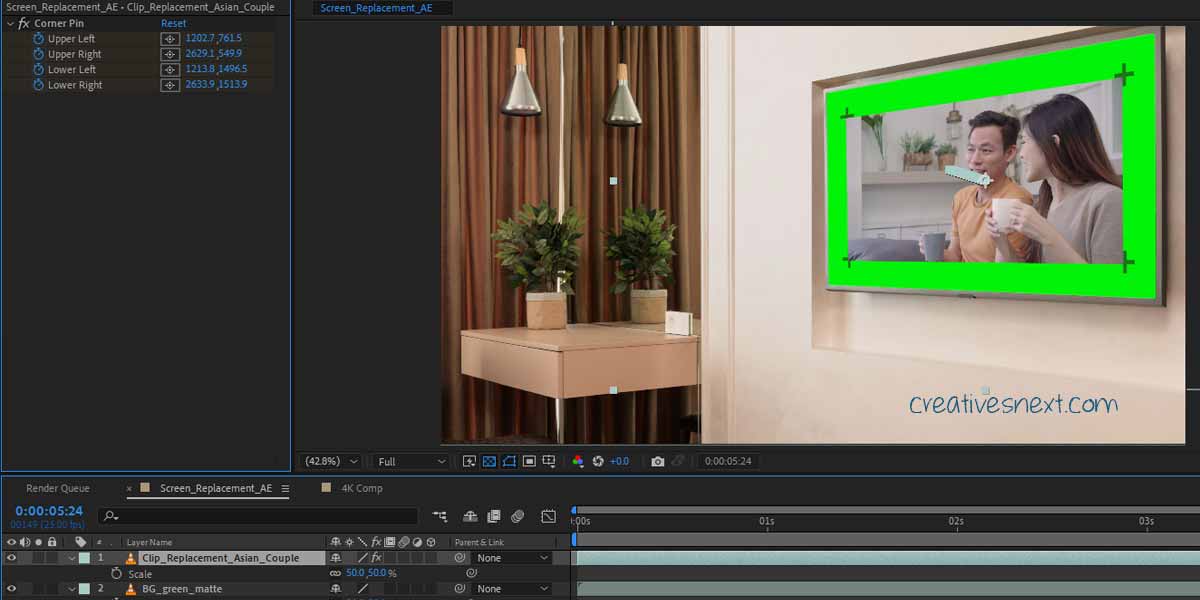
3. Position the Perspective Corner Pin over the Crosshairs

The moment you select the Perspective Corner Pins as the Track Type, as many as 4 corner pins will appear and you have to position all these pins at the crosshairs over the green matte of the screen.
- Make sure the play head is parked right at the first frame and you pick the pins in such a way that you can move both the region boxes with the pin within.
- Position the pins at the high contrast areas. This helps After Effects track the motion much more efficiently resulting in generating a better set of tracking data.
- You should zoom in and refine the corner pin positions for precision and a better motion tracking. Use Zoom and Pan(Hand) tools from After Effects Menu. See an image of the screenshot below.

All the while you’re positioning the corner pins, your play head must park at the frame #1 as you will start tracking from that frame to the end.
Bonus Tip: Use Z for Zoom in, H for Hand or Pan and V for selecting Pins while refining their positions. Also, use Z+Alt for Zooming out the Canvas area.
4. Track Motion for the Layers – Apply the Tracking Data to the other layer used for replacement

After positioning of the corner pins is over, time is now to track motion by analyzing. You do that by clicking on the play forward button.
Just in case, your play head remained parked somewhere in the middle, you could first track forward (play forward) and then track backward (play back) to complete analyzing.
Personally, I like to park the play head either at the first frame or on the last and accordingly track forward or backward.

You get your tracking data after the ‘Analyze’ is over and you get to apply this data onto the layer which is to be used for replacing the green matte.
5. Apply Tracking Data on the Target Layer [the clip used for screen replacement]
Click on the Edit Target to select the target layer used for replacement.
Now, click Apply. The moment you click on the Apply, the tracking data already generated will be applied on the target layer that just selected.
As far as our motion tracking and using the tracking data are concerned, our tasks are over. Now we have to work on the target layer. Let’s go and do that.
6. Work on the Target Layer – Scale Up
First, you need to turn on the visibility of the layer.
You get the idea. The tracking data applied on the Asian_couple clip changed its orientation in the way the green matte has. Just scale it up to cover whole of the green matte and then we have to work on removing the green matter using the Keylight, a widely used After Effects effect to key out a particular color.
Let’s see how the scaled up clip (target layer) looks like.

You now have to move the target layer beneath the green matter which is our BG_green_matte clip.

This is crucial because you now have to use Keylight to key out the green matte.
7. Using Keylight in After Effects to remove the green matte
Now we’re almost closing in. I mean in the last lap to be precise. We have to key out the green with a few edits.

- Get Keylight (1.2) from the Effects & Presets and apply on the BG_green_matte layer
- Pick the Color Swatch from Screen Color and Click somewhere on the green matte. Let’s see how does it come out!

But the work is not over yet. We have make some adjustments in the Keylight features to get the crosshairs eliminated and add some feathers to the edge of the Asian_couple clip.
8. Make Final Adjustments in the Keylight – Change the Screen Matte Settings to get a clear background white
Select Screen Matte in the View Type from Final Result.

In the Key light settings, twirl down and open the screen Matte settings. We have to get rid of some areas in the background white.

Lower the Clip White until you get the background white of any black or grey areas as we can see in the previous image. This is the way to separate out background footage and screen matte area where we have placed the Asian_couple clip.
But still some works left.
9. Eliminate the White Cross hairs on the Screen matte

Raise the Screen Despot White until the crosshairs on the screen matte completely disappear. You should this disappearance dragging the play head back and forth.
Once you’re sure of absolute elimination of the cross hairs, you arrive at the final value of the Screen Despot Value. You could also use Screen Shrink/ Grow to increase or decrease the matte area. I have used a value of 5 to reduce the matte surface slightly.
And, now get back the view type (at the top of the Keylight settings) to Final Result.

Conclusion
So, there are your.
Screen replacement using Adobe After Effect is pretty simple easy a task that you can achieve in less than 5 mins. Thus, this piece is a short one. Hope you find this useful.
I’ll write more on the 3D camera tracking and set extension using After Effects and 3ds Max in the coming days. So please keep a close watch.
Please don’t forget to share this to help me get a wider traffic footfall an encourage me write more such content.