

More Use Cases of After Effects Expressions with Various Properties
Published on 28 April, 2025
Table of Contents
Introduction
In this article, we’ll see more use cases of After Effects Expressions with its various layer properties.
Motion designers and animators heavily depend upon the Expressions while using this Adobe program for creating animated explainers fast and easy.
Repeated tasks like text animations, movements of the graphics elements, lights, camera, you name it. You can simulate almost every movement, in patterns and repetitions, with the help of After Effects Expressions.
I have already published quite a few articles on the Expressions, covering the Random movement of layers, Java script Math Operators, Vector Animation Techniques and Animating After Effects Lights that you may find useful for creating animated explainers.
You can also visit our Category page on After Effects, if you want to delve deeper on those expressions.
This writing highlights more instances of expressions with various After Effects properties. The idea is to extend the expression functionalities and creativity to the maximum possible extent.
I assume you’re familiar with After Effects Expressions and do have the working knowledge of operations.
Let’s first start with animating text and mapping it with the change of shape layer.
1. Change Text Value with Animating Bar Graph
Now the point is, you know how to create this simple scenes with a few shape layers. I’ll not get into that. The only thing here I would like to mention is, you have to set the anchor points of both the bar at the bottom.
Because, you want to animate the bar graph vertically up and down and not left to right.
I have created two Bars and two source texts at the bottom. The idea is to change the value of the text in relation to the changing heights of the bars. Let me now share a screen shot of the AE composition and then discuss.

1.1 Wiggle ‘Y’ value of the Scale property of the Bar
First, I have added a simple wiggle expressions to the scale property. But you have to apply this on the Y value, else the bar will animate in the left to right direction too.
Wiggled = wiggle(5,80);
[value[0], Wiggled[1]]
The code is simple. I brought a new variable as ‘Wiggled’ and assigned wiggle expression to that. Then, I used Value [0], for X and ‘Wiggled’ for Y. That’s what is affecting the Y value of Bar in accordance with the wiggle value.
And now you have to change the Source Text with the animating Bars.
1.2 Change Source Text by Parenting to Y Value of Scale & Use After Effects Expressions Math.round to get rid of the decimal places
In this case, I have Alt Clicked on the stop watch of the Source Text property of the Text layer (respective to the Bars) and then parented that with the pick whip to the scale property of the bar. It will create values with decimals.
To remove the decimals, you have to use Math.round expressions which you can access through the Expression Language Menu > JavaScript Math.
Use the following code to the Source Text Layer.
Math.round(thisComp.layer("Bar_1").transform.scale[1])Replace the respective layer name from your composition. Note that, here “transform.scale[1]” corresponds to the Y value of the Scale. X = Value [0], Y= Value [1] & Z = Value [2] in After Effects Expressions.
2. Change Source Text with Rotating Dial – Rotation and Math.round
You can create the scene composition with a base circle and line that’s like its radius. Set the anchor point of the line or radius at the center of the circle.
2.1 Add Wiggle to the Rotation Property of the Dial or Radius
wiggle(2,360)I have added 360 as the amplitude to make the dial take the whole circumference of the circle for its wiggling.
Let’s have a look at the following screenshot and you’ll get the idea.

2.2 Parent the Pick whip of Source Text to the Rotation property
Look at the image segment to the left, marked 1. The Source text, after parenting, changed to a value with many decimal places, which is certainly not exactly what we want.
At this point we’ll have to use Math.round to get rid of the decimals like before.
2.3 Use After Effects Expressions Language Menu to Call Math.round function
After you call the Math.round function, the code will look like the following.
Math.round(value)But, you have to tweak the ‘Value’ at this point. You have called the Math.round function but you’re yet to change the argument i.e. the (value).
2.4 Parent the value of Source Text Math.round function to the Rotation property of the Dial
The final After Effects Expressions at the Source Text with the value rounded off is like the following.
Math.round(thisComp.layer("Dial").transform.rotation)3. How to sample color of a Text Layer from an Image below with After Effects Expressions?
This time, you create a text layer and put an image beneath the text layer. Before you add the After Effects expressions, you have to do a few things.
Select the Text layer, twirl down its properties and and add Fill color. Then using the Expressions Language Menu, you have to add the color sampling function as indicated below. See the screenshot below and the following code.
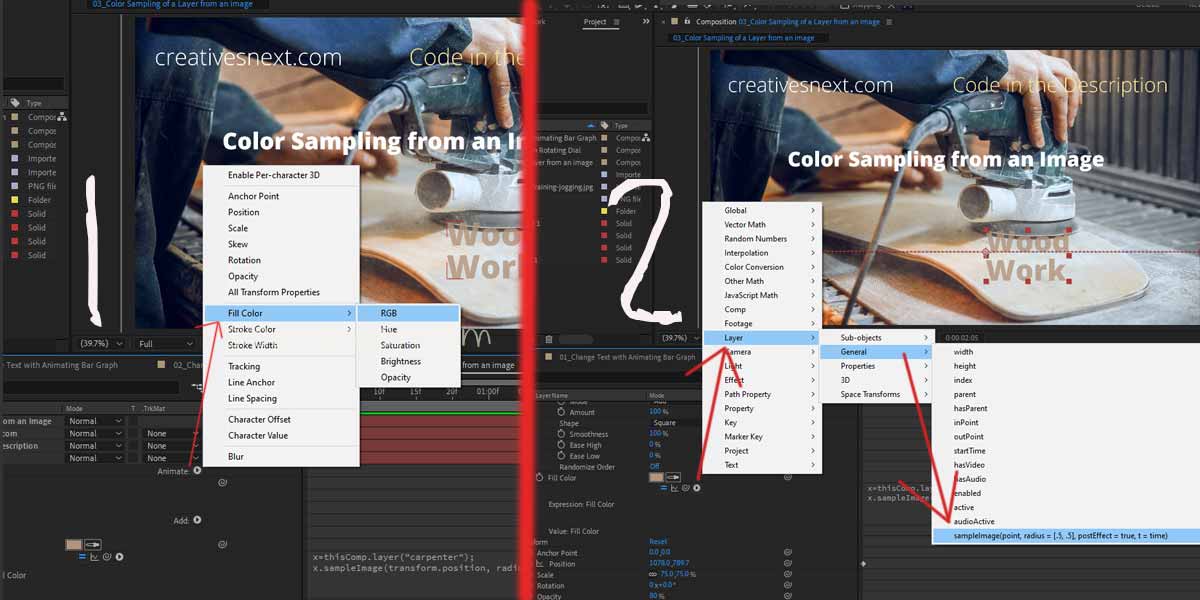
Why you have to add the fill color in the layer properties of the Text layer ? Because you can’t animate the the color from the Character panel of the text.
Finally you add Layer > General > sampleimage() function from the expression language menu. I have tweaked the function with a few changes. Th final code is as follows. My layer name is “carpenter”.
x=thisComp.layer("carpenter");
x.sampleImage(transform.position, radius=[10, 10])
4. Change RGB Color to HSL with After Effects Expressions
In this case, the idea is to convert the color of one layer, that’s originally parented to a text layer of RGB color fill into HLS.
As before, I have added ‘Fill Color’ in to both of the Layer Properties and then parented the Layer with “Convert RGB value to HSL value” to the layer “Wood Work”.
The color of the child layer is now updating according to the “Wood Work” layer. Both the layers are now holding RGB colors. But now, we’re going to convert the color of the child layer into HSL and that will show the change in the values.

You see the difference in the colors both the text layers updating are clearly different. Let’s now have the code below.
// Convert RGB value to HSL Value
rgbValue=thisComp.layer("Wood  Work").text.animator("Animator 1").property.fillColor;
hslValue=rgbToHsl(rgbValue)
5. Use of After Effects Expressions in Sound – Change Graphics with the Audio Keyframes
Let’s first have a look at the above screen grab.
We’ll do four things here.
- Create a graphics which we’ll resonate with a sound file
- Import a Sound file and create audio wave keyframes, essentially converting the Audio to Keyframes
- Parenting a Layer property to Audio Keyframes
- Adding Linear Expression with control the range of animation
Before, I delve deeper, let me just walk through briefly how do I set the above scene.
5.1 Set up your scene for creating a graphics to animate with sound track

I have create a blob like graphic with a few simple steps stated below. You can create anything you like. But the style or structure is no important here. All we want to animate the graphics in a wave like pattern with the sound track.
- Create a Circle selecting the Ellipse shape tool with a considerable stroke value. I have assigned 15. Select two different colors for Fill and Stroke.
- Apply Wiggle Path to the Shape Layer with the values of your choice. I have kept the default value of 10 for the Size and Details, also the default value of 2 for Wiggle/ Sec.
- Add Repeater from the Shape layer property (Right arrow/ triangle). I have adjusted the values of the Transform Repeater to some extent to get the Repeats in the style of a set of concentric circles. You can add more Fills and Strokes from the Shape Layer Properties, if you want different colors of Fill and Stroke for the Repeats. I haven’t done that.
- Finally, applied Turbulent Displace to distort the graphic and to give it a more organic shape. I have kept the value of the amount at 50.
5.2 Convert your Audio to the Keyframes before applying the After Effects Expressions

Once you convert the audio into the keyframes, it will create another layer with a few properties. It actually yields a Null layer with Keyframes for Left, Right & both channels.

These keyframes of the layer ‘Audio Amplitude’ which is nothing but a Null layer. The keyframes provide the values, while the channels are the expression controllers. They don’t affect the layer directly.
The idea is to parent the amount of Turbulent Displace to these Keyframes and make it change with the changing values of the Keyframes.
But before parenting, we’ll remove Left & Right Channels and will only work with the Keyframes under the Both Channels. Just select and hit the backspace to delete both the Left and Right Channels.
5.3 Parenting Turbulent Displace [Deformity] to Audio Keyframes for applying the After Effects Expressions

You have to parent the Turbulent Displace’s Amount (Alt + Click on the stop watch) to the Slider value of the ‘Audio Amplitude’ Layer to apply the After Effects Expression. Once parented, the expressions become as follows.
thisComp.layer(“Audio Amplitude”).effect(“Both Channels”)(“Slider”)Let’s have a quick look at the animation at this point.
5.4 Use Linear Expression to control the Displacement further
You can further modify or control the animation of the graphic, just in case you want to. And we’ll do that with the help of Linear expression.
In After Effects, the linear() expression function re-maps a range of input values to a different range of output values. This allows you to link one property to another in a linear, proportional way.
Here we’ll first see the max and min value of the Parent layer i.e the slider values of the audio keyframes and then we’ll map those values to the child layer i.e. the Turbulent Displace in certain range.

What did I do here?
- Select the Audio Amplitude Layer and twirl down the layer properties to get to the Slider Values. These values are the functions of Audio waveform where each wave has a peak and a trough.
- Click on the Graph Editor icon, as arrow-marked, to open up the graph.
- Get to the Info Panel (Get to Windows > Info if not already opened) to check the Max and Min value of the slider. I have got -363 & 414 (rounded off).
Let’s now switch back to the Time line by Toggling off the Graph Editor. Now, use the following modified expression in the child layer.
x=thisComp.layer(“Audio Amplitude”).effect(“Both Channels”)(“Slider”); linear(x,-362,413,-100,100)Now, this hasn’t markedly changed the wave pattern. But with more tweaks and twist of the features under Turbulent Displace, you may see much more pronounced changed with the application of the linear expressions.
Conclusion
This is no way complete and I’ll keep on adding more and more After Expressions to this article. I would suggest you bookmark this page and com back once in a while to check if there are more expressions added next to the current ones.
After Effects Expressions are a huge repertoire of codes that doesn’t not only make your work much easier, but it also offers a wide varieties in animations that’s otherwise extremely tedious to create.
Text, Colors and Sound are some of the layer properties that you can have a great control over using these After Effects Expressions. Add more varieties tweaking the properties and changing values in the expressions to make the changes more pronounced.
As I mentioned, I shall keep on adding more After Effects Expressions with other layer properties to this page and use of expressions with Camera movement is in the pipeline.
I would suggest you to visit this page after some time to get to other use cases of the After Effects Expressions.
Please share his article if you find this useful. It will help me craft more such helpful content.