
Color Correction in Avid Using Curves – Make the Best Use of the Tool sets
Last updated on 28 June 2026, Published on 30 April 2023
Introduction
Color Correction in Avid using Curves provides a hell lot of features for both amateur and professional users. Avid has many groups of tool sets for color correction, especially when you have activated the Symphony option.
But even before the symphony came into being, the Curves tool sets in the workspace were there for the users.
Possibly from Media Composer 8.0 back in 2015-16, Avid had been integrating the Symphony option. The change is particularly evident in the color correction workspace.
There are many different tool sets for color correction in Avid like HSL, Levels, Channels, Curves, and Secondary Color Correction. Out of all these, Curves somehow enjoy editors’ and colorists’ preferences over others.
Before delving deeper, I would recommend you go through a previous publication on Color Correction in Avid Media Composer – Using HSL & Y Waveform. This piece has some basic concepts about the use of scopes and waveforms as well as video black and white.
Color Correction and Color Grading are different. Color Correction takes place first, always. The objective of color correction is to fix the errors in a shot. These errors could be related to brightness or luma range or any color casts.
Color grading is adding or enhancing a tone of color for that particular shot. So it’s obvious that Color Correction always precedes Grading and not the other way around.
For low-budget and indie productions, there is hardly any dedicated colorist and you have to handle color correction or grading whatever is needed for that matter. And that’s quite an acceptable norm across the World.
Let’s now see what you’re going to have in this piece for learning Curves in Avid for Color Corrections.
Your Free PDF at the end of this Blog
Table of Contents
Assess Your Shot for Color Correction in Avid using Curves
It’s important that you examine your shot before actually starting color correction. Two things to notice primarily for a shot.
One is the brightness or luminance range of a shot. By this, I mean how dark or bright a shot is. Now that’s a subjective term and not a measurable one.
To make it measurable or quantify, you have to find the reference points for black and white in an image. or maybe the points that are close to black and white. You know from our previous post on Color Correction in Avid Media Composer – Using HSL & Y Waveform that the legal range for video black and white is 16 and 235 respectively.
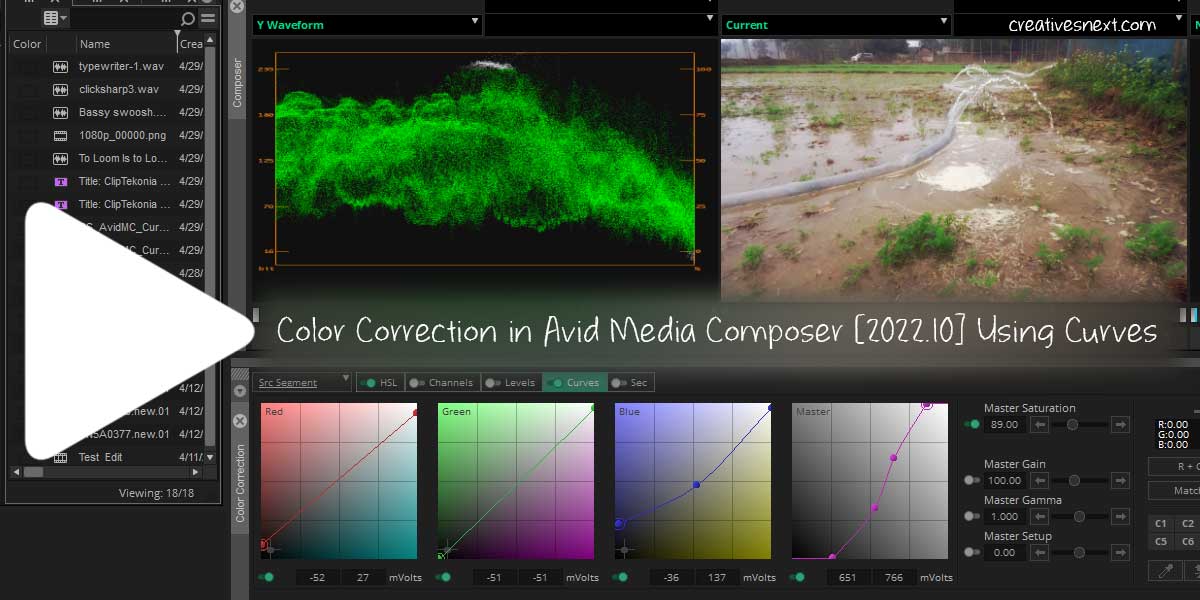
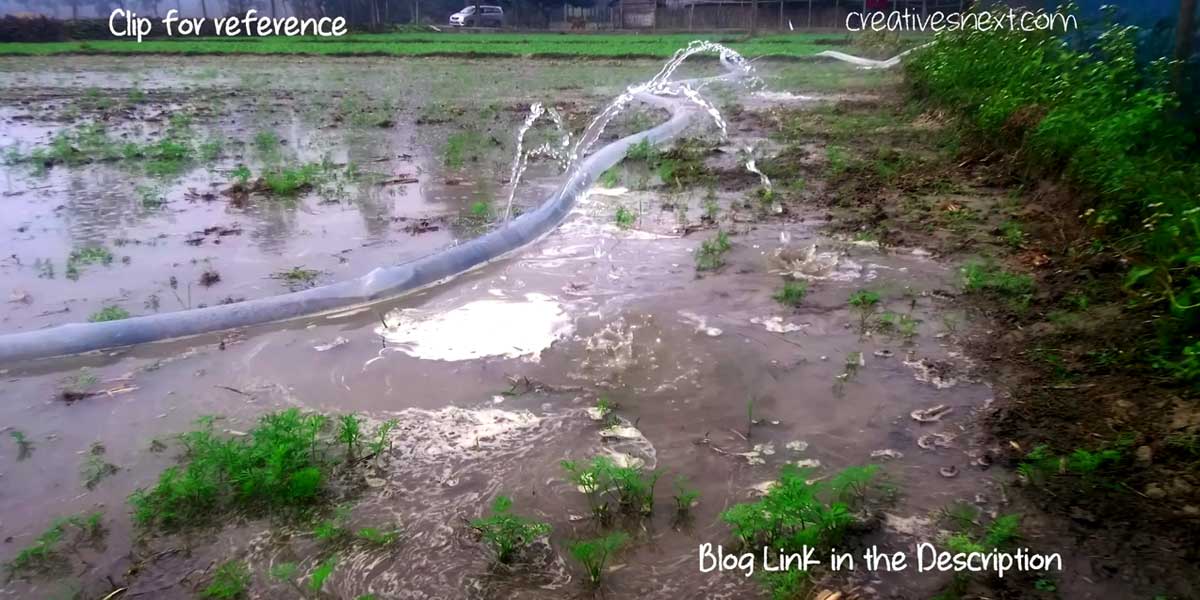
For that, you have to follow certain steps. Let’s now see a clip that I have chosen for color correction using curves in Avid.
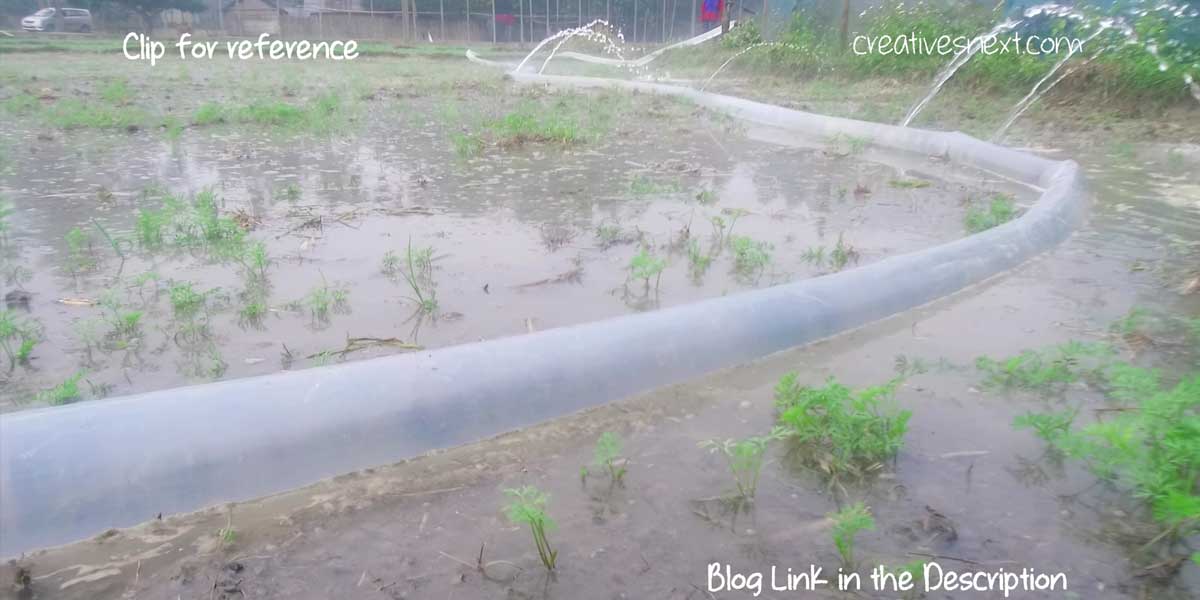
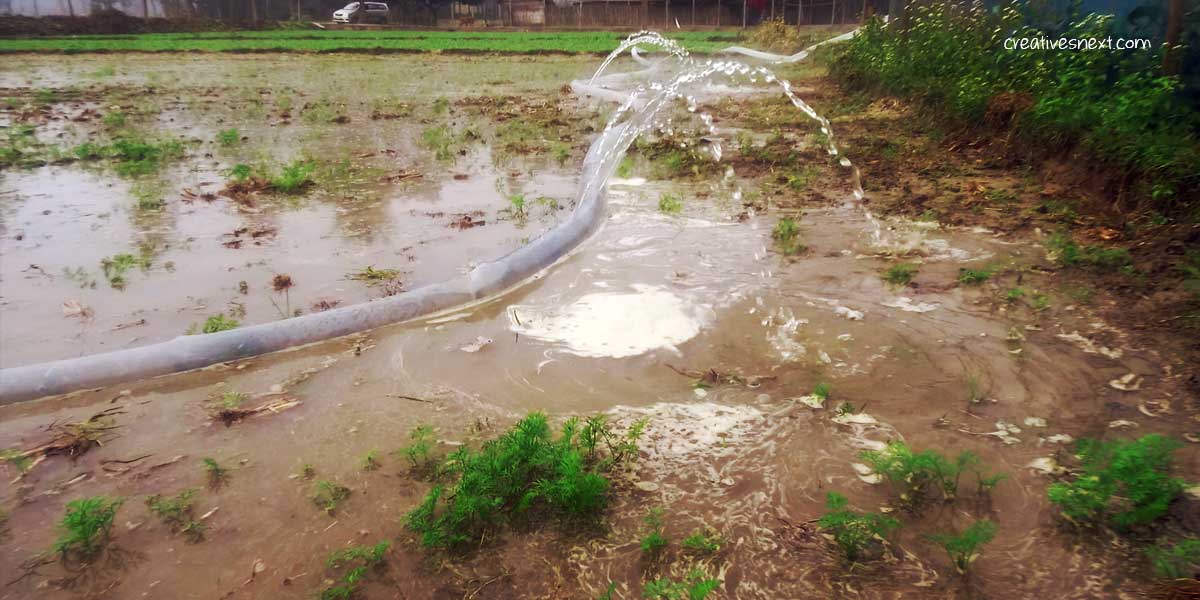
Watch out the clip and you’ll clearly see that the shot looks completely awash. Briefly, I took the shot using a Follow Focus or OSMO viz. DJI Ronin back in January 2019 while making a series of agricultural documentaries. This was on a field of legume cultivation, during irrigation in the morning.
It’s evident too in the Y waveform that I have plotted in the monitor left to the shot. Ideally, the whites are to peak at 235 while the blacks are at 16. You’ll make those adjustments using Curves.
In terms of color bias, however, there is no intense color cast as such. Still, I find the shot lacks warmth. That may be due to the fact that it was shot on a foggy morning and sans the sunlight. But you could alter any tone after you have fixed the video’s black-and-white level.
Plot Y waveform to evaluate Video Black & White before using Curves in Avid
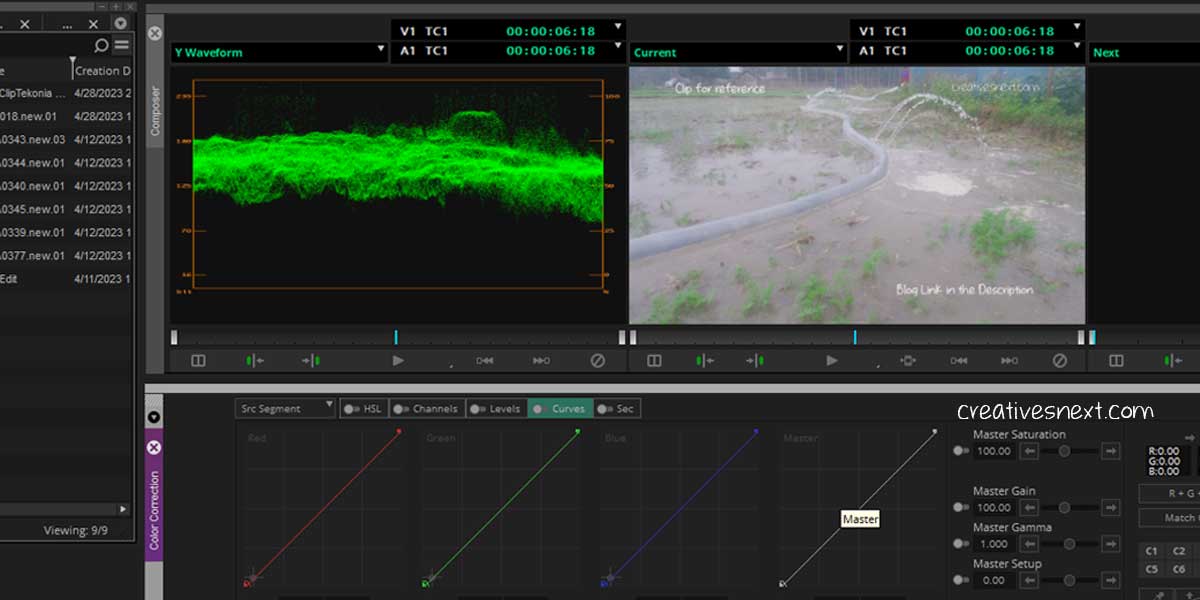
Get the Y waveform in the monitor left to the uncorrected shot loaded in the middle monitor named ‘Current’.
You plot the Y waveform and it’s immediately clear that what you assessed with the naked eye is evident in the waveform also. Video Black and White are to be at 16 & 235. But the waveform shows that the curve is very narrow.
It also clearly shows us that the curve has a bias toward white which we have to neutralize to the maximum possible extent. Therefore, at first what we have to do is fix the black and white levels, following the Y waveform, using Curves.
How to use Master Curves in Avid for tweaking Video Black & White following Y waveform?
You can see there are four different graphs for color correction in Avid while using curves (under the Curves tab). Three for three primary colors and one named master. Remember, you can add up to 16 control points in a Curve graph.
So, you can have high precision control while conducting color correction in Avid using the Curves.
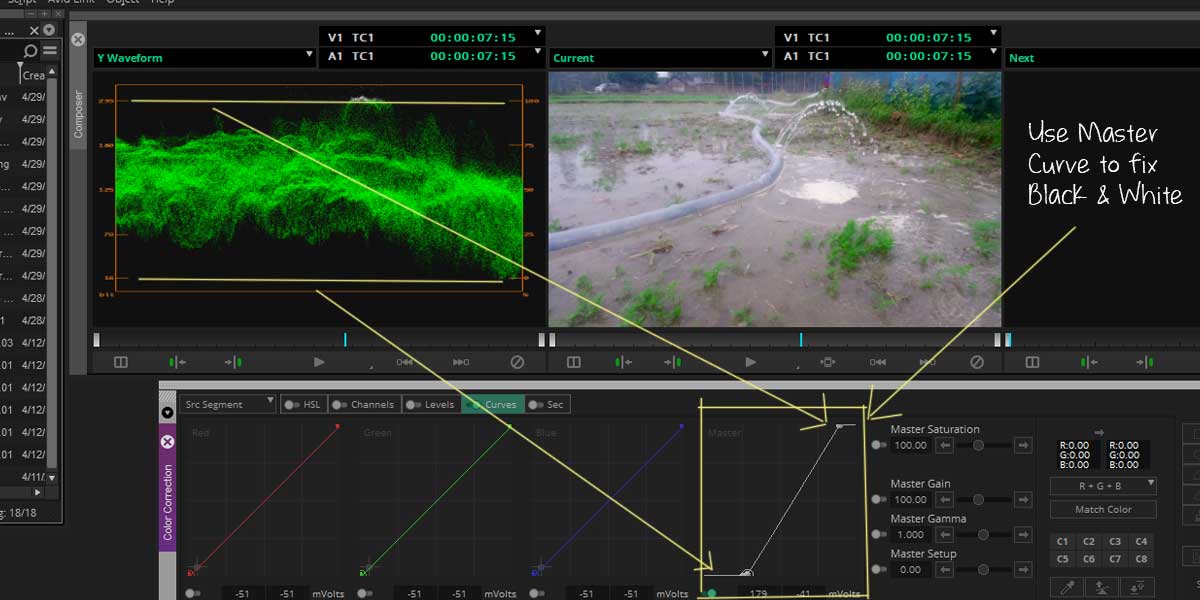
In the diagonal straight line of the Master Curve, the upper right corner controls the upper end of the Y waveform. That means the Highlight area, represents the whites. And you can control the lower end of the Y waveform or Black level using the left bottom corner of the Master slider or Curve.
There are two types of control points on a Curve graph. A solid circle within a bigger and concentric circle is the currently active control point. And one with a solid circle with no bigger one around is a control point that is inactive.
And the moment you click on the straight line, a point within a circle appears. You can create multiple points in between that fall in the mid-tone range. I’ll come to that in a moment.

Now, look at the modifications I made to the Master Curves. There are a few things to notice.
Modification 1 – Control Master Curve to change Black & White
I have moved the upper right and bottom left control points, representing the black and white to an acceptable level. You can see there is a marked area at the top where the waveform shoots above the legal range. And that’s okay for this shot.
This shot has specular highlights. Water droplets, glass are some of examples of specular highlights that have white greater than 235. Accordingly, they show up in the Y waveform. Here I have marked the area.
Note that the shot doesn’t have a clearly defined black. So what I have done is an Approach-Black tweak for this shot. This is very common where you don’t see a clear black or white in a shot and there you have to change the black-white levels to approach the ideal levels of 16 & 235.
Modification 2 – Control Master Curve to change the mid-tone
I have added a couple of control points in between to inflate the tonal range of the mid-tone. The upper right and bottom left control points are okay to deal with the video black and white levels (16 & 235).
But they are not meant for making any changes to the mid-tone area. And it’s pretty obvious that you have to tweak the mid-tone of the shot too. The moment you inflate the mid-tone range by adding multiple control points, the shot becomes alive.
Depending on the composition of the shot, you have to think through if the mid-tone should be neutral or a bit biased. Although the shot doesn’t have any sunlight and certainly not bright and sunny. But the shot doesn’t have a significant dark area either. So I have left the mid-tone range slightly middle to the top to match the nature of the shot.
So, there you have it. It’s not over yet. But, you could see there is a significant improvement in terms of Black and white as well as the mid-tone of the shot.
As I said just a few whiles ago, there are some specular highlights in the shot. The water splashing out of the tube for irrigation contains more white than the legal limit.
At this point, we know the shot lacks a warm tone. But changing the hue or adding a bit of color cast or its removal will require us to use a different set of parameters.
Use RGB Parade for Color Correction in Avid while using Curves
To balance the colors in a shot we have to use a different graph along with assessing through the naked eye. This time we’ll use RGB Parade. Use the drop-down menu of the Y waveform and select RGB Parade.
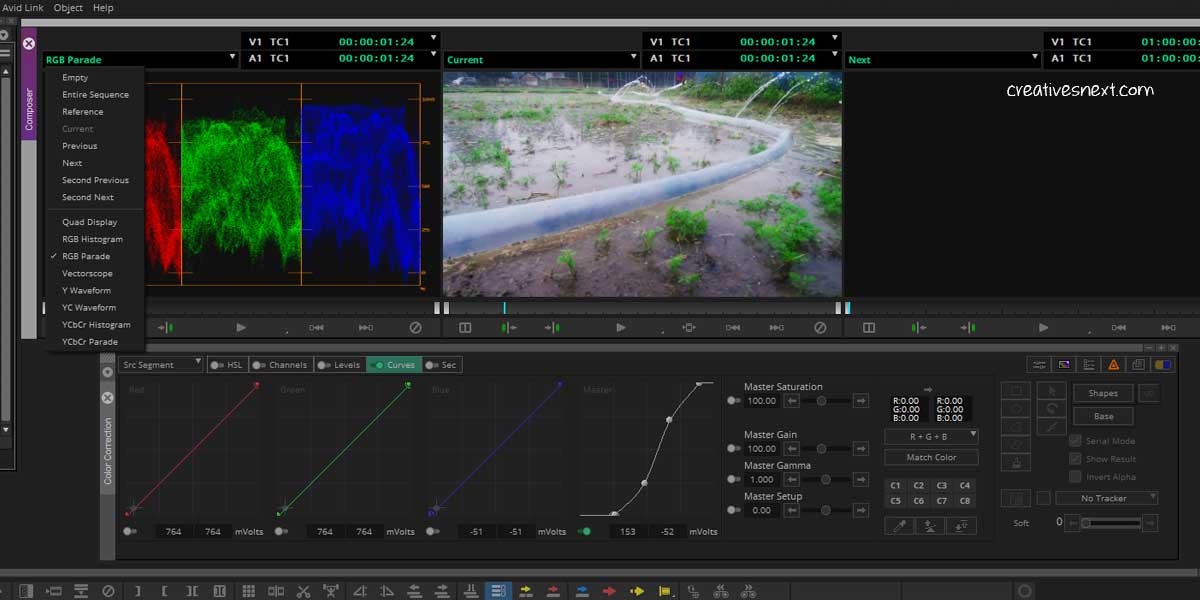
The shot clearly has a slightly extended Blue range compared to Red & Green. So, it’s better to modify the Blue Curve to bring parity with the other two.
Now, you could go either way, for color correction of this shot. You may add a warm tone. Or you could neutralize any tone. Let’s first see how to add a warm tone.
Add Warm Tone during Color Correction in Avid using Curves
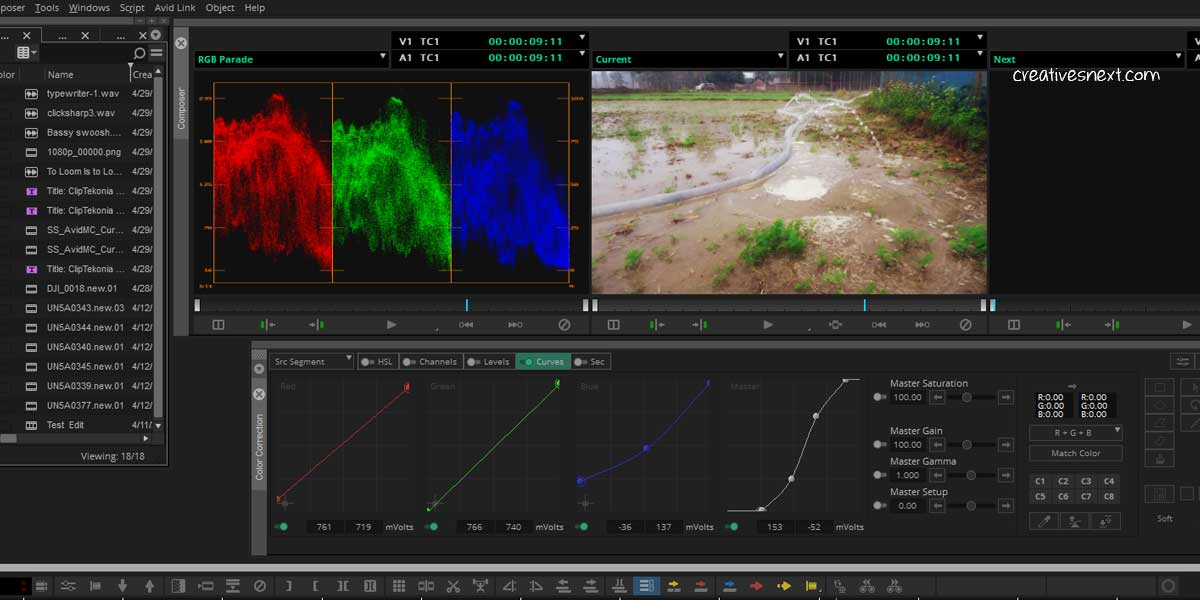
Look at the Curves and you’ll realize the change I have made. First the Blue curve. I have lowered the uppermost level of the Blue curve to bring in similarity with the other two. Also raised the bottom.
You could see I have made slight changes to both Red and Green too. The idea is to make all three curves look as close as possible. Finally, to cut off the bluish tint I have added a control point in the mid-tone and lowered that a bit. Just compare the Blue curve of the above image with the previous one and you’ll understand.
Now, this has certainly added a warm tone to the image eliminating the cold, bluish tint. You could spend more time refining this to get to the level of satisfaction for attaining your preferred tonal range for the shot.
There is no hard and fast rule for which curve to modify first. But I find it easier to deal with the predominant one first. In this case that was the Blue Curve. You may have to move to-and-fro one curve to another while adjusting the color. Remember, this is where you fix the color or hue for your shot after you have fixed the luma range.
Let’s now see how we can go further neutralizing the warm tone that we have added.
Reduce Warm Tone Using Curve during Color Correction in Avid
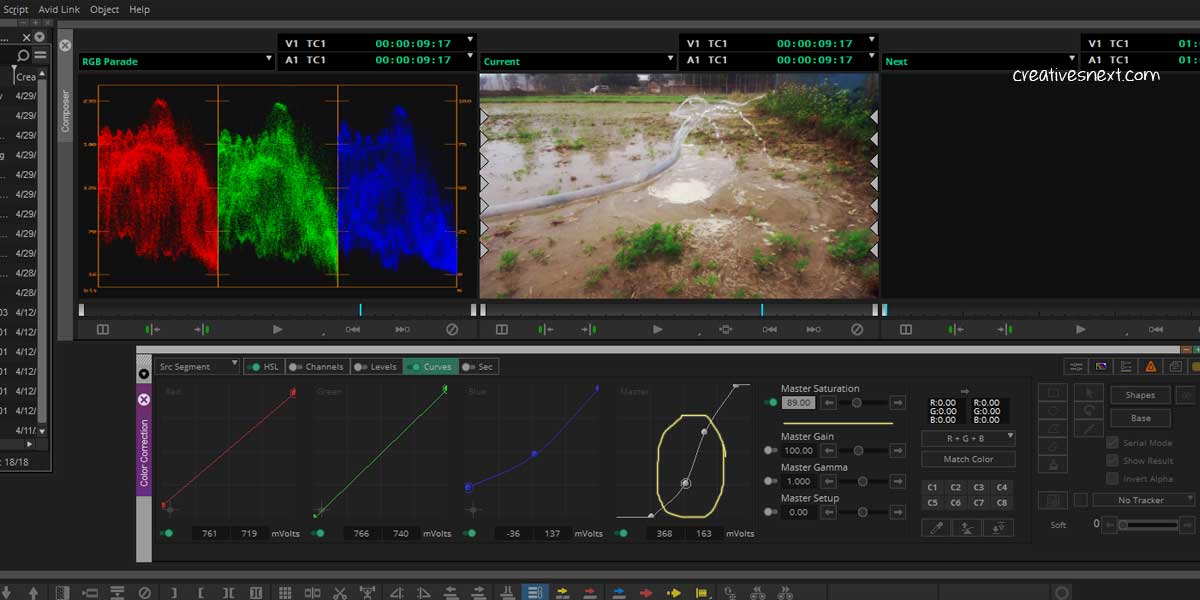
To reduce the warm tone, I have lowered the Master Saturation to 89%. It instantly brings down the saturation. To compensate for any loss of depth, I have tweaked the mid-tone control points a little bit.
You can continue with this trial-and-error procedure till you’re happy with the result. Here is the one that looks pretty good after carrying
out a color correction in Avid using Curves.
How to Change the Interface of Color Correction Tool sets in Avid Media Composer?
It’s not essential though. Just in case, you want to change the interface of the Color Correction tools in Avid whether or not using curves, here is a quick tip. But let’s first see, what is going to happen.
What are Chroma curves & what is the advantage of using them?
So far I have used the controlling curves with the interface shown above. But that’s because I am already familiar with the points as well as the effects they create with their moves.
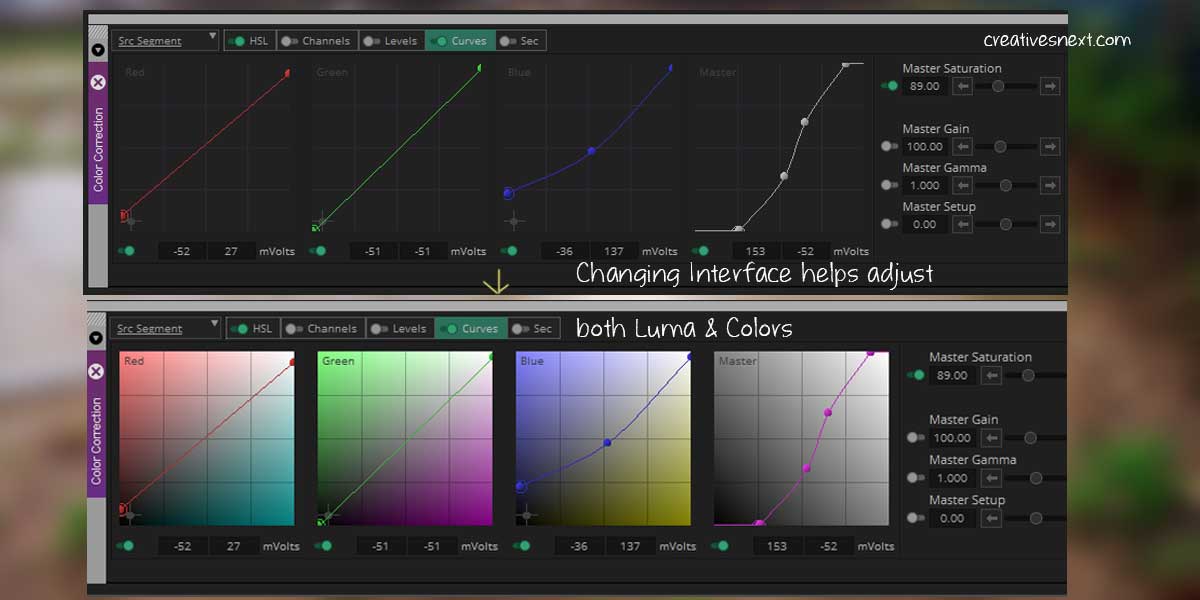
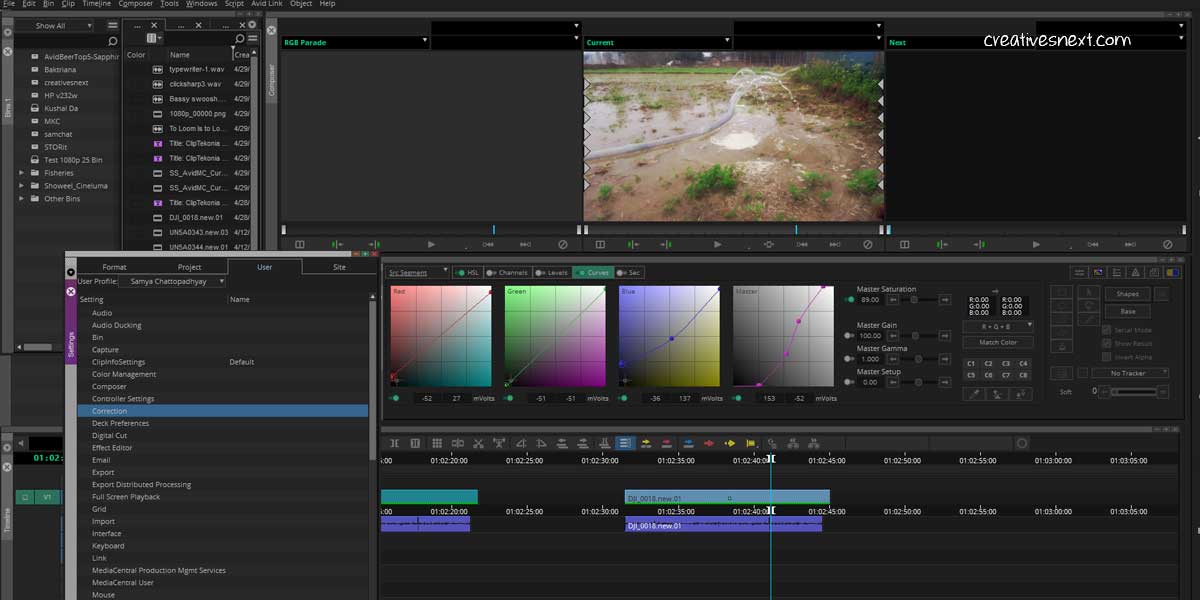
Just in case, you want a guided movement of the controlling points while you do corrections or grading, you may change the interface just like the one at the bottom half of the above image. These graphs with fluorescent backgrounds are called Chroma Curve Graphs. We’ll see how to get this interface in a moment. But before that, let’s realize how does it help!
The image is quite self-explanatory. See the Master Curve at the right. The Black, White, and Grey areas are indicative of the shadow, highlight, and mid-tone region of the shot. So wherever you move the control points of the Master Curve, you get a guide across the graphical surface. It certainly helps, right?
In the case of the Color Curves, the Chroma helps in a different way. They are showing the opposite colors in the color wheel. Look at the Red Curve. The diagonal line has the Cyan region at the opposite of the Red end. And that’s exactly what would guide you not only during Colo Correction but also at the time of Grading.
The same is the case for Green and Blue Curves. This Chroma guide is of immense help for adjusting color casts in the shots. You instantly get to know which side of the control points you’re having to move on. Now that you get the idea, let’s see how to change the interface.
Change the Color Correction Interface – Get the Chroma Curves & Wheels activated
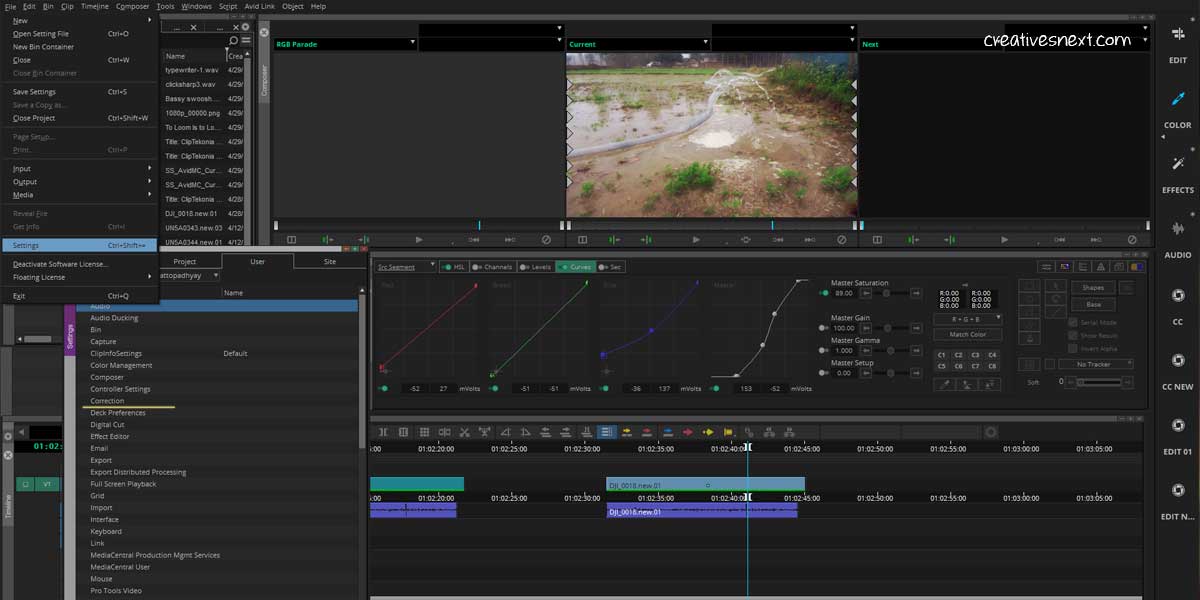
Go to File > Settings or just use Ctrl+Shift+= to the Settings dialogue open. In this, click on Correction (marked) to get to the Correction Settings.
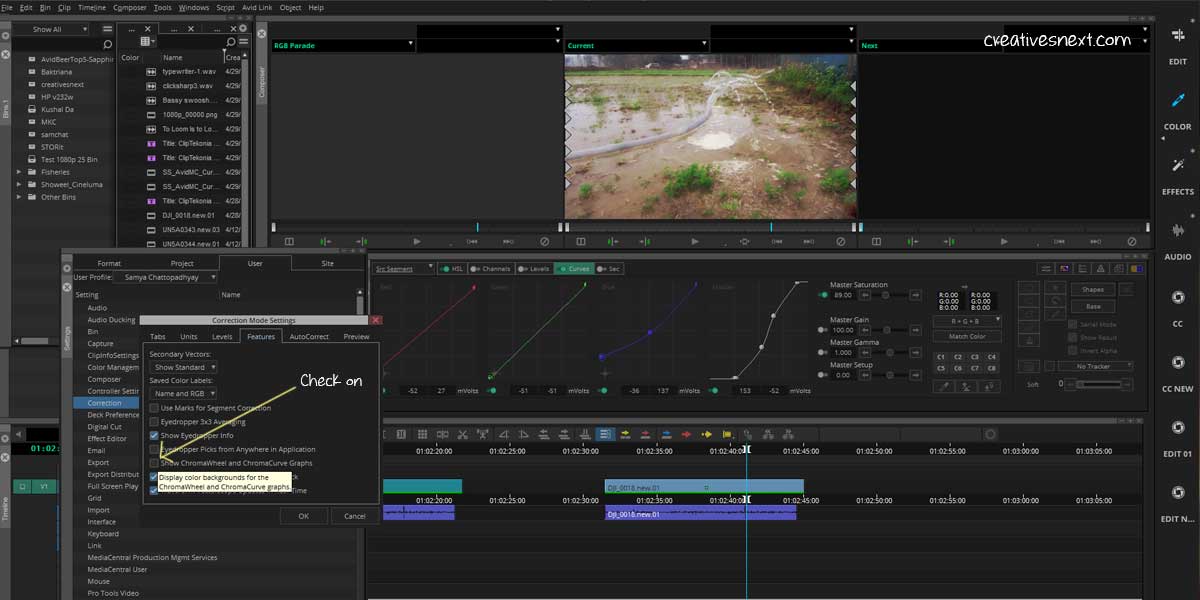
Now just check the box before Show ChromaWheel and ChromaCurves Graph. Finally, click Okay. You get the ChromaCurve Graphs.
A few sources of Free Clips for practicing Color Correction & Grading
Here are a few links to the sources of Free clips. You may visit the pages and get some stock footage for practice. Freepik, Pixabay, or Pexels are not appropriate in this case as the clips they offer are already graded. So you hardly have any chance to fix the errors.
Remember, you must do color correction first and grading later, not in the other order.
Conclusion
Color Correction in Avid using Curves offers adequate features for both corrections and grading. In this piece, I have mainly focused on corrections. Once you get accustomed to the corrections, you could make a move to grading.
To sum up, when you have a shot for color corrections, you first have to assess its brightness or luma range using the Y waveform. After you assess the shot with your naked eyes, go ahead plotting the waveform. Now tally the findings in the waveform with what you have thought out looking at it.
This is a nice practice. The more you do it, the closer your assessment would get to accuracy in accordance with the Y waveform. Next, you have to tweak the Master Curve using its control points. You could add multiple points in between to adjust the mid-tone. Once you’re through with an acceptable Y waveform, move on to adjust the color.
Again, you have an assessment with your eyes whether the image has a warm tone or cold cast. A warm tone indicates the richness in red and yellow or orange while a cold color signals a higher Blue or Green.
After you assess the color, plot RGB Parade and again compare. See how close your assessment is to the actual. Now spend some time adjusting the Color Graphs to get to your point of satisfaction.
Change the interface right at the beginning since the Chroma Curve helps much more efficiently, for both master and color graphs.
Download Your Free PDF
Mastering Curves & Color Grading in Avid Media Composer
Enter your name and email to get instant access