
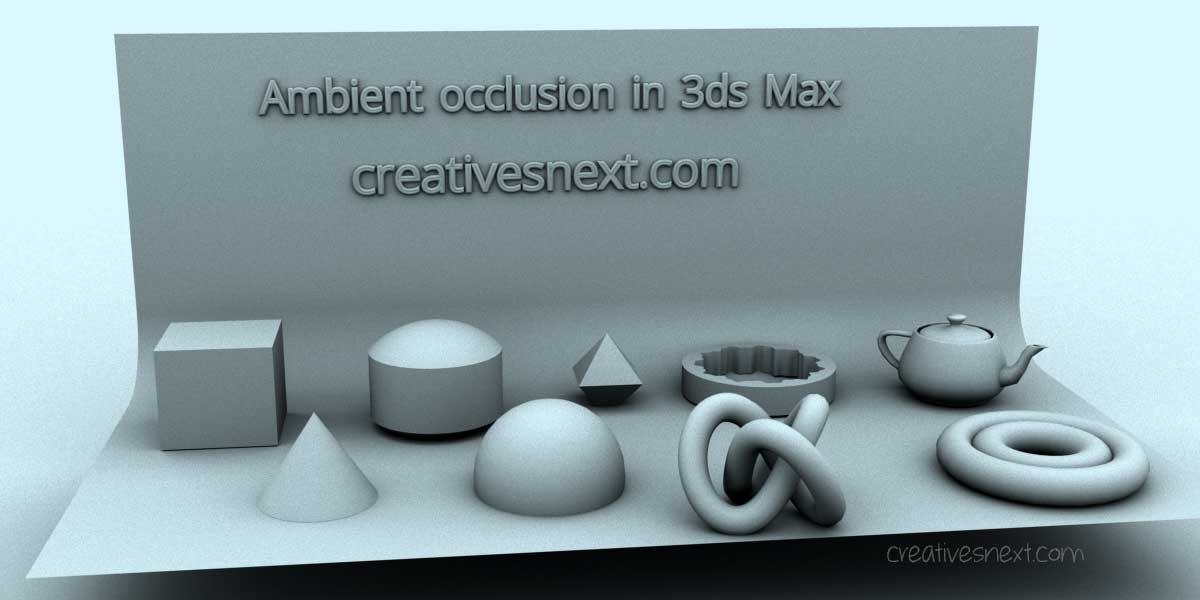
Essentials of Ambient Occlusion in 3ds Max [Fundamentals & Render Settings]
Published on 15 February 2024
Introduction
Ambient occlusion in 3ds Max, or in any 3D program for that matter, lets us present 3d scenes and models with contact shadows and global illumination. Global illumination uses different shaders to determine how much lights are absent in the contact area by casting shadows right there.
Ambient occlusion is very useful for presenting draft render of models and scene props without having to utilize the full resources of the 3d render engines. Much liked and often used this technique by the 3d modellers and artists worldwide, you should have a know how of it , if you’re into 3d scene creation or simulation. No matter if it’s related to a simple 3d scene development or creating an animated explainer or leading a post-production.
The term ‘occluded’ means prevented from receiving lights. It’s obvious that such contact shadows will simulate the 3D geometries and props in the scene in the absence of diffuse colors. Representation of 3d scenes with Ambient occlusion is popular among the Film, telly, and 3d industries as it helps us move ahead with the modeling toward its finalization.
There are many ways you can attain an ambient occlusion in 3ds max. We’ll dig one by one. Our main objective will be to learn how we can use ambient occlusion in 3ds max with various techniques using different render engines like Vray, Physical Materials, Arnold, and even the pretty basic scanline renderer.
But before dealing with those render setups, we’ll go through a little bit of physics of ambient occlusion, since it’s optics after all. Ambient occlusion is a shading technique for rendering where the rendering engine calculates how much an area or a point of the surface is exposed to ambient light. There is a varying degree of light incident across a surface. These shades of light are what create contact shadows as well as depth in a 3d scene or environment.
A tube’s interior is not as exposed as its exterior. But that takes place in the real world. To simulate the real-world phenomenon inside our 3d program, we have to decipher what exactly going on! It will help us better understand how the render engines calculate the scattering of light on a surface.
Table of Contents
Fundamentals of Ambient Occlusion – Why does Industry love this rendering technique?
- A little History – SSOA or Screen Space Ambient Occlusion
- What is Global Illumination?
- Mathematical Expressions for Shadow Approximation behind the Algorithm of Ambient Occlusion in 3ds Max
Ambient occlusion in 3ds Max using ART renderer
Ambient occlusion in 3ds Max using V Ray
- Change the Material – Use V Ray Material
- Select VrayLightMTL – Use Vray Dirt Map
- Change Settings inside the V Ray Renderer
Ambient occlusion [AO] Pass in 3ds Max using Corona
- Clear Material from an object in 3ds Max using a Code [in Max Script Listener]
- Change the Corona Render Settings for AO Pass [Render Elements & Maps]
- Edit the Corona Material Settings for Ambient occlusion in 3ds Max
- Tweak the Render Settings for De-noising
Ambient occlusion in 3ds Max using Arnold renderer
- Change the Render into Arnold – Assign renderer in Render Set up [F10]
- Edit the Material Settings – Get Ambient occlusion in Arnold Material
- Tweak the Arnold Render Set up to change the Environment Background
Fundamentals of Ambient Occlusion – Why does Industry love this rendering technique?
In real life, we notice an approximate ambient occlusion on an overcast day. This is a much more empirical way to put it as such. But an instance of global illumination of a cloudy, overcast sky looming above brings us close to what we can get as a real-life ambient occlusion. And that takes us to the arena of indirect illumination or lighting.
When the shader of Ambient occlusion or AO is used, it generates a greyscale render, if the occluded and unoccluded shades are left to the default value of Black and White (I have changed this value slightly to blue).

What you see in the scene, in terms of ambient occlusion, is a global illumination technique where each point or object in the scene is illuminated directly by the source of light and indirectly by all the geometry there in the scene as well. So it’s the resultant of the direct and indirect illumination.
There are many areas where shadows are not cast very hard. These contact areas appear shadowy and not entirely darkened.
A little History – SSOA or Screen Space Ambient Occlusion
A little detour while learning the fundamentals of ambient occlusion. It first came into being back in 2007 by Crytek for a game Crysis. Known as Screen Space ambient occlusion of SSAO, the technique used to calculate the pixel depth rather than the scene geometries while creating an ambient occlusion Map. This process takes into account the scene arrangement around the pixel and not the global illumination.

The SSAO algorithm acts like a pixel shader and stores the scene depth buffer as a texture. The idea is to sample the depth values around a pixel and determine the extent of occlusion (or absence of light) around each sampled point. So, in simplified terms, there is a varying degree of data in relation to pixel depth for each sampled point.
The SSAO method, in its early stage, would require as many as 200 textures for acceptable visual quality. This is hardly a practical solution for real-time rendering. With the passage of time technology advanced and arrived at a point where the number of depth samples for each point came down to 16 or fewer while retaining high visual quality.
SSAO is used for soft real-time computer games. But the algorithm of Screen Space Ambient Occlusion has some downsides. Since this technique uses pixel depth in close proximity, that’s in all likelihood affected by any geometry. This may not be desired in every situation.
There is also a problem with SSAO while smoothing the noise and grains without changing the continuity of depth. This would affect the object edges, again an unwelcome scenario.
Why am I discussing all these when you don’t have to deal with them directly? Because these are the techniques that play out behind the render engines like Vray, Arnold, Physical Material, Scanline, or other engines for that matter. These techniques make up the algorithms, useful for understanding how the shaders work while rendering ambient occlusion in 3ds Max.
What is Global Illumination?
Global illumination, also known as Indirect Illumination, is a different set of algorithms that are widely used, these days, for computer-generated graphics and animations. The shaders of Global Illumination create much more realistic lighting in a 3D scene by taking not only the source of light (or lights) but also other surfaces in the scene that bounce or reflect rays of light.
By this, Global Illumination takes into account direct as well as Indirect illumination in a scene and produces all optical phenomena like reflection, refraction, and shadows that come under this rendering technique. In global illumination, an object in the scene affects the illumination and thereby rendering of others and thus it’s called Indirect Illumination too.
There are many popular shading techniques that use the algorithm of Global Illumination. To name a few are Raytracing, Radiosity, Volumetric Path Tracing, Ambient Occlusion, and Path Tracing. The time for rendering using Global Illumination is somewhat slow due to its computational intricacies, but it yields more accurate results.
The algorithm of Global illumination uses diffuse internal reflection, specular reflection as well as caustics to generate an accurate scattering of light rays from surface to surface in a scene.
A scene, in all likelihood, comprises several geometries some of which are regular and some irregular. Therefore, indirect illumination or Global illumination naturally yields better photo realism in terms of surface scattering of lights.
Now, we can understand that the Global illumination or Environmental lighting creates the z-depth of a scene in the absence of color or material applied on the objects and lets us have the impression of the scene depth with all the objects in it.
But how do the render engines calculate the amount of light emitted from or received at a points or different points! Behind the algorithm of the render engines for creating both direct and indirect lighting, there is a mathematical equation. Although, it’s not essential to understand the mathematical expressions that tell us the shadow approximation, it’s interesting to know how do the render engines work on to recreate the real world scenarios.
Mathematical Expressions for Shadow Approximation behind the Algorithm of Ambient Occlusion in 3ds Max
When you diffuse an object with environment light cast in a 3d program, it looks flat and unrealistic in absence of any shadow. Ambient occlusion generates soft shadows especially in the surface contacts. So, lights access or partially access or do not in those contact areas.
The deduction of ambient occlusion in the 3d render engine’s algorithm involves measuring something called ‘accessibility value’, which is percentage of hemispherical illumination above each surface point, not occluded (or made inaccessible) by any geometry. Besides, the calculation takes into account the direction of least occlusion, known as the bent normal.
This bent normal is used instead of regular surface normal for more accurate shading results during the environmental lighting.
Now the idea is to calculate the accessibility value at each element or point surface as 1 minus the all other elements or object cast shadow over that element or point surface. Here the point surface shadowed is called the receiver and the elements or the objects casting shadows are known as the emitters.

The above diagram shows the mechanism of shadow approximation. Here, we get the approximation based on a solid or 3d angle of an oriented disk A of surface area, lets assume S(A). Now, this disk A, the emitter, is casting shadow over the disk B, which is the receiver.
Considering the surface are of disk A being S(A), the shadow can be approximately deduced by the following equation.
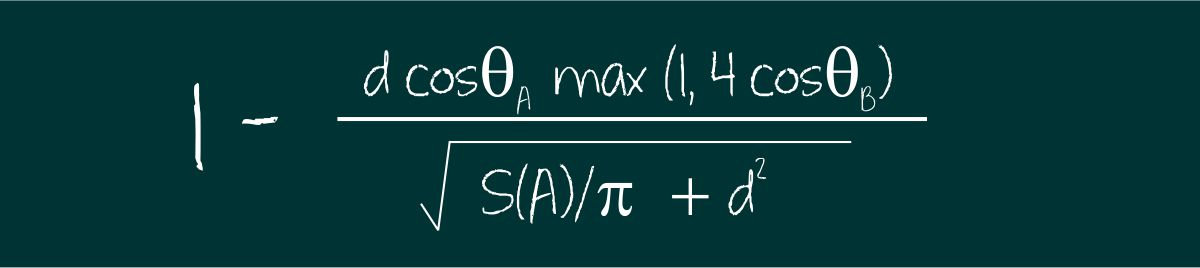
Although, we don’t have to memorize this expression for rendering using Vray, Corona or Max’s own ART render engines, I found it’s intuitive how this calculation is done.
Here, the quantity max (1, 4 Cosine theta) has been added to the solid angle of the receiver ‘B’ to discount the emitters that are not within the hemisphere above the receiver B. It helps the render engines get rid of the rendering artifacts for the geometries that lie near the horizon.
In a nutshell, the deduction involves considering a uniform hemisphere of illumination over a receiver as 1 and then subtracting all the emitters’ shadow cast upon it. I was interested to know how the secondary engines create light bounce within a scene interacting with different objects. It’s not very intuitive, but it’s not a no-brainier either.
Ambient occlusion in 3ds Max using ART renderer
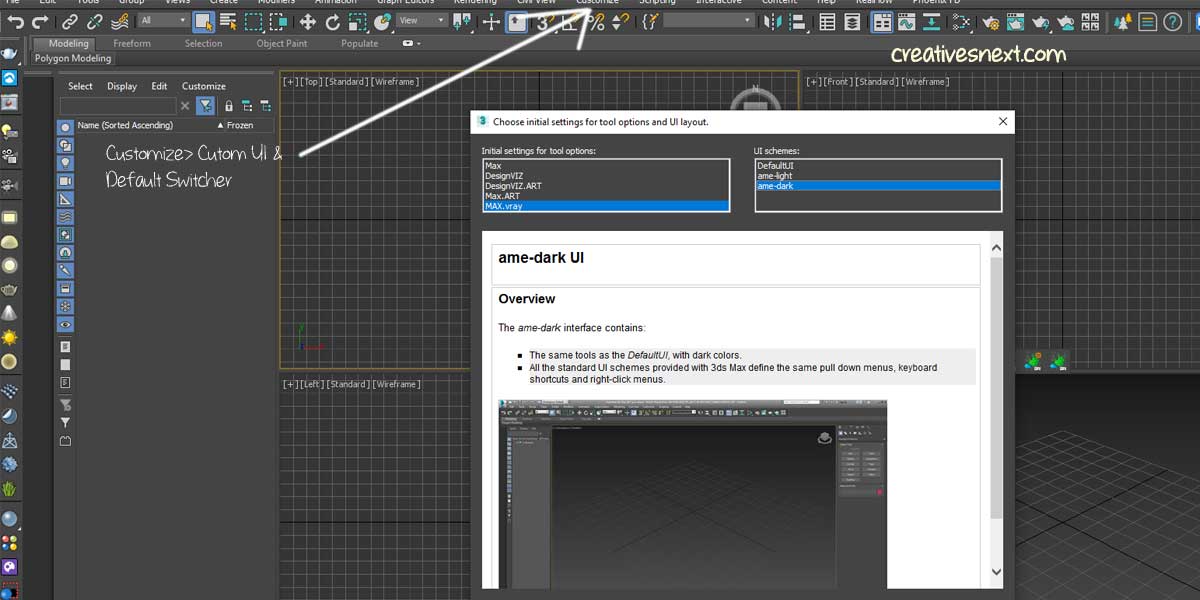
ART or Autodesk Raytracer is free plugin that ships with 3ds Max. Just note that, ART renderer is not the best choice for animation. But it lets you preview a static 3d scene with reasonable quality. Although it’s not the first choice of the CG artists, but with the changes made in this render engine in recent years has enabled the 3d modellers quickly develop some renders using Max’s Physical material and ART renderer.
Let’s have a quick run down.
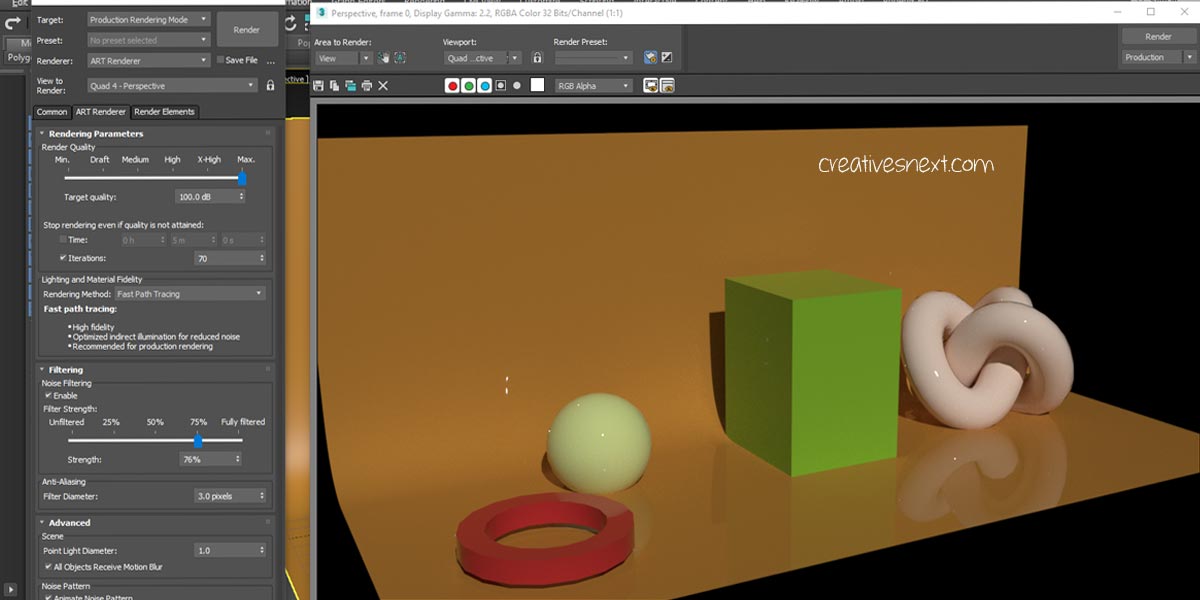
Here are the things. Select ART renderer in Render Set up [F10]. Play with Render quality from Draft to Max level.
Also enable the Noise Filtering at the lower half and try out with different Filter Strengths. I have kept it at 75%. But you have to add the ‘ART Renderer Noise Filter’ in the Render Element Tab before.

Now In the Material Dialogue Box [M], add a standard material from Scanline. Then press H to select all the scene objects by name and Assign Material to Selection to change the Diffuse color of the objects to an off-white shade.
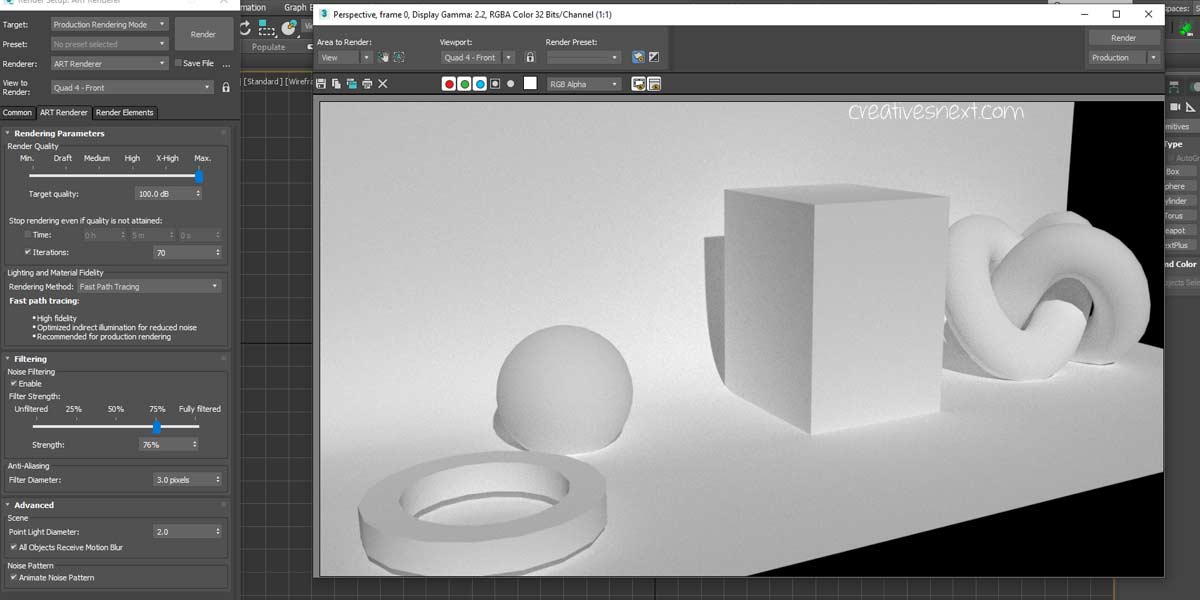
And below is a render pass with the ART Noise Filter level cranked up to 75%. But this one is the render pass. You’ll have to then see the Render Element with the ‘Noise Filter’ Added. First the Render Pass and then the Render Element. So here we go.
Also I lowered the Render Quality to X-high from Max, Target quality from 100 to 40 dB and Iterations to 50 from 70. Don’t forget to change the Render Engine to ART render in the Max Switcher (changing only in the Render Set up won’t do). You may have to restart the Max to initiate the Render Engine.

You still have some noise left. Though it has some noise, you can still do with draft pass for preview. But if you need a smoother image for the added Noise Filter set at 75%. Render Quality at X-high, Target quality at 40 dB and Iterations set at 50.

I find the ART render with this Scanline material and the added Render Element of ART noise Filter set at 75% is highly effective for a quick pass of ambient occlusion in 3ds Max.
It took me 27 sec or so to get this pass with a Corei5 processor, NVIDIA GTX 1050Ti and 48 gigs of RAM.
Ambient occlusion in 3ds Max using V Ray
The settings of V Ray for ambient occlusion in 3ds Max is the most used ones among the CG artist and modellers, simply because of the popularity of the render engine.
Let’s get straight into the Vray ambient occlusion settings, by first changing the Max switcher into Vray. It’s important as we have to change the material first. Remember you’ll get the V Ray switcher assigned from the next time you launch 3ds Max. So you have to restart!
Change the Material – Use V Ray Material
After switching the Render Engine in the Customize, relaunch Max and the first things you have to do is to change the renderer in the Render Set up [F10] dialogue. Else the previously assigned renderer, in our case the ART, will start throwing up error messages. Let’s now pop up material dialogue by pressing M. Now assign a few VRay material to the objects.
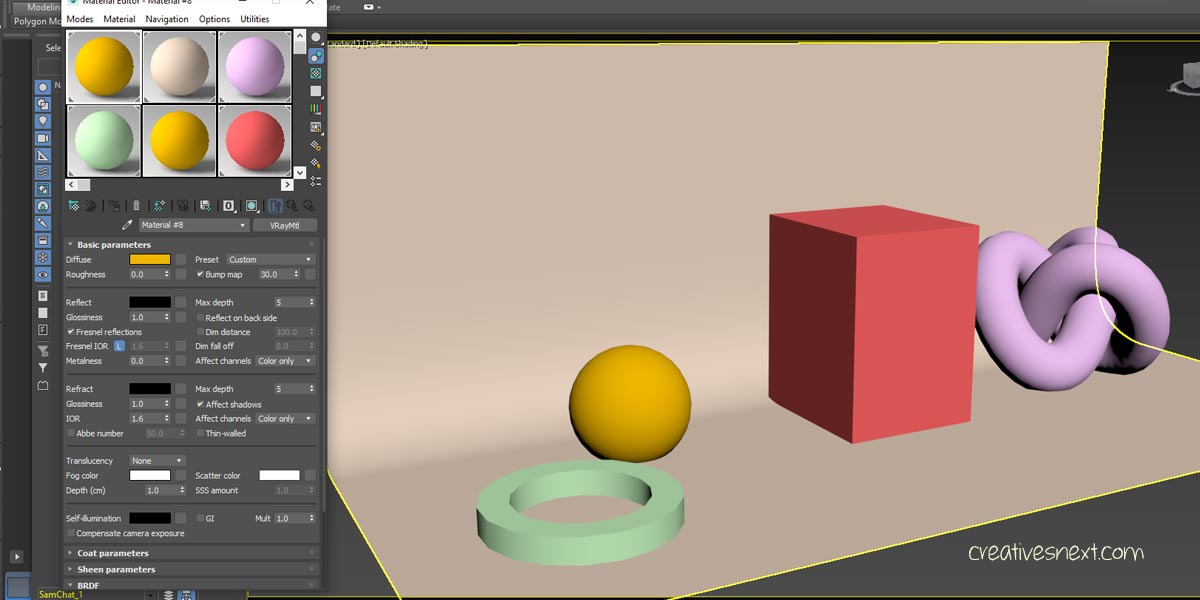
Within the material editor, find VRayLightMtl or Vray Light Material and drag in the middle pane of the Slate Material Editor. With all the objects selected either assign the material at once or one by one.
Just in case, you find the Slate Material Editor is a bit inconvenient, just switch to the Compact Material Editor [from the ‘Mode’ Menu from top left of the Slate Material Dialogue]. I have done it separately and assigned to the objects.
Select VrayLightMTL – Use Vray Dirt Map
Now deselect all the objects and selecting a different material slot (sphere), in the material editor, assign VRay Light Material.
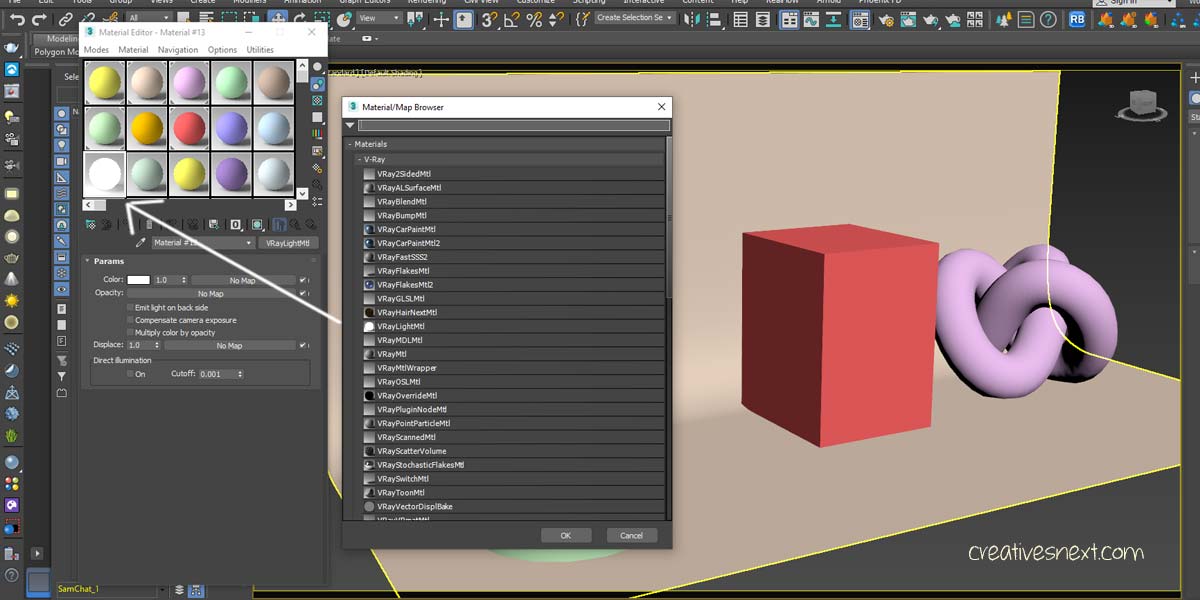
Click on the ‘No Map’ slot right beside the Color swatch and select V Ray Dirt Map. This is the ambient occlusion map in 3ds Max while using V Ray.

Now you have to tweak a parameter inside the V Ray Dirt Map. Under VRay Dirt Map dialogue box, you’ll find something called Radius right at the beginning. Crank up the value of the Radius to 200 from 10.

Now open up the Render Set up dialogue [F10].
Change Settings inside the V Ray Renderer

Let’s now go to the V Ray tab under the Render Set up dialogue [F10]. Twirl down the Global switches. Check on the ‘Override mtl’.

And then bring the VRay Light Material we created from the material editor slot and release over the ‘None’ button beside ‘Override mtl’ tab. Immediately, you’ll see a material instance dialogue box pops up. Just select ‘Instance’ and then ‘OK’. Now you close all the dialogue box of Material Editor & Render Set Up. And press F9. Here is the result.

So here is the thing. In V Ray, you build a V Ray Light Material with a V Ray Dirt Map assigned and later use that material instance in the Global switches with the ‘Override material’ checked on. It gets you rid of separately selecting the objects and then render.
Essentially you’re creating an ambient occlusion map in 3ds Max while using V Ray, in this technique. There is also another takeaway with this technique.
You can use different material like physical material and then change the render to V Ray followed by building an ambient occlusion map in V Ray to get this result.
I assigned a few V Ray materials to the objects, even before creating the V Ray light material, because the previously assigned ART renderer was popping up error message. Mere changing of the renderer inside the Render set up didn’t work. Changing on both fronts yielded what I sought after.
So there you have the ambient occlusion in 3ds Max using V Ray.
Ambient occlusion [AO] Pass in 3ds Max using Corona
Let’s go one by one. Change the renderer to Corona in the Render Set up dialogue and then you have to change the material assigned to our previous set of object collection. This render engine has its own way of producing ambient occlusion in 3ds Max.
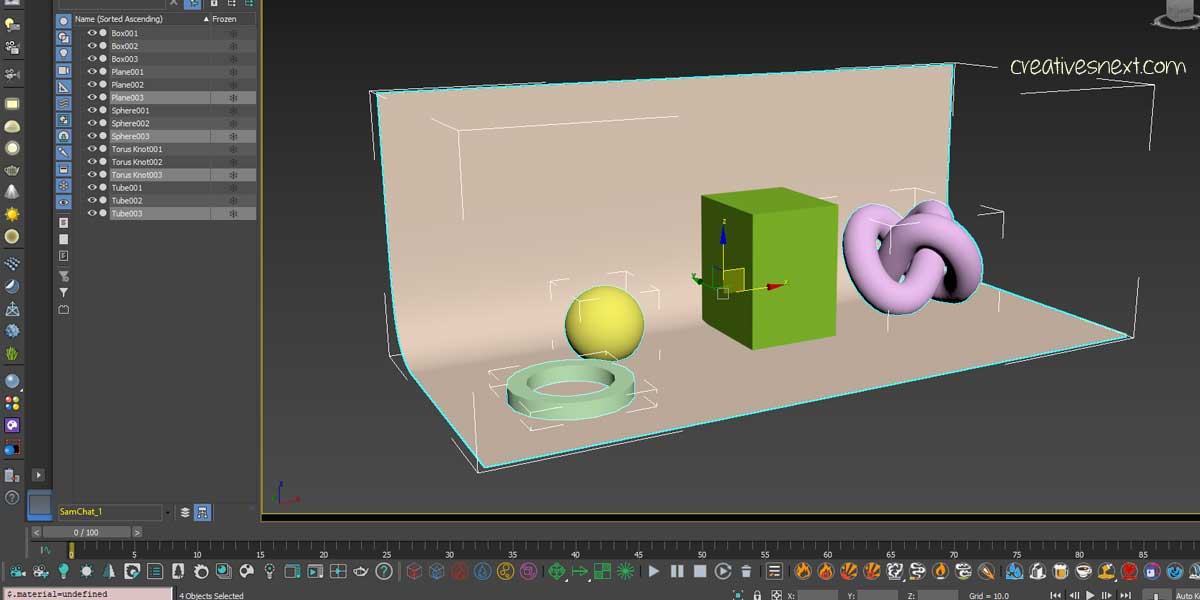
Now, just copy the set of objects from those in the V Ray ambient occlusion settings. Now you have to assign Corona material to this copied set of object which are now carrying V Ray material. You could create a fresh set of objects and assign Corona material. But I have copied this set on a purpose.
I’ll show you how to clear material assigned to an object using Max script listener.
Clear Material from an object in 3ds Max using a Code [in Max Script Listener]

So there you’re. Selecting any object, write down the following code in the field of Max Script listener at the bottom left (arrow-marked).
$.material=undefinedAnd then press Enter. Here you go.

You can also go for multiple select and get rid of the materials at once. With the same piece of code of course.
So there you have it. All the objects clear of V Ray material and ready to accept Corona Material and undergo ambient occlusion in 3ds max using Corona renderer.

Change the Corona Render Settings for AO Pass [Render Elements & Maps]
Let’s get back to the Render Set up and tweak a few things. Go to the Render Element Tab and click on ‘Add’. For creating an AO pass in Corona, you’ll have to use a different element as there is nothing like AO Pass or Map inside the Corona Render Elements.

Right at the bottom of the ‘Render Elements’, you’ll find something, which you have to select. This is CTexmap or Corona Text Map. Add the Ctexmap and let’s change the name of the Map to a convenient one, like ‘AO Pass’. And that’s convenient for your fellow artists to keep in mind while rendering a pass for ambient occlusion in 3ds Max.

Edit the Corona Material Settings for Ambient occlusion in 3ds Max
Pop us the Slate Material Editor and write CoronaAO. It’s the Map we’re looking for. Add this map to the middle pane of the editor.

Now, double click on the CoronaAO Map to open up its features and at the same time keep the Render Set up dialogue box open right beside the material editor. Crank up the Max distance to 300 and assign this Map to ‘Texmap Render Element’ at the bottom of the Render Element Tab of Render Set up.

And now render [F10].
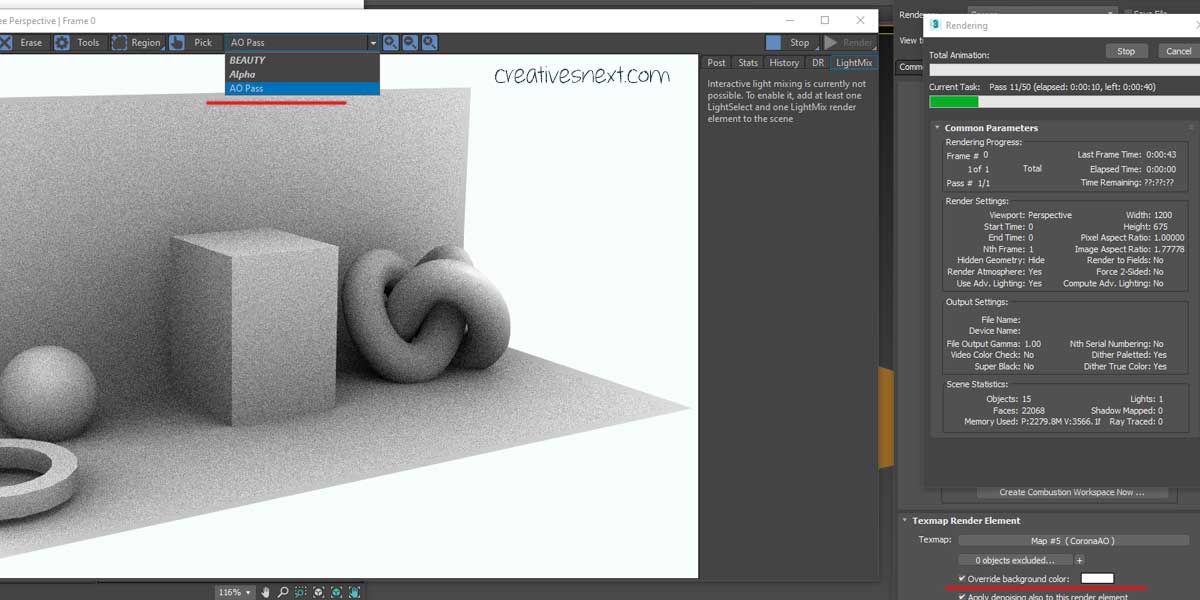
Immediately, we see a pass of ambient occlusion in 3ds Max using the Corona renderer. Now before we deal with the noises, let’s remember two things.
Tweak the Render Settings for De-noising
You have to select the ‘AO Pass’ from the top menu of the Corona VFB or the Virtual Frame Buffer while rendering for ambient occlusion in 3ds Max. Else you could see a blackened screen and to get the whitish or light background just Check on the Override Background Color at the lower half of the Render Element tab of the render Set up Dialogue box.
Also change the color to white or any lighter shade that you like. And now let’s deal with the noise.

Here are things. Under the ‘Scene’ tab select ‘Corona High Quality’ as the ‘Denoising Mode’. I have cranked up the radius to 5 to make the noise clean up more evident. You may play around in between.
If you want delve deeper for Corona Render settings, look here. Since we’re talking about the ambient occlusion in 3ds Max, I have gone through the things that are required in terms of the particular render engine, here Corona.

Two more things I would like to point out here in relation to the Corona render settings. One is you may fix the Pass limit in the scene tab to reduce time of rendering. I have put it to 50.
Two, if you want a deeper color in the occluded region or the contact shadow, you could increase the value of the Color spread in CoronaAO map inside the material settings (which is basically used as an ambient occlusion map in 3ds max). I have increased to 0.5 from 0.1 and that yielded the result as shared above.
Ambient occlusion in 3ds Max using Arnold renderer
By this time, we well understand that there is a pattern specific to each render engine for generating an ambient occlusion in 3ds Max. So is for the Arnold renderer. Let’s get straight into action.
Change the Render into Arnold – Assign renderer in Render Set up [F10]
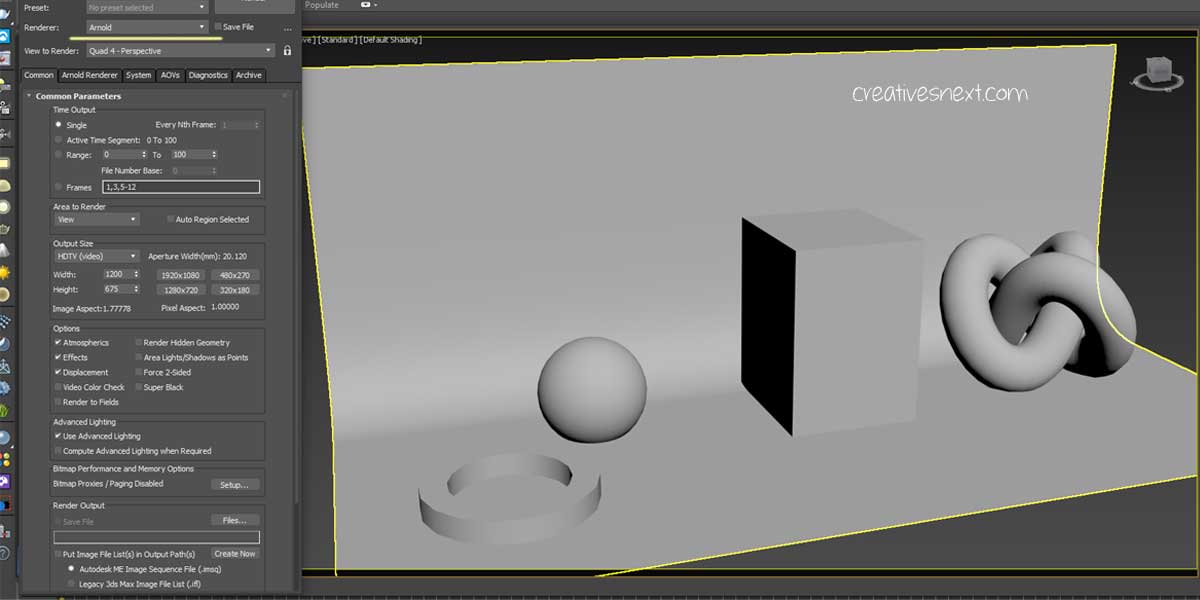
Besides, we have to get rid of material previously assigned, if any. Use the code in the Max Script Listener and clear off.
Edit the Material Settings – Get Ambient occlusion in Arnold Material
Open the Material Editor and the top left field under the Material & Map browser, type ambient occlusion and you’ll get the Ambient occlusion material in Arnold. Drag it to the middle pane of the editor. You’ll need this.

Also, type ‘Map to Material’ in the same field like before and drag it too to the middle pane. Now link the Ambient occlusion to the ‘Maps to Material’ dialogue box.

Now, double click on the ambient occlusion dialogue and we have to do a few things. I have assigned a value of 0.01 in the Fall off [obscured behind the dialogue with Assign Material to Selection]. Now selecting all the scene objects, right click on any empty area in the middle pane

of the Material editor to select ‘Assign Material to Selection’. Now press F10 to initiate a production render. See the result below.

A pretty decent production without any doubt. Now a few things to state to tweak a couple of features for this render pass. The first things is about the noise or level of occlusion. That you can control by tweaking with the value of fall off. I have just

cranked up to 0.09 from 0.01 and see the change. With a little increment, the highlight got much more pronounced and level of occlusion has got significantly lowered. You can alter this as per your preference. The second thing is about the environmental background. For that you have to make a minor change.
Tweak the Arnold Render Set up to change the Environment Background

Go to the ‘Open Environment Settings’ in the Arnold Renderer Tab in the Render Set up [F10] and then change the Background color as shown above. Here is the result below. I have reverted the value of Fall off to 0.01 from 0.09.

See the background has changed and we got a fairly occluded ambience.
Conclusion
Ambient occlusion in 3ds Max is often looked after a topic that we search online to generate a pass quickly. I have discussed all the four major render engines in 3ds Max and their settings to generate an AO pass.
The CG artists and 3d modellers are many a times in look out of creating a pass of ambient occlusion in 3ds Max in draft quality for showing up to their clients. This piece of content could be a quick guide for them.
Please consider sharing if you find this piece useful. Also don’t forget to leave your comment below to let me know your take. More content on 3ds Max and its features will be coming out soon.
Great post!
Your blog consistently connects with readers by offering both depth and accessibility. It would be fascinating to see you investigate how these concepts align with technological advancements, such as virtual reality or decentralized finance. Your talent for finding relevance is truly impressive. Thanks for always providing such valuable perspectives—I’m looking forward to your next post!