

Basics of Avid Media Composer; Part 3 – Audio
Last updated on 18 July 2024, Published on 18 June 2023
Disclaimer: This site contains product affiliate links. We may receive a small commission, if you make a purchase after clicking on one of these links, with no additional cost to you.
Introduction
They say audio editing is much trickier than video editing. Because a viewer can easily notice an error in audio than a flaw in the video. That leaves us with no room for leniency while learning the basics of audio in Media Composer.
This is Part 3 of this series. We have had two before this one, viz. Part 1 on Program Overview & Media Management & Part 2 on Editing.
So why is audio so important? Because your ears are the sense organs that you don’t voluntarily close. The persistence of sound stays longer than the visuals you watch in a video. Remember you see a passage of some 24-30 frames in a second and that’s not the case for sound.
So the key takeaway is you, as an editor, have something trickier to deal with when it comes to audio.
Usually, I perform audio editing at the penultimate stage. Means right before Color Correction. I leave the rough cut with some basic level of adjustment like gain control and a little bit of mixing. That makes me edit most of the fine-tuning at the end of video editing and before the CC or Color Correction.
There is, however, no firm ground why I do CC at the last lap. But maybe it’s because audio, let’s someone talking on camera, is intrinsic to the video clip. Hue or color is a different parameter. It doesn’t have any bearing upon the outcome, for me, and that’s what matters.
Let me put down how I’ll explain the basics of audio in media composer. The approach here will be how you have to deal with audio settings, editing and fix issues, if any, from an editor’s point of view and not from a Sound Recordist or Engineer’s POV.
This leaves us having to take control of different tools that are used during editing (transcoding too of course!) and exporting. Not particularly for the scenario when you set up audio during production keeping in mind the different parameters of Media Composer.
Table of Contents
Familiarize yourself with a few ‘Audio Terms’ used in Media Composer
We often use different terms related to sound recording and audio editing irrespective of the gadgets and NLEs we engage. It’s important that we have a clear idea at the very outset of this article. Because we’ll have many references to these terms throughout this article.
Channels or Audio Channels
We refer to audio input or output as the channels. If there are two different input channels whereby you’re recording your sound either to the camera or any external recorder, you’re said to have a two-channel audio recording. Effectively, they become tracks inside an NLE like Media Composer.
When we say a multi-channel recording system, we refer to more than two (usually) channels or audio inputs associated with the film or video production. Channels are much more associated with physical devices, be they input or output.
The idea of the audio channels (input in this case) becomes clearer if we discuss a test-case scenario. Let’s say you’re recording a singer. She is singing on a mic (1), with two hands. One is playing a guitar (2) and another is playing a drum or percussion (3). In this case, you’re having three input channels.
Usually, these channels are Mono each i.e. a single input. Once they’re in, you can create different tracks, depending on the production need.
Tracks

Let’s examine this screenshot and you’ll get to know how channels and tracks play out on an Avid Timeline or sequence. Look at the left of the timeline. There are two audio tracks A1 & A2. It means there were only two channels or tracks of the source audio.
‘Video channel’ has no meaning as you can’t have two channels of video at a time. The source monitor has nothing and that’s why there is no video track here. But you could see one such in the screenshots below.
The idea is to create different tracks for editing different audio streams for output. We can have multiple video and audio tracks for editing in Media Composer. Once inside an NLE, within a Bin, or on the Timeline, we refer to the channels as tracks.
We can use as many as 16 Mono Tracks, 8 Stereo tracks, and two 7.1 surround soundtracks. A Mono track has a single input or output channel associated, while a Stereo track uses two different channels, most commonly the Left and Right channels.
5.1 SMPTE Surround Sound System
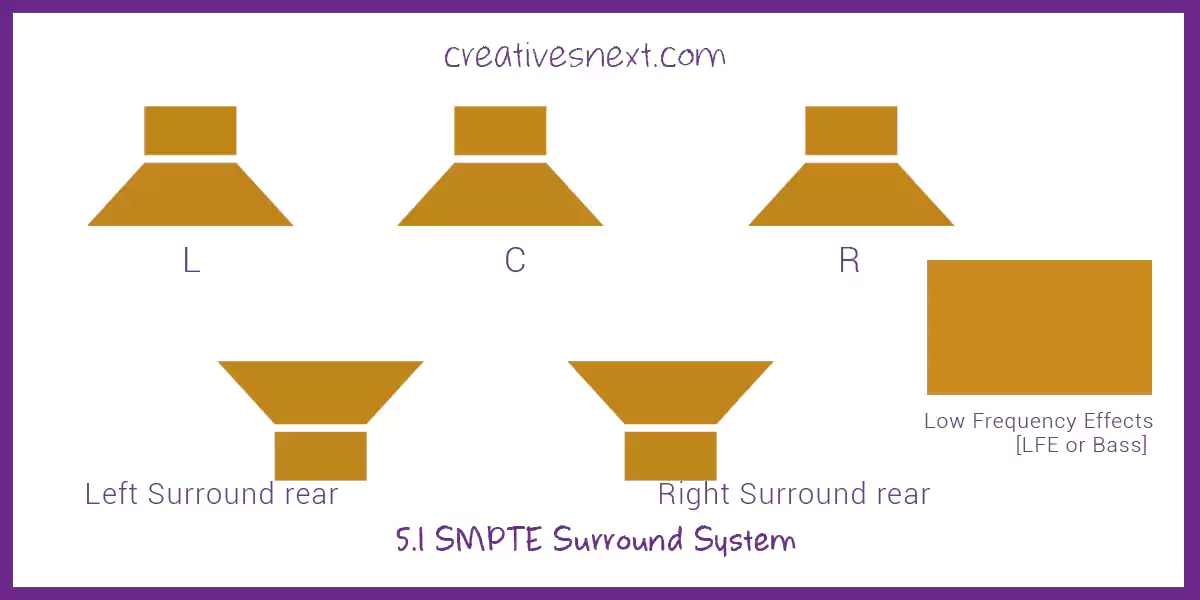
It’s pretty familiar to many of us. You can create sound designs on Media Composer to create a 5.1 Surround Sound System. Now, we don’t require to know what SMPTE means as it’s a protocol standardized by the IEEE or the Institute of Electrical & Electronics Engineers.
If you’re really interested to delve deeper into this protocol go here.
7.1 Surround Sound System

Track Control Panel

There is something called Track Control Panel in the Timeline of the Media Composer that lets you tweak the properties of each Audio track. An arrow at the top left of the timeline, adjacent to the Timecode window, opens or closes the Track Control Panel.
This panel allows you to display Audio Waveforms, Clip Gains, Volume, and Pan directly on the timeline. Although I am not a great fan of this Track Control Panel, I’ll come back to it later to discuss it in greater detail.
Soloing and Muting Tracks do not come under Track Control Panel. That means, even if the Track Control Panel is closed, you will see the Solo & Mute Button. Soloing and Muting are frequently used operations and are fundamental to the basics of audio in Media Composer or any NLE for that matter.

What You Should Know of AI voice over generator
Unlock the potential of your video marketing with a wonderful solution. Speechelo – An AI powered voice over generator.
Understanding different Tools – For the basics of audio in Media Composer

This is the first tool that I use while dealing with audio. It’s the Audio Tool. There is a miniature Audio tool, showing the audio levels at the top left of the timeline, but I prefer having it larger as the Timeline version doesn’t show up the values in Decibels.
Monitoring sound level comes first and is of prime importance to learning the basics of audio in Media Composer.
How to access the Audio Tool – Different Functionalities & a Quick Tour
You can access different audio tools from the Tool menu right at the top of the interface. It’s better to create one Audio Workspace depending on how you use them.
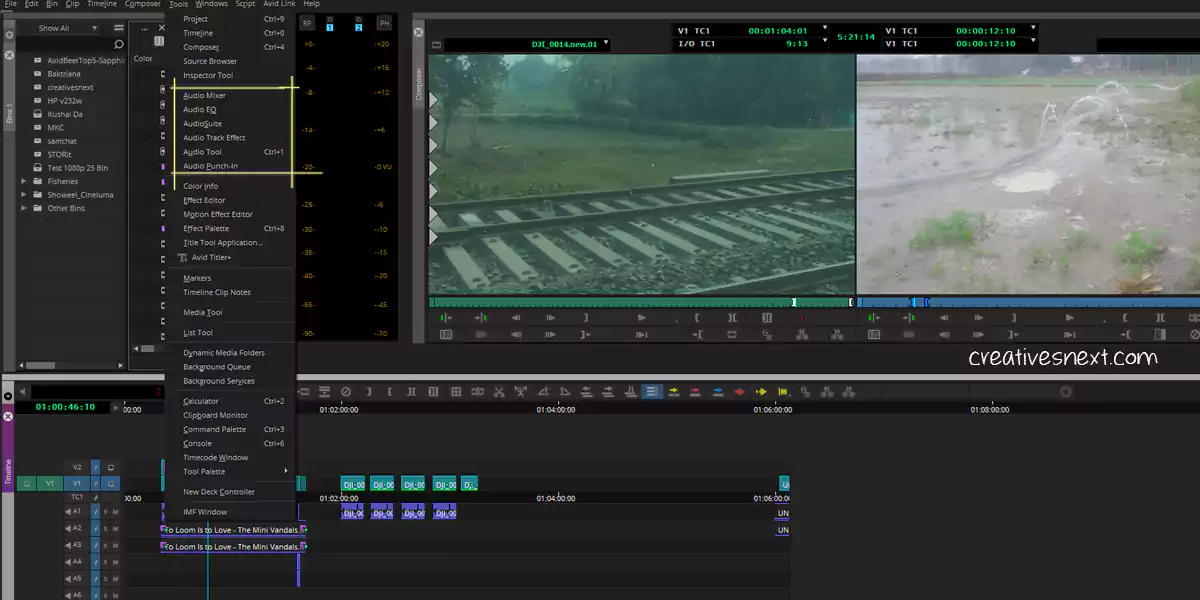
Let’s start with Audio Tool that you can also access using Ctrl+1.
Audio Tool
We use the Audio tool primarily for monitoring the Audio Levels. This is crucial for mixing. There could be several tracks with voice-over or dialogue, ambient sound, different effects, and background music. To make a clean audio edit, you have to make just one dominant at a time, mostly.
But to attain one riding above the others, you have to check the audio levels of each track and then adjust the volume or clip gain (we’ll discuss this later) of others accordingly.
In a bygone era, with analog tapes and audio equipment in sync, this audio tool was used for calibration too. Sound recordists used to set up hardware and set the levels before recording. You can also create different calibration tones for reference to the speakers or recording device.
The Audio Tool has two different meters in it to measure the levels. One is the Digital Scale to the left of the meters. This bar shows values from -90 decibels (dB) to 0, with the 0 being maximum.
There is another meter, to the right, called Volume Unit or the VU scale. It shows a range of values corresponding to the magnitude of the audio source. Though, technically it’s a digital scale, in actuality it’s an analog scale.
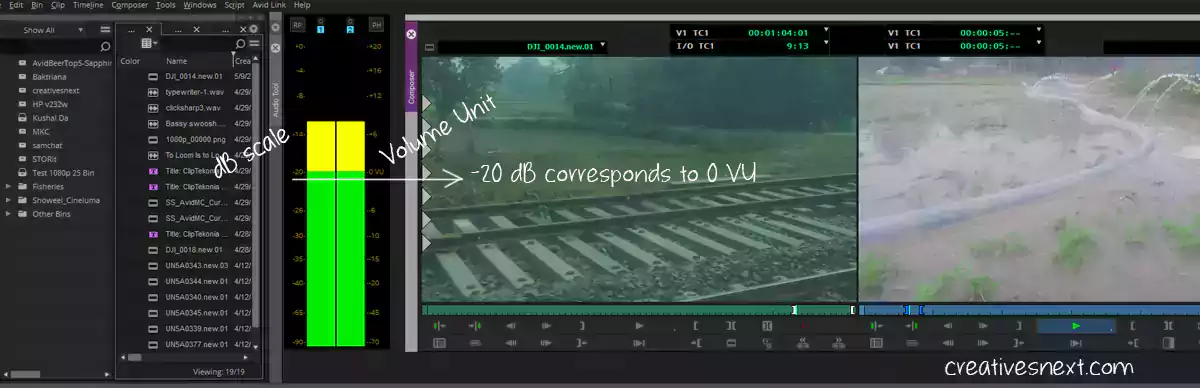
Usually, we keep -20 dB as the default reference range. The meter shows green up to -20 dB and yellow up to -3 dB from -20. Over -3 dB, it shows you red or any other color as set in the interface to alert you.
There is a Button at the top left as RP or Reset Peak. I’ll show you in a moment what it does.
Before delving deeper into this Audio tool settings, I must tell you that controlling these settings and different parameters used to be crucial when we had an analog system in place and you had to sync Avid with the recording device or the input devices.
Also, editors or sound recordists are used to calibrate speakers for output. The Audio Tool parameters are all about monitoring and setting audio levels at different points of a combination of devices.
A lot of these settings may appear redundant in the sense that you don’t have to tweak them in today’s file-based system
It would be easier for us to understand the function of the RP or the Reset Peak after we make a detour of the PH or Peak Hold button at the top right. But this time let’s go in a Q&A mode.
What are the Input & Output Settings of Peak Hold Menu – The Audio Project Settings

Most broadcast standards require 48kHz as the audio sample rate. We have already selected PCM (Avid OP-Atom) as the Audio wrapper format. You don’t need to tweak the settings here unless, of course, you require to do so when necessity demands.

The Input and output Settings are quite obviously functions of the device systems Avid Media Composer is integrated with. So is the Hardware. Avid used to sell many hardware and it still does. The file-based systems are common all across the world and many of these features hardly require any adjustment.
In the Effects tab, however, leave the settings as shown here, unless otherwise intended.
What are Peak Hold and Infinite Hold?
These two are very close to each other in terms of functionality. The Peak Hold (when checked on) leaves a small horizontal line in yellow showing the peak of the audio level at any given time. It goes away within a few seconds.
But checking on the Infinite Hold leaves a similar marker for the peak of audio level that persists until another one supersedes. I don’t see any major significant difference in their functioning. Since I would have to adjust the level whenever there is any increase in level surpassing the allowable range.
Let’s see a small video to check how differently these two parameters behave.
Although, I haven’t used or rather changed much between the Peak Hold and Infite Hold, the Infinite Hold looks like a better option for observing the peak value of the Audio Level at a given time or in a segment of any sequence.
The Calibration of Tone and How to Set the Reference Level?

If you look at the PH menu, there are a few things under the Peak Hold and the Infinite Hold.
Calibration Tone is simply connotative. Just select this feature and you’ll hear an annoying sound at the level you have set in or rather the default level, if you haven’t changed.
The Calibration Tone is nothing but a reference tone like the scale used for tuning a musical instrument. Even the maestros need accompanying scales to tune their instruments after so many years of forming a trained ear.
Click on somewhere else to put off that annoying sound. You will need the Calibration Tone s a reference to compare the audio level of the recording device and the soundtracks during post.
Now, how to set the Calibration Tone?
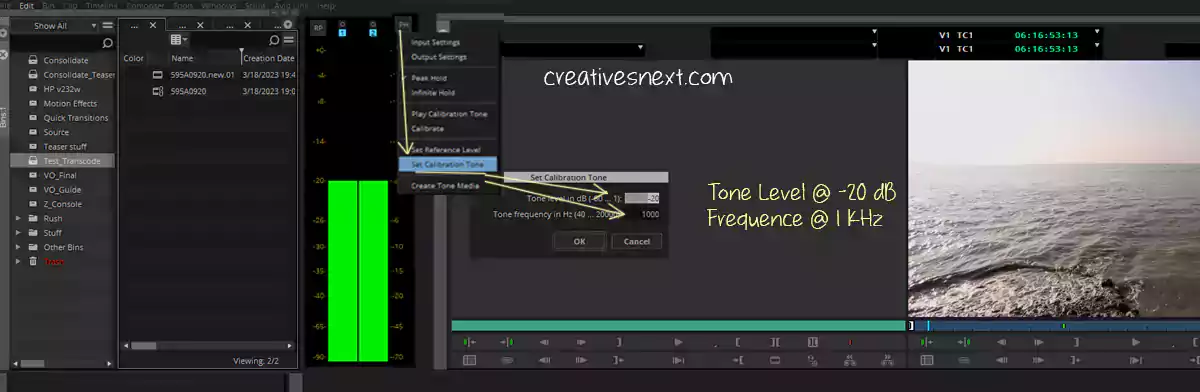
What you hear as you click on Calibrate Tone has a Tone Level set at -20 dB, if you haven’t changed the default settings. Also, you leave the default frequency at 1000 Hz or 1 kilo Hertz. This is the most standard for broadcasters and Social media uploads.
You can change these levels, if required, by going to the Set Calibration Tone from Peak Hold Menu.
How to Create Tone Media?
Gone are the days when we used to see a Tone in Telly, followed by 10 seconds of black, and then the program started. The commissioning editor or the producer did this on purpose.
In those days, technologies were not as advanced as they’re now. The broadcasters needed to check the legal luma level i.e. 16-235 and the calibration tone as specified. So the executive producers or the series producers require to ensure that the black and tone media are there at the beginning of the program.
So there you’re. We now have to Create Tone Media as part of our learning the basics of audio in the media composer.

Pretty straightforward. You click on the Create Tone Media via PH menu at the top right and then this dialogue box pops up. You set the level, frequency, and media length. Also don’t forget to select the number of tracks and the target Bin. The Target Drive will appear if you have already created the Bin.
The moment you click on OK, it will create a media and an audio clip in the target Bin. We bring that 2-track clip into our timeline and playback. Let’s see how that plays out.
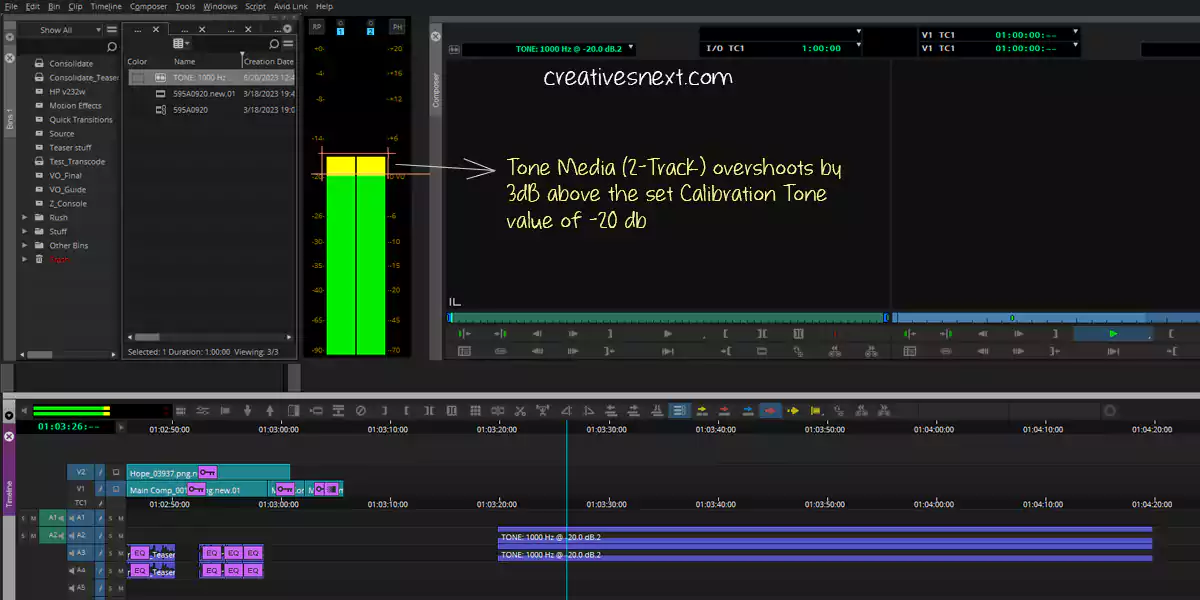
But this is weird, right? This is what we didn’t set. Then why it’s overshooting some 3 dB above the set value of -20 dB? We have to fix this.
How do you fix overshooting of the Tone Media in Avid Media Composer and get it right?
What actually happens in this overshooting is due to some Audio Settings (User).
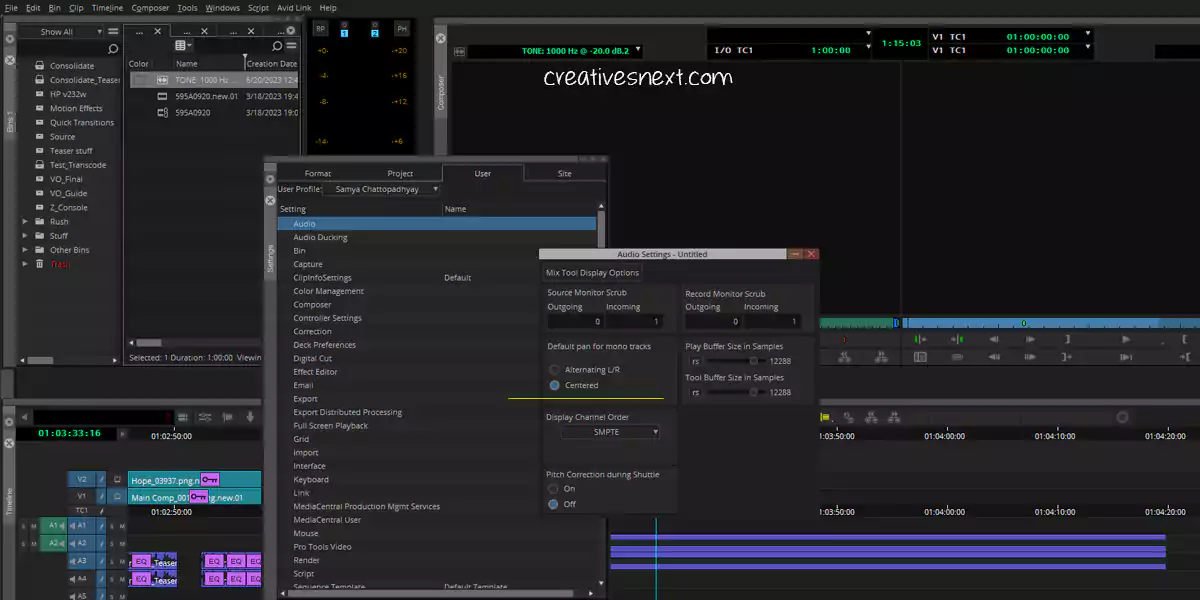
This Pan setting ‘Centered’ for the Mono Tracks is what makes the Tone 3 dB louder than the specified value of -20 dB. Change this to Alternating L/R and you’ll get it right. Here it goes like this.
So, now you get the idea of how to fix this overshooting. It’s important because you need to have a correct reference of the tone media for audio editing in media composer.
We’re not going to discuss three major tools and functions in this article and will come up with them in a separate post shortly. These are Audio Mixer, Audio EQ, and Audio Suite Plug-in.
But before I conclude, I would mention two things which won’t take much time. And they’re very useful. One is Audio Scrubbing and the other is Auto Sync of the video clips with audio you have recorded externally.
What is Digital Audio Scrubbing in Avid Media Composer?
Audio scrubbing is dragging your play head over the timeline or sequence or any source clip (rush) and listening to the segments of audio you’re moving your play head back and forth. These days Audio scrubbing is Digital Audio Scrubbing as we all work on NLEs.
Now, why do you do this Audio Scrubbing, to begin with? What is the point?
Audio Scrubbing becomes useful when you have a huge rush of material and hours of interviews to comb through. It actually lets you navigate through the audio files quickly and reach a point of your destination. For small projects though, I don’t find it very useful.
Now, how to be able to do this audio scrubbing? There are two ways.
Simply, press and hold Shift and drag the Play Head. Alternatively, go to the Command Palette > Play > Select Toggle Digital Audio

Scrub with the Button to Button Reassignment checked. Bring the button somewhere in the timeline. It’ll function as a toggle button.
How to Auto Sync Video Clip with Audio recorded in a separately recorded channel in Media Composer?
This is useful, really useful!
Whenever we go for a shoot, we religiously take audio on different channels. One is directed to the camera or camcorder as the reference or guide audio. There is another taken on an external recorder. This is the minimum staple during production. There could be many more channels that you could take.
Now what if you have to do syncing all the video clips with the audio channels that are simultaneously recorded onto separate devices? Manual syncing is tedious and time-consuming. Learning auto-syncing is a useful measure for the basics of audio in Media Composer.
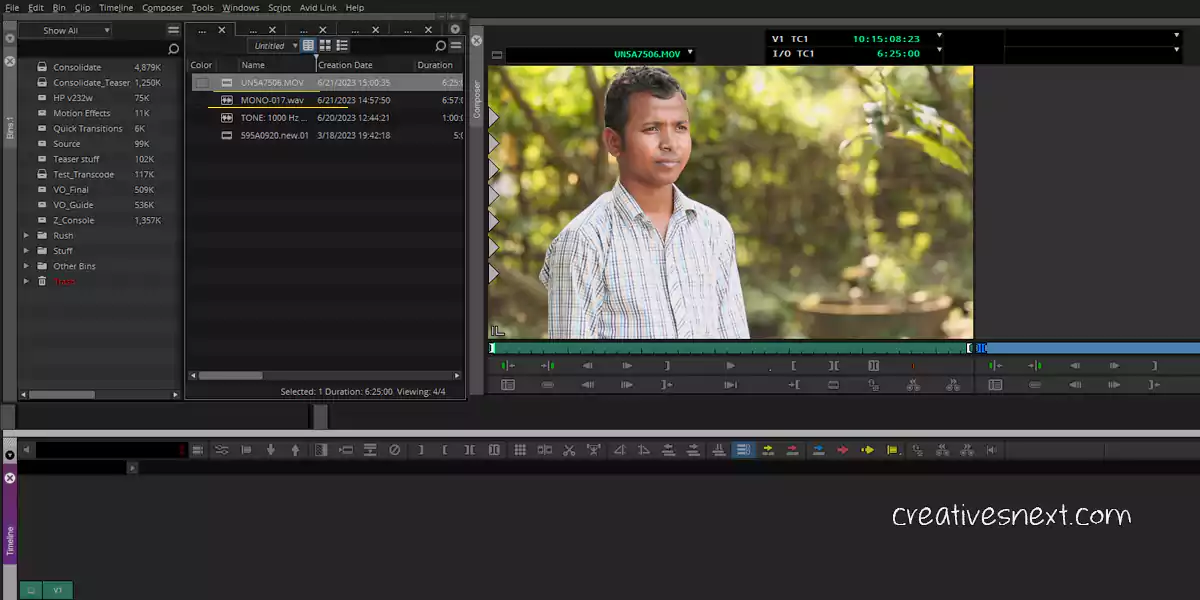
Here goes a video clip I have transcoded. I took the video in a Canon 5D Mark III and I made the sound guy attach a cordless lapel connected to a Zoom H4n external recorder.
So the idea is to sync the audio of Zoom H4n to the video clip and delete the noisy audio tracks of the video clip after syncing. You can see two different files with yellow underline, one with .mov and another in .wav.
There are two different ways you can sync. One is you can sync right there inside the bin which will create a subclip. And then bring that sub-clip to a sequence for editing. Alternatively, you first create a sequence somewhere (I’ll show creating one right here) and then place the video clip and the audio file into a sequence.
You will put the audio in .wav in a track below the video clip and then sync the two. Let’s see how it goes.
So you get the idea. Either you can create a sub-clip right there in the bin and then bring that sub-clip onto a sequence for editing. You can also create a new sequence first and then bring those clips and finally sync.
It’s better to do waveform syncing unless you’re absolutely sure of some reference TCs and their parity in all the clips throughout. In that case, a quick solution is to use a clap stick or simply make someone clap before recording the talking head.
There are a hell lot of options and features inside the Auto Sync dialogue box and here we just scratched the surface. The baton is now in your hand!
Conclusion
Audio editing is highly creative. In this piece, we have just got familiar with some of the tools and features essential for learning the basics of audio in media composer.
Basically, I have covered the tools and features required to monitor sound in the input and output devices. Audio editing is widely different from video editing in the sense that, you get audio in multi-channels that become multi-tracks inside Avid Media Composer.
You have edited the audio and then depending on the need, you create multi-track output. At least a stereo track is what you’re likely to produce.
There are three tools viz. Audio mixer, Audio EQ or Equalizers, and Audio Suite Plug-in inside Media Composer or Symphony that we extensively use for editing.
In the upcoming part, I’ll discuss those tools and features. Please leave comments if you have anything in mind and I’ll respond to that.