
Color Correction in Avid Using Levels – The Tool sets and their use
Last updated on 3 July 2024, Published on 10 May 2023
Introduction
Avid Media Composer offers different toolsets for color correction and grading. As we know from a number of previous publications on this site that there is a difference between color correction and color grading. And like other toolsets, color correction in Avid using levels has many features for both correction and grading.
While discussing Color Correction in Avid using HSL and Curves, separately, we have seen that Color Correction fixes a shot in terms of its flaws or deficits. And by Color grading, we add certain tones and hues to enhance the shot.
This naturally obviates that we perform Color Correction first and then Color Grading and not the other way around.
In all these pieces, I have focused mainly on Color Correction, not grading. Because for a moderately budgeted production, editors have to perform the tasks of the colorists too. So a thorough knowledge of Color Correction is essential for the editor. And the more toolsets you get a firm hold on, the better.
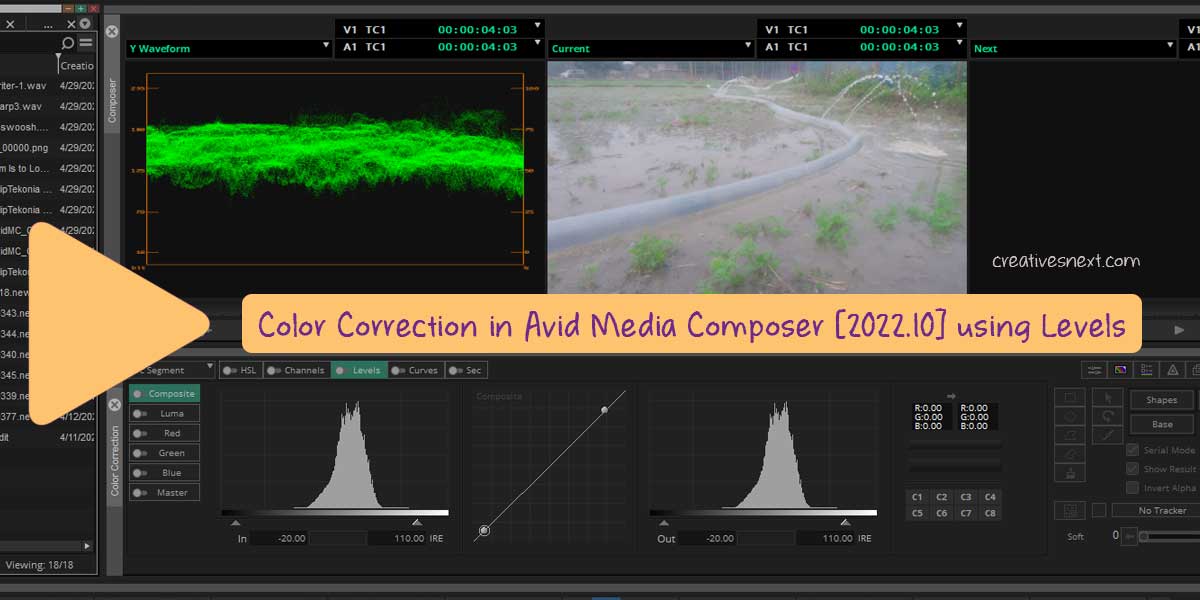
After the HSL and Curves tabs, this time I shall be talking about the color correction in avid using levels and the use of its different features.
Levels enable the users to tweak both luminance range as well as color channels. There is also an advantage of using levels for color corrections over the use of the HSL tab. Levels offer much finer adjustments for the shots for both luminance and colors.
The prime objectives of Color Correction using levels, too, are modifications of brightness or darkness or the Luma range of a shot, followed by adjusting the color casts, if any.
Let’s now see what will be in our kitty in this article.
Table of Contents
The interface – Tool sets for Color Correction in Avid using Levels
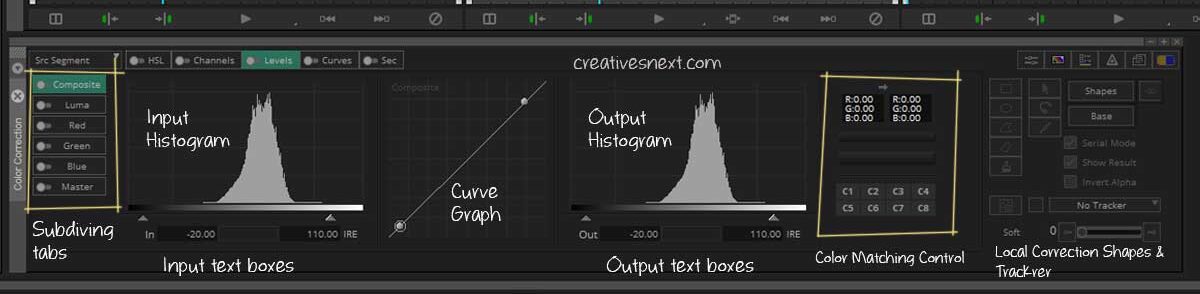
As you can see, there are subdividing tabs comprising Composite, Luma, Red, Green, Blue, and Master Channels.
To the right of the Subdividing Tabs are Input Histogram and Input Text boxes and then the Curve graph. To the right of the Curve Graph are the Output Histogram and text boxes. Then come to the Color Matching Control and the Shapes and the Tracker for local level correction of a shot.
The level group tool sets help us adjust the luminance of a shot by defining its black, white, and grey points. You can do this either by tweaking the Master Channel or each of the color channels.
The idea is to balance both the luma and color of a shot with a number of features or all of them combined. You can certainly have much finer control during the color correction in avid using levels than using the HSL tab.
While using Levels, you can extend the contrast and details to the full range, if the original has a narrowly defined range. Both the Input and Output histogram and text boxes are very useful while balancing the black, white, and grey points of the image.
We’ll also see how to change the luma range using the Curve Graph in the Levels tab. We shall not, however, discuss the use of shapes and trackers for local-level corrections here.
Within these tool sets are four different methods by which you can fix the black, white, and grey points. You can assign some numeric values or move the sliders of the histogram. You can also move the control points on the Curve Graph or use the Color Match control.
Summarily, the Levels group lets you extend the luma range and adjust the color of a shot with fine controls.
How to Change the Units for Color Correction in Avid using Levels?
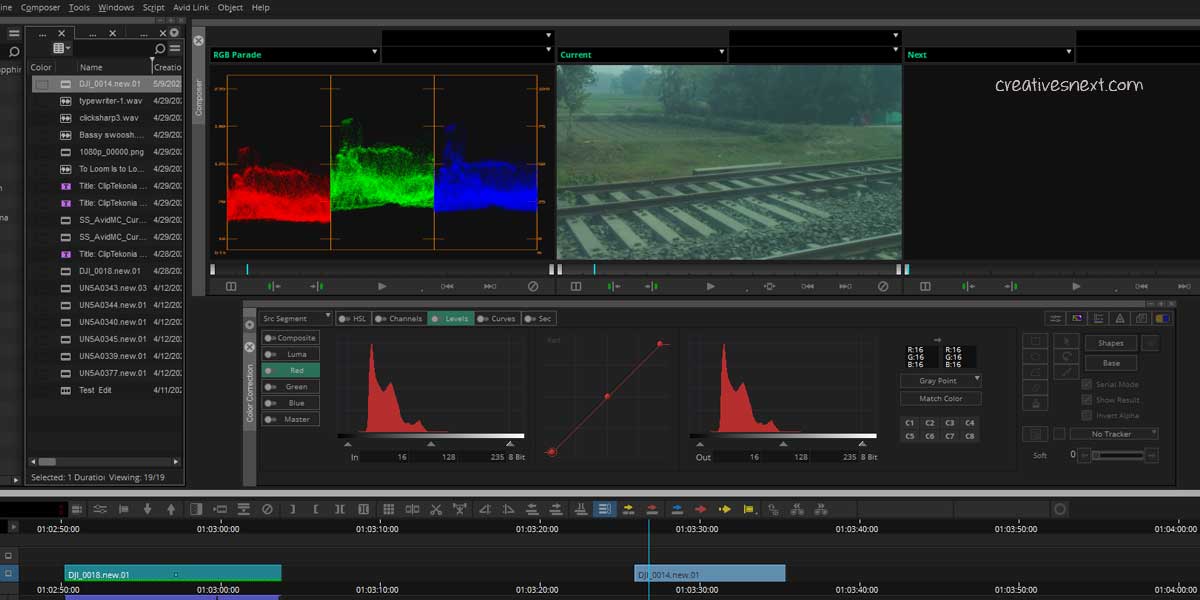
Look at the above image for Color Correction in Avid using the Levels tab. You could see with the Composite Tab selected the units for Input and Output values are in IRE.
Since we’re referring to the 8-bit color channel with a legal broadcast range of 16-235, we have to change the units. For that, Go to Settings > User > Correction. Then within the Correction Moe Settings, under the Units Tab open the drop-down under RGB and select 8 bits. Click OK and you’re set to go. Here is a snapshot from the Settings to change the units.
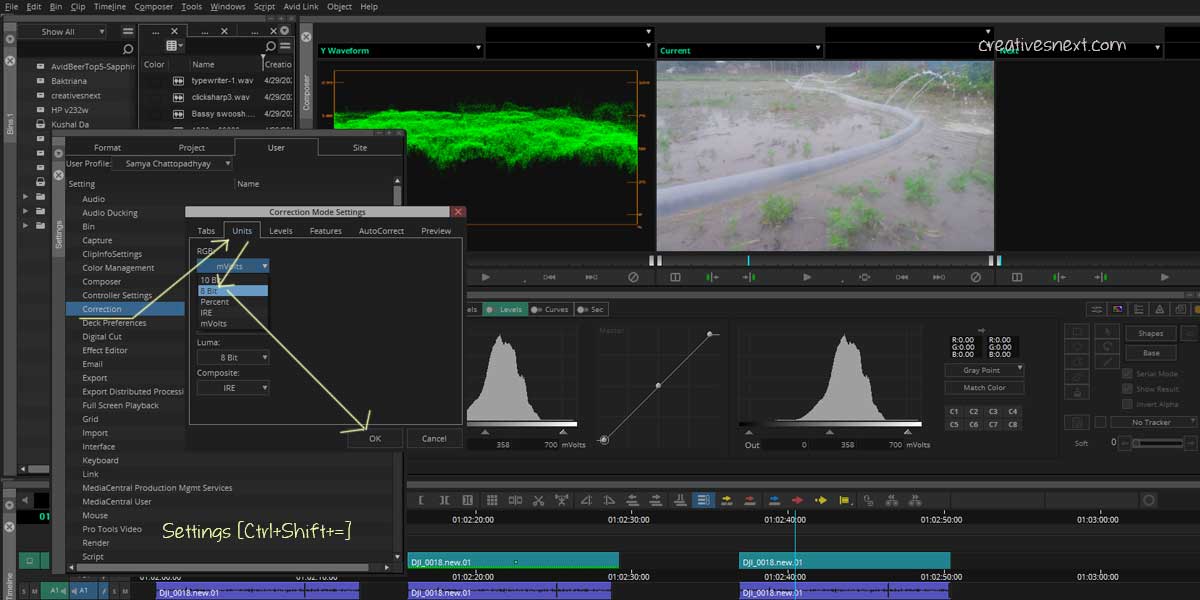
Once you change the units into the 8 bits color channel, you’re ready to refer to the grey scale and the broadcast range with common parlance. Let’s now dive into understanding Input and Output adjustments for color correction in Avid using Levels.
What are Input and Output Levels Controls in Avid Media Composer?
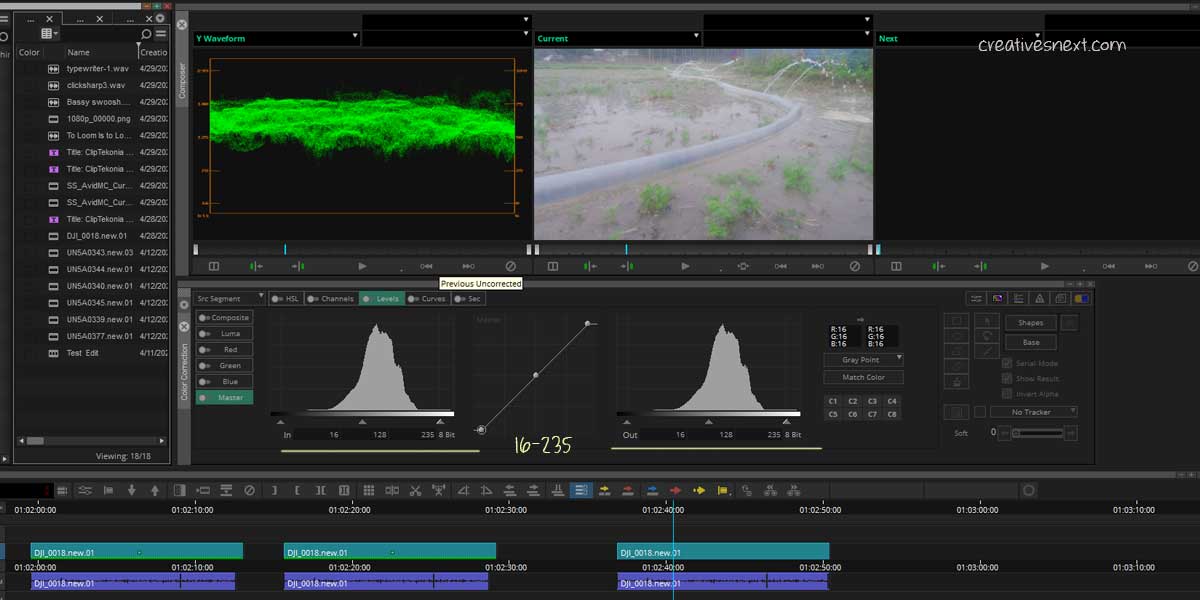
When you make any changes to the parameters under the Levels tab, you’re essentially changing the relationship between the Input and Output levels.
In a normal scenario, both the Input and Output tabs in Levels show up the Black as 16, the White as 235, and the Gray as 128. The black-and-white levels point to the legal broadcast range.
Now, if you make any change to the input side, what you’re doing is you map the altered range in the input side across the full range of the output side i.e. 16-235.
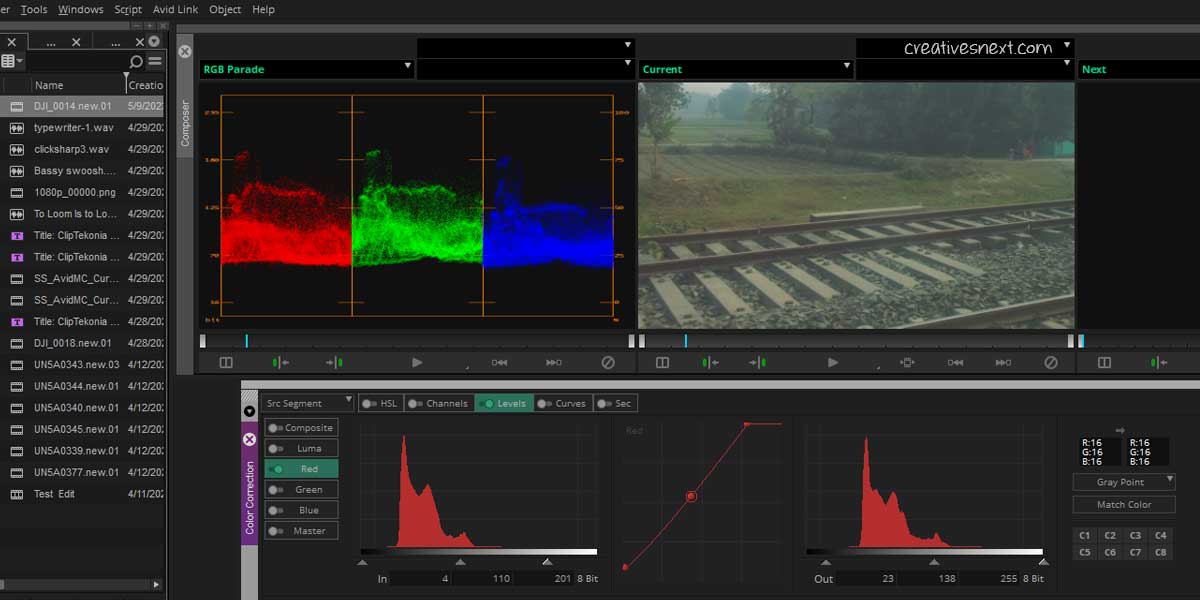
Let’s discuss this with an instance. We take the same shot here again and just remember the curve showing in the Input and Output side. They’re actually the same and that’s natural because we haven’t made any change yet.
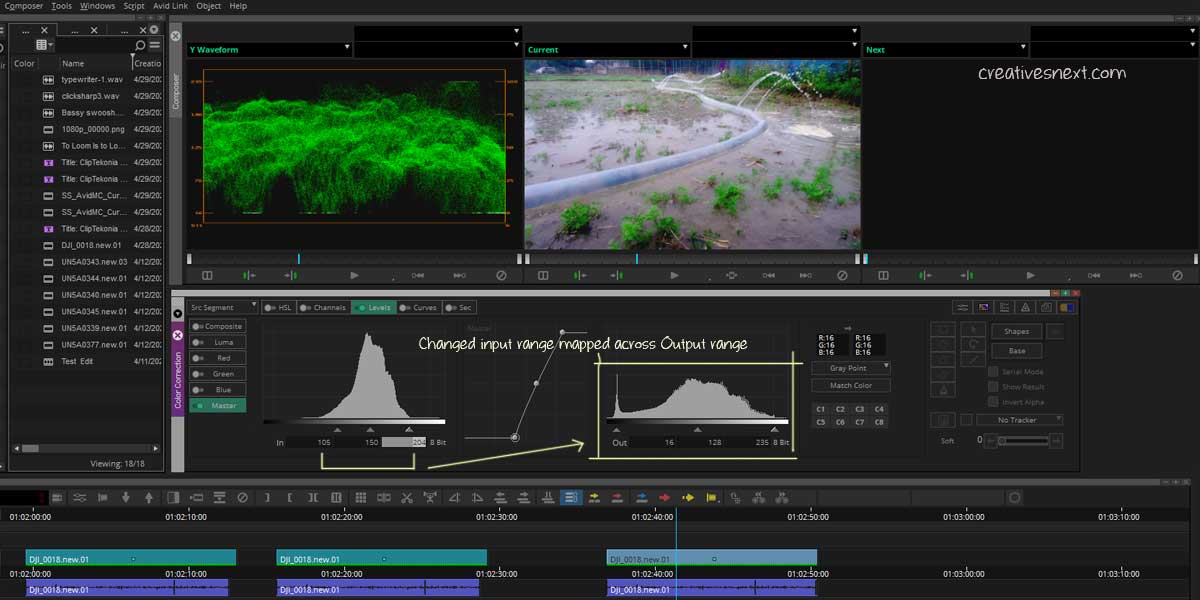
See the above image very carefully and we’ll now talk about what exactly happening here.
What is the interpretation of a changed Input Range mapped across the full Output Range during Color Correction in Avid while using Levels?
In this instance, I have moved the Black slider to 105. So I have instructed the system to calibrate all the values at 105 or less to the Output value of 16. I have also moved the White Slider to 204 which was at 235 originally. So what happened is, apart from 105 or less mapped to the Output value of 16, the altered input range of 105-204 has got mapped over the full output range of 16-235.
Besides, I have also moved the gray point slider to 150, instead of 128. So the resultant curve got stretched over the full range of the Output scale i.e. 16-235.
With this, I have clipped the black up to 105. And that’s logical too. If you see the Y waveform [on the left] before the correction, you could see as much as 100 or so in the 8-bit scale virtually with no information as such.
So I have clipped up to 105 and then mapped 204-105 or 102 Input steps across a much greater range of 16-235 in the output scale. This has widened the Luma range of the originally awash image revealing the shot with much contrast and detail.
The idea is to pick up the Input range with maximum information, clipping the rest with little or no values, and then map those ‘qualified’ Input values over the full stretch of the Output scale. This opens up the shot with greater details.
Gray point or Mid-range adjustments
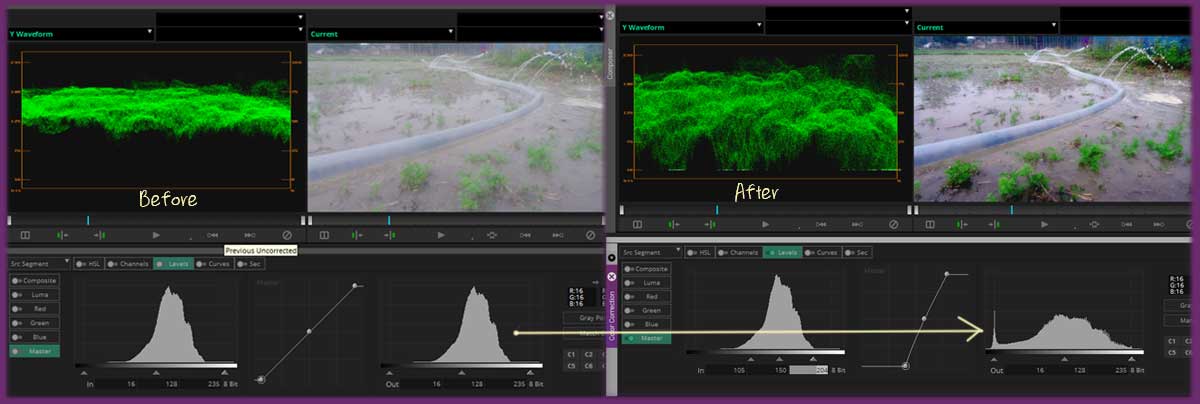
So far you have dealt with the Black & White Sliders. But moving the mid-range or the gray point slider is as much important. Depending on the nature of the image, you move the mid-range or gray point slider either to the white end or to the black end of the Y waveform.

Compared with the uncorrected shot, you can clearly figure out that the mid-range has shifted considerably to the bottom end. Though the ‘center of gravity’, if we may say so, remains on the upper half of the Y waveform. It’s evident from the Output histogram too.
So the idea is you have moved the gray point in the Input slider to 150, which is way above 128. But the Input range of 105-204 has widened across 16-235 of the Output range. Therefore, most of the mid-range has fallen to the right side of the gray point in the Output scale.
Now, this has occurred in this shot. But you may have different types of shots where you have to move the slider in another direction. The main objective is to distribute the White, Black, and Mid-range across the Y waveform. Just keep in mind the legal range of the broadcast standard.
There is another thing pertinent to this input and output adjustment. You better make the adjustments by moving the Histogram slider. Once you figure out which position, tentatively, is correct for a control point, you then go on refining, putting the values in the text boxes.
If you move the Output gray point slider less than 128, say 90, then you’re narrowing the Input range of 16-128 to the Output values of 16-90. And you’re then mapping the 128-235 Input range over the Output values of 90-235. Most likely this will darken the image slightly.
The Subdividing Tab Features & their Functions for Color Correction in Avid using Levels
Before you go using the features under the Subdividing section within the Levels tab, familiarity with them is necessary. We’ll rather see their functions and how to use them together.
The Composite Tab inside Levels Tool sets
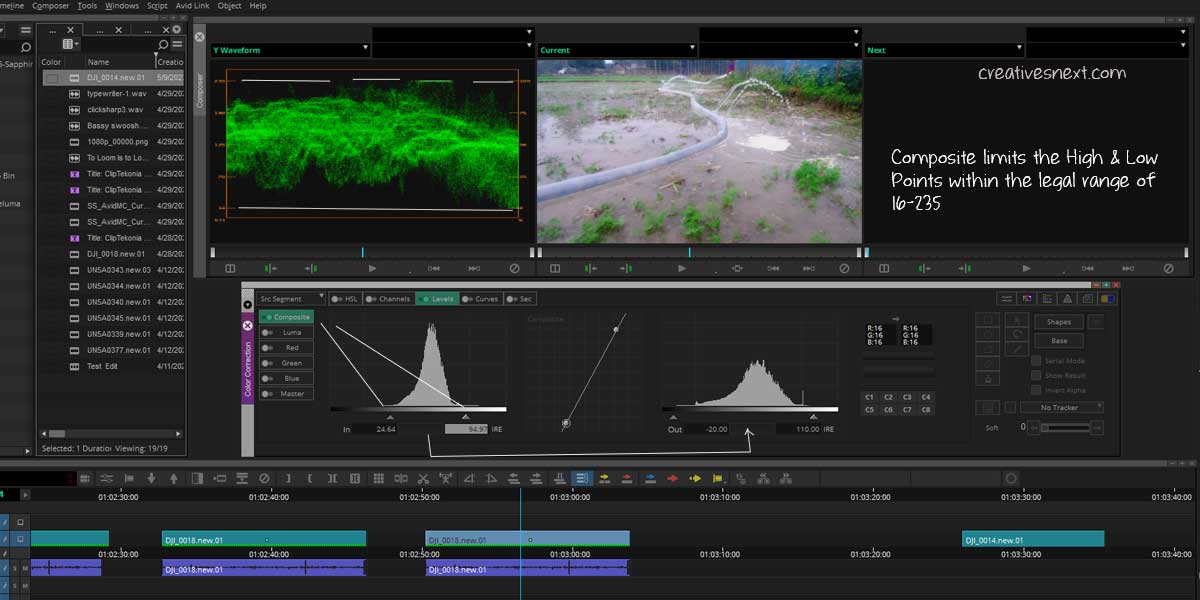
When you make any changes to the Histograms under Composite Tabs, it helps you control the high point and low points, not the White and the Black, to conform to the safe broadcast limit i.e. 16 & 235.
See what I did. I have moved the Lowermost control point to the right, in the Input Scale, and the Uppermost control point to its left. By this, I have clipped the areas of the curve where there is no vertical segment. It has inflated the Output range by mapping the narrow Input range spread over the full range of the output scale.
Notice when you adjust the Histograms or text boxes under Composite Tab, they strictly limit the high and low points of the curve. And you don’t have any control over the mid-range. Any change using Composite affects the shot overall. That means brightness or darkness. The composite doesn’t affect the saturation of the color.
The Luma Tab inside Levels Tool sets
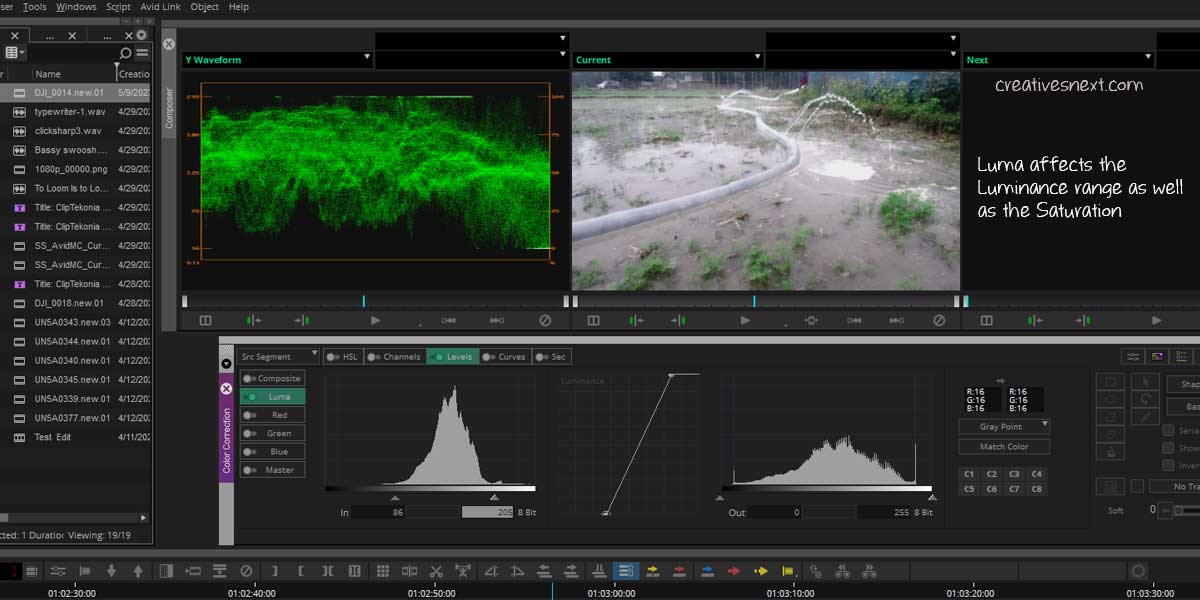
This feature helps you change the luminance range only. But that effectively changes the saturation also. What has happened here is that I mapped a narrow range in the input range over a wide range of Output Range.
As a result, the luminance, as well as colors, get distributed over a wider range. It makes the colors and luminance look a bit pale for this shot.
The Red, Green, Blue & Master Channels inside Levels Tool sets
Pretty connotative. The Color Channels let you control each one for level adjustment. The Master Channel allows you to adjust all three color channels together. Let’s consider a different shot with a color cast that we have to get rid of.
This time, adjusting color channels or the master channels for color correction in avid using levels becomes necessary. Instead of using the Y waveform, I have opened up the RGB Parade to compare what we see with what we get.
A green cast is clearly evident in the shot means there must be a deficiency in red. And that becomes immediately visible once we open the RGB Parade. What we have to do here is tweak the Red channels to neutralize the Green cast in the shot. Basically, we’ll make the Red curve look similar to the green and blue ones by changing the input and output Levels histogram.
Now there is no hard and fast rule for how you adjust the Input and Output Histograms. After quite a few changes of the control sliders, back and forth, at both the histograms, I have arrived at this.
I can still make it slightly better with a little more refinement. But I leave it there as you get the idea. The shot now clearly lacks the contrast which we’ll bring out using the Master Channel adjustment.
The primary task of removing any color cast in a shot is you plot the RGB Parade, closely watch out for the dissimilarities in the curves and then bring parity between them. This is the first step for balancing the colors while fixing any cast.
And then you need another measure for refinement.
Master Channel Adjustment – Refining the Color Correction in Avid using Levels
Now let’s go and click on the Master right at the bottom of the Subdividing tabs under Levels.
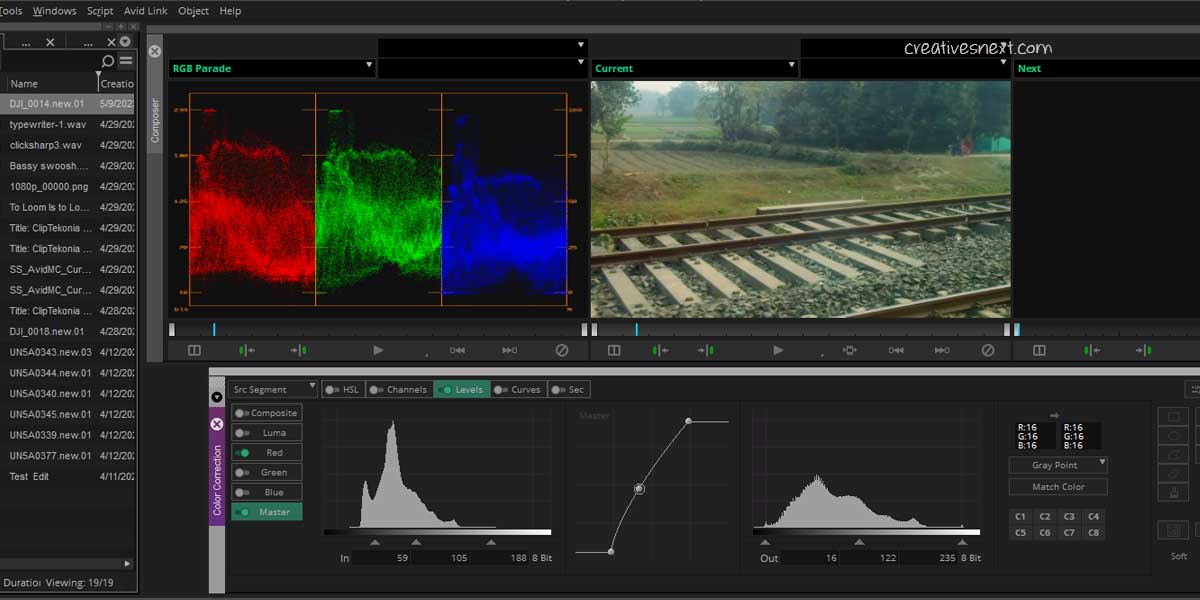
This time I have tweaked the control slider of both the Input and Output histograms a few times. You see the shot now looks with more contrast and detail.
What I have done here is inflated all the Reg, Green, and Blue curves as much as possible within the range of 16-235. You may not be able to expand this curve to the full range every time. And that’s okay. Because every shot is different.
I can still see a slight bias toward green. And that’s because of somewhat different mid-tones of the curves. You can figure it out very easily by looking at the RGB Parade. With some more time and effort, we can fix this difference and remove that little cast too.
Histograms & Curves – The Two Interactive Controllers for Color Correction in Avid using Levels

There is no complexity in understanding the histograms and curves for color correction in Avid using Levels. All through, in this piece, we have changed histograms through its control sliders. Still, a little more understanding would always help.
The grey scale of 0-255 is plotted along the horizontal axis, while the vertical axis represents the color pixel values. Thus a value of 100 at the mid-tone point of 59 means the color pixel value of 100 is there at the mid-tone point of 59.
But what does that mean for our practical purpose? It means when you move the slider, you change the color pixel value along the slider. As a result, it changes the pixel values or density corresponding to that region of the slider. All through we have done exactly that. The tool reflects instant changes you make with the sliders.
Instead of using the sliders, you can use the text boxes too for assigning the values. But I find using the sliders is more convenient for getting closer to the right position. Refining further with the text box values thereafter will take you close to accuracy.
I have marked the sliders with Shadow, Mid-tone, and Highlights to indicate colors as well as luma. Using the terms Black, White, and Grey points could be a misnomer.
The use of Curves in the middle of the tab is another interactive tool with a straight line inclined at 45 degrees from left to right. The bottom-left corner represents shadow, the mid-point along the line shows the mid-tone and the top-right corner represents the highlights.
With any change you make to the Curve, without touching the histograms, immediately affects the histograms too, and vice-versa. Thus both these tools are interactive and help you make the adjustments for any color correction in Avid while using Levels.
Conclusion
Color Correction in Avid using Levels offer basic to advanced level adjustment. Refining those corrections is a bit difficult with the features under the HSL tab. So, it’s quite obvious that you choose Levels for color correction when you have some intricate tasks at hand.
The Curves tab also lets you advanced-level features for color corrections.
As I mentioned, broadly, there are two major tasks when you do any color correction. The first is to fix the brightness and darkness or luminance range of the shot. While doing this, I have shown Y waveform comes with immense help for fixing the black and white region, as well as the mid-range luma.
We have seen how Composite or Luma under the Subdividing tab could help us correct the luminance of the shot.
Secondly, you go on balancing the color. Unless you have a color cast in the shot, you have got a substantial portion of the work done after fixing the luminance with the help of the Y waveform. But many a time, you have to remove the tint.
For that, you have to plot the RGB Parade instead of the Y waveform. Now assessing the shot and looking at the RGB Parade, you have to tweak the Color channels to the extent you’re satisfied with.
Color Correction is a time-consuming process. It doesn’t only require a lot of practice for getting a firm hold on the tool sets, but it demands a pair of intuitive eyes too.
Using Levels for color correction in Avid offers you adequate tool sets. I have put a simplified explanation of the features and their use. Hope you’ll find this piece helpful. Please don’t forget to share this article and leave comments.